Dietary: Gluten Free
This recipe shows you how tomatoes are packed full of flavour when roasted, causing it to be a delectable addition to any meal. The roasting process really does intensify the sweetness of the tomato, whilst also creating undertones of depth when they begin to char slightly.
- Preheat the oven to 180c.
- Slice the tomatoes into rounds and then place them into a large bowl with the olive oil, sugar, and plenty of cracked black pepper. Toss the tomatoes so they are well coated.
- Place the dressed tomatoes onto a baking tray and place into the oven for 30 minutes, turning them from time to time to ensure they don’t burn.
- They are ready when they are fully roasted and beginning to char. These are delicious when simply served with some olive oil and a pinch of Maldon salt.
What is Eton Mess?
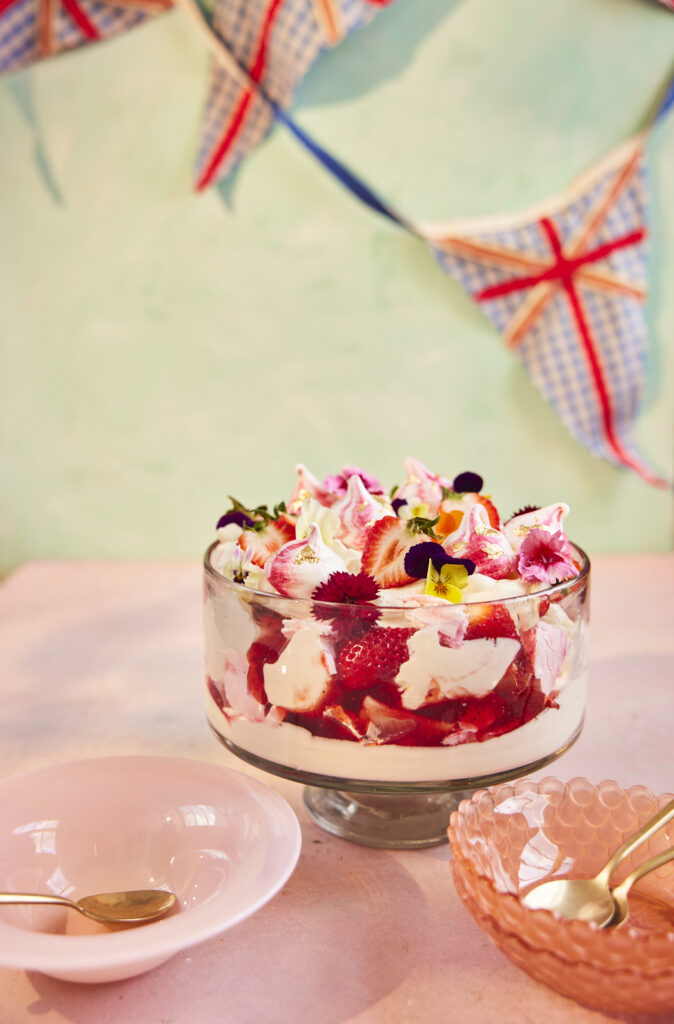
Eton Mess is a classic British dessert, consisting of meringue, whipped cream, and fresh strawberries or strawberry sauce. The elements are layered and served together before resembling a delicious ‘mess recipe’. This dessert is ideal for serving when strawberries are in season in the UK (April – July) and is typically known for being a relatively easy dessert to make for your dinner guests.
Eton Mess origin
The classic Eton Mess supposed origin dates back to 1893 from Eton College. This is where a decadent strawberry pavlova was made to celebrate a cricket match against the opposing Harrow School. However, it’s believed there was an accident and the pudding was crushed! However, the students didn’t care about the mess that was made, and thus the famed ‘Eton Mess’ was born from that day onwards.
Conversely, the first written mention of an Eton Mess was found in 1893 when Queen Victoria attended a party for her eldest son, and was served a dish called Eton Mess aux fraises which translates to ‘Eton Mess of strawberries‘.
How to make Eton Mess
- Preheat the oven to 100C.
- Begin by making the meringues. Add the egg whites to the bowl of a stand mixer and turn the whisk attachment on to high. Whip the egg whites until they form stiff peaks and then turn the speed down to medium-low. Slowly add the caster sugar, a teaspoon at a time, allowing each addition to be properly incorporated before adding the next. You can also add a few drops of vanilla extract for a gentle sweetness. You need to make sure the caster sugar is dissolved after each addition. The best way to check this is by rubbing a little bit of the meringue between your thumb and forefinger. The mixture should feel smooth and not grainy. If it is still grainy then continue to whisk until smooth and all the sugar has been added.
- The meringue should now form stiff peaks, be voluminous, and glossy. Add the tablespoon of lemon juice and whisk again to incorporate. The lemon juice helps to stabilise the meringue.
- Alternatively, you can buy store brought meringue from various UK supermarkets, however homemade meringue tastes much better and fresher!
- Once you have made your meringues, line two large baking sheets with baking sheets or parchment paper, and use a little of the meringue mixture on the corner of the baking sheets to stick it to the pan / tray. With our recipe we have chosen to bake some large meringues to crumble throughout the Eton Mess but also some smaller, meringue kisses to decorate the top – but this is optional.
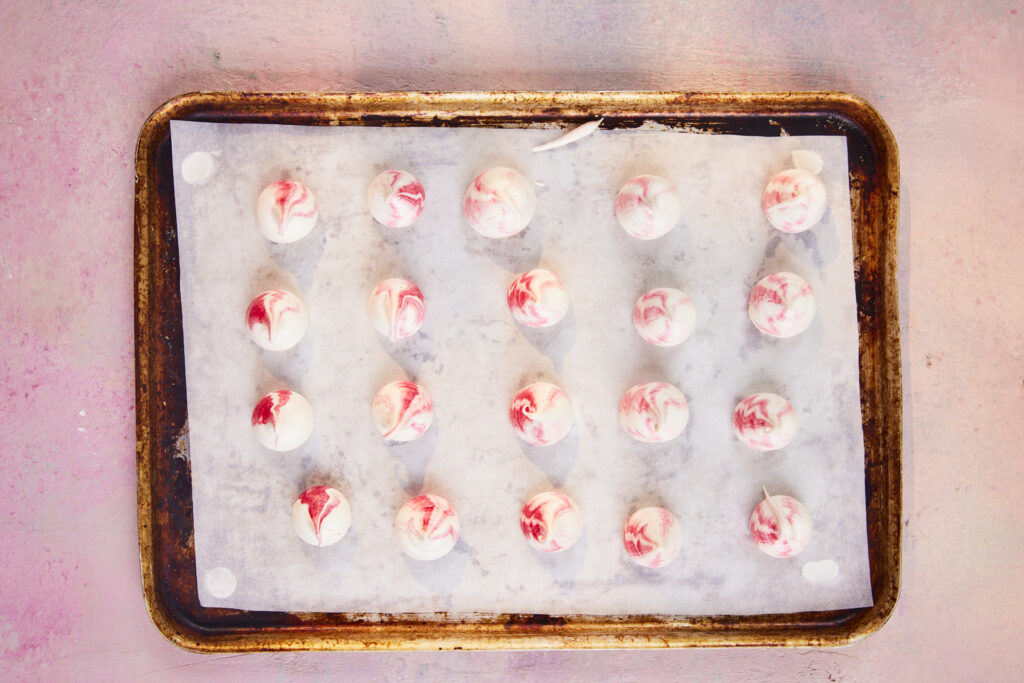
- To make the pink and white meringue kisses, use a a piping bag with a small nozzle attached, then paint pink gel food colouring up the inside of the piping bag with a food safe brush. Then, simply spoon some meringue mixture into the piping bag and pipe small kisses onto the baking tray. These small kisses take roughly 45 minutes to bake.
- With the larger meringues, you can simply spoon these straight onto the baking sheet. We left some of ours white. Then with the remaining meringue mixture we marbled some pink through by folding pink food colouring through, stopping before it was fully mixed. Then we spooned this onto the baking sheet in the same way. These larger meringues take approximately 1 hour to bake. The best way to tell if the meringue is baked is if they lift very easily off the baking sheet or parchment paper.
- Once all the meringues are baked, remove from the oven, and allow to cool. Once the meringues are cooled you can assemble the Eton Mess. Lightly crush the large meringues and leave the kisses to garnish.
- Pour the double cream into a clean bowl and add the icing sugar. Use an electric whisk to beat this to soft peaks. You can whisk this by hand, it just takes longer and a little more elbow grease! Finally add the vanilla extract (or vanilla bean paste), and Maldon Sea Salt flakes before folding through gently. Adding Maldon Sea Salt is both a delicious and vital element as it helps cut through the sweetness of the dessert and enhances the flavours of the strawberries and vanilla.
- In a large trifle dish, you want to start layering up – there is no correct way to do this, hence why it’s named a ‘Mess‘. Simply alternate between layering the softly whipped cream, strawberries, crushed meringues pieces, and strawberry sauce. If you want to make your own sauce, try our delicious homemade fig jam that works perfectly with the sweetness of the meringue. Finish the top of the layers with some soft peaks of the whipped cream.
- Finally, garnish with the meringue kisses (we decorated ours with little flecks of gold leaf), strawberry halves and edible flowers. Serve immediately.
Can you freeze Eton Mess?
Yes, you can freeze Eton Mess! Make sure you store the Eton Mess in an air-tight container before placing in the freezer. You can freeze for up to 1 month.
However, you must be very careful when defrosting Eton Mess as you do not want the dessert to absorb any moisture as this will soften the outside the meringue, ruining it’s delicious crispness! To thaw or defrost the pudding, remove from the air-tight container and put it onto a wire rack. It shouldn’t take more than one hour to completely thaw and should be consumed immediately after!
How long does Eton mess keep in the fridge?
Although Eton Mess is best served immediately after assembling, we recommend storing the dessert in the fridge for up to 2 days. After the second day, the meringue will start to soften and the fresh strawberries will start to go squishy and unpleasant.
How far in advance can you make Eton Mess?
You can certainly make a Eton Mess in advance! For example, the cream can be whipped an hour earlier and stored in the fridge. Additionally, if you made your own strawberry sauce or coulis instead of store bought, then making the sauce from scratch can be made up to two days in advance, ensuring it’s covered in the fridge!
What is the difference between Eton Mess and Pavlova?
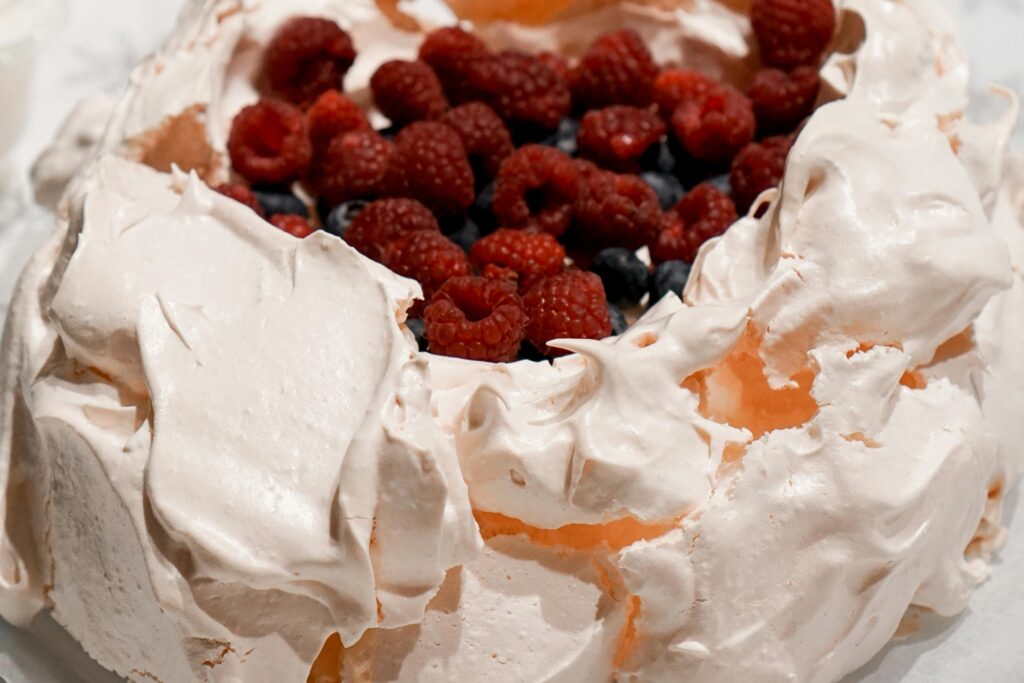
Although both puddings have a meringue base, whipped cream and topped with fruits or a sweet sauce, the main difference between an Eton Mess and pavlova is how they are presented. Eton Mess is assembled in a way that resembles a ‘mess‘ (pun intended!). It has broken pieces of meringue, folded up or mixed altogether before being presented in a glass. In contrast, a pavlova is an unbroken meringue, topped gently with whipped cream and fresh fruits.
What is the origin of the Pavlova?
The meringue-based dessert originates from either Australia or New Zealand in the early 20th century, with the two countries still debating to this day where it’s true origin came from. The name ‘pavlova’ derives from the Russian ballet dancer Anna Pavlova, who toured in Australia in the 1920s, in which the country is believed to have celebrated her through patisserie. However, Helen Leach of the University of Otago revealed a paper stating the a recipe for pavlova appeared in New Zealand in 1929.
Wild garlic is an abundance at this time of year and is very easy to make – it can be stored in the fridge for up to 2 weeks or frozen. It is delicious drizzled over meat, fish or vegetables, stirred through pasta or through scrambled eggs.
- You can either make your pesto in a food processor or by hand in a pestle and mortar. If using a food processor, simply start by adding your wild garlic and pulsing a few times to break the leaves down. Then add the grated parmesan and hazelnuts and pulse again. Next you can slowly drizzle in the olive oil until it reaches your desired consistency – stop mixing earlier if you like a chunkier texture or keep mixing if you would like it smoother.
- Finally add the lemon zest and a pinch of Maldon Salt and stir through. Put into a sterilised jar and it will keep for up to 2 weeks in the fridge or use straight away.
This samphire salad makes an elegant and delicious starter. Samphire is rich in vitamins and minerals and has a naturally fresh flavour. It pairs brilliantly with sweet crab, crunchy fennel, and peppery radish.
- In a small bowl, make the dressing. Add the olive oil, the juice of ½ a lemon and 1 tbsp of cider vinegar. Add a good pinch of Maldon salt and some cracked black pepper before whisking together.
- In a large serving bowl add the samphire, shredded fennel, radishes, herbs, and white crab meat. Drizzle over the dressing and toss so it is all well coated and combined. Finally zest over the remaining lemon and serve.
A beautiful seared steak salad recipe paired with the best in season purple sprouting broccoli and broad beans.
- Preheat the oven to 180C.
- Begin by cooking the steak. Make sure your meat is out of the fridge 30 minutes before you want to cook it, so it has time to come up to room temperature. Get a frying pan or griddle pan on the heat get it to a nice high heat. Drizzle some olive oil onto your steak and season generously with Maldon salt and cracked black pepper. Once the pan is nice a hot, place the meat in and allow it to sear and sizzle on one side first. Depending on the size of your steak this can take a good 5 minutes on each side. You want good, deep caramelization on all sides of the meat.
- While the meat is cooking place the purple sprouting broccoli onto a baking tray and drizzle over some oil and a pinch of Maldon salt. Place the tray into the oven and roast the broccoli for 10 – 12 minutes until tender and starting to char slightly.
- Once the steak is cooked to your liking – we’ve served it medium rare here – remove from the pan and leave it to rest on a chopping board. The resting time is key! It helps keep all the cooking juices to stay absorbed inside before slicing.
- While your meat rests, prepare the rest of the salad. Place the olive oil in a small bowl and mix with the chopped parsley and coriander, the diced red chilli and some Maldon salt and cracked black pepper. Set this dressing aside.
- On a large platter scatter over the wild rocket. Next top this with the roasted broccoli and the blanched broad beans.
- The meat will be rested now, so carefully slice at a diagonal into thin slices. Place this over the salad. Any meat juices that are left on the board can be carefully poured into the bowl with the dressing ingredients.
- Drizzle over the dressing, shave some parmesan across the top and sprinkle over toasted pine nuts. Give the whole salad a final pinch of Maldon salt and some cracked black pepper and then serve.
This recipe teaches you how to pipe little meringue kisses and the importance of baking them slowly at a low temperature. They are easy to store in an airtight container in room temperature – and they make the perfect little snack, or edible treat to decorate cakes.
- Preheat the oven to 100C.
- In the bowl of a stand mixer add the egg whites and whisk until they form medium peaks, then reduce the speed slightly and gradually add the caster sugar a teaspoon at a time. You need the sugar to dissolve fully before adding the next amount of sugar and so this can take roughly 15 – 20 minutes.
- Once all the sugar has been added, check it is fully dissolved by rubbing a little of the meringue between your finger and thumb – if it still feels grainy then continue to whisk, it should be smooth and glossy.
- Once the meringue is made you want to line a few baking sheets with baking paper. A good tip is to stick the baking paper down with a little dot of meringue in each corner – this stops the paper from flying up in the oven and ruining your meringues.
- For each colour of kisses, you need to place a small nozzle in the end of a piping bag, then using a food safe paintbrush, brush the inside of the bag with a little food colouring of your choice. Spoon some of the meringue mixture into the bag and then pipe little kisses onto your lined baking sheets. Repeat this with as many colours as you like.
- Once all your kisses are piped, place the trays into the middle of the oven and bake for 40 -45 minutes. They should be light and lift easily off the paper when they are baked – if they are still stuck then leave them in for a little longer.
- Allow the meringues to cool slightly and then gently brush with edible gold and scatter across some Maldon salt before serving.
The flavours of the chargrilled asparagus, creamy burrata and vibrant parsley oil all pair beautiful in this dish which would be an impressive starter or side dish.
- Start by making the parsley oil. In a high-speed blender add the parsley and olive oil and blend until smooth and bright green. Pass this through a fine sieve till you are left with a vibrant oil, then stir in the capers and set aside.
- Heat a frying pan or griddle pan. When hot, drizzle in some olive oil and add the asparagus. Toss and cook them for approximately 3 minutes until they are lightly charred and tender. Remove from the heat and set aside.
- Now you can assemble your dish. Place the burrata in the middle of a serving dish, then scatter over the charred asparagus. Drizzle over the parsley and caper oil and grate over some lemon zest. Finally finish with a pinch of Maldon salt and some cracked black pepper. Delicious when served with some toasted sourdough bread.
This recipe shows you how to prepare radicchio for salad and combines apple, rocket, pecorino and pine nuts along with a beautiful dressing.
- Start by preparing the dressing for the salad. In small bowl or jug, combine the lemon juice, olive oil, walnut oil and cider vinegar. Whisk together and then season with Maldon salt and cracked black pepper. Set aside.
- To prepare the radicchio, carefully pluck the leaves off working your way into the centre core. Once you reach the inside white core, discard this as it can be bitter and tough.
- Arrange the radicchio leaves on a large serving platter and toss with the apple matchsticks, wild rocket and dill.
- Drizzle the dressing over the leaves and apple before topping with the pecorino shavings and toasted pine nuts, plus a final garnish of dill fronds.
FAQ
There’s something truly special about baking cookies that feel both indulgent and nourishing – and these homemade oat cookies are just that. Packed with wholesome rolled oats, rich dark chocolate, chewy dried fruits and a medley of chopped nuts, they’re bound together with creamy cashew and almond butter for a decadent texture and taste. The magic touch? A pinch of Maldon Sea Sat flakes, which enhances every flavour and adds a subtle crunch.
Finished with decorative chocolate swirls on top, these cookies are perfect for cosy autumn gatherings, thoughtful homemade gifts, or simply treating yourself after a long day. Every bite is a celebration of comfort, craft and a little salty-sweet sophistication!
How to Make Oat Biscuits With Dried Fruits, Nuts and Chocolate
- Preheat the oven to 180C and line two baking trays with parchment paper.
- In a large bowl mix together the oats, Maldon Sea Salt, baking powder, chopped nuts and dried fruit. Set aside.
- In a smaller bowl, mix together the cashew butter, almond butter, maple syrup and coconut sugar. Stir until well combined and the coconut sugar has dissolved.
- Pour this wet mixture into the larger bowl with the dry ingredients and mix together until well distributed and combined.
- Take a small amount of the mixture and roll together in your hands – roughly the size of a golf ball. Place onto the lined baking sheets with a 2inch gap in between and press down gently to flatten slightly. Place into the preheated oven and bake for 10 – 12 minutes until golden brown on top. Remove from the oven and allow to cool on the baking sheets.
- Once cool, use the melted dark chocolate to drizzle across the tops of the cookies. Sprinkle with a final pinch of Maldon salt and then allow the chocolate to set before serving.
FAQ
This recipe shows you how easy it is to make butternut squash spaghetti by spiralizing the squash, which makes a great and healthy alternative to pasta. You can make different sauces for your squash spaghetti; however, this is a lighter alternative which uses burrata, courgette, mint and lemon.
- Begin my peeling and deseeding the butternut squash. Then cut into sections and using a spiralizer, create long ribbons which look like spaghetti. Place a large frying pan on the heat and drizzle with 1 tbsp olive oil. When the pan is hot, add the butternut squash spaghetti and sauté for 5 – 7 minutes until softened and golden. Remove from the heat.
- While the butternut squash is cooking, place a second small frying pan onto the heat and drizzle in 1 tbsp olive oil. When the oil is hot, add the slices of courgette and fry for a few minutes on each side so they are golden and toasty – you made need to do this in batches. Remove them from the heat.
- Now you can plate up – pile a golden heap of butternut squash spaghetti onto two plates. Top with some burrata, fried courgette slices, diced chilli, fresh mint leaves and some lemon zest. Finish each plate with a final pinch of Maldon salt, some cracked black pepper and a drizzle of olive oil.