






- Start by placing the pistachios into a food processor and blitzing until they are very finely ground. Tip these into a shallow bowl and set aside. Wipe out the excess from the food processor, but there is no need to clean it.
- Then add the walnuts to the food processor and pulse these until finely ground. Then add the medjool dates, flaxseed, chia seeds, Maldon Smoked Sea Salt, cocoa powder and orange zest and juice. Blitz this until everything is well ground and mixed to a thick paste.
- With slightly damp hands, roll out small golf ball sized balls of the mixture. Then roll each ball in the ground pistachios from earlier. Set these onto a tray and into the fridge for 15 minutes to firm up.
- Remove from the fridge when you are ready to enjoy them.
Dietary: Gluten Free
- Preheat the oven to 140c.
- Place the thinly sliced sweet potato on tray and spread the out in an even layer. Do the same on a separate tray for the beetroot (otherwise it will stain the other vegetables), and the carrots. Place these into the oven for about 2 – 2.5 hours, add the parsnip ribbons for the final 45 minutes. Bake the vegetables until they have dried out and gone crisp. They will go darker in the oven but make sure they don’t burn or catch too much.
- While the vegetables are baking, make the beetroot dip. Place the cooked beetroot into a food processor along with the Greek yoghurt, grated garlic and Maldon Pepper Sea Salt. Then blitz until smooth and vibrant pink. Tip this into a bowl and set aside.
- When the vegetable crisps are done, remove from the oven and pile into a large bowl. Sprinkle over some Maldon Pepper Sea Salt and serve alongside the beetroot dip.
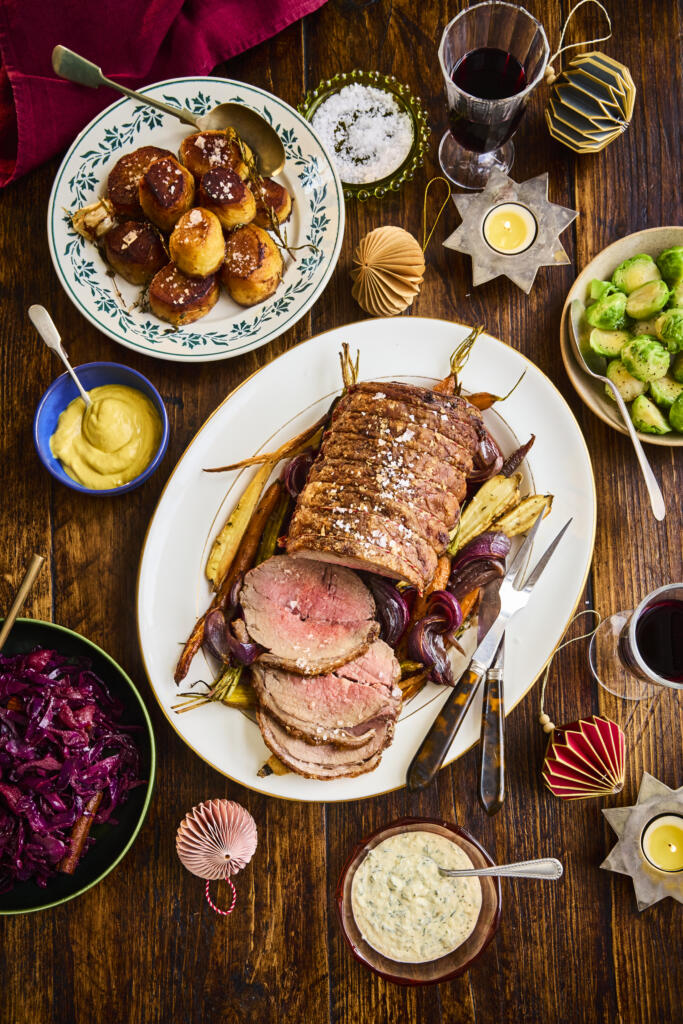
Make Christmas roast beef the easy way. A 2kg sirloin roasting joint is seared for a flavourful crust, then roasted over a tray of carrots, parsnips and onions. Finished with a quick red wine jus and seasoned with Maldon Sea Salt, this roast beef recipe delivers tender, medium‑rare slices and caramelised vegetables—perfect for a show‑stopping festive main.
How to Make Christmas Roast Beef with Easy Veg Medley
Step 1 – Temper and Season the Beef
- Remove the beef from the fridge 2 hours before cooking. Pat dry and season all over with Maldon Sea Salt. Drying is important as it allows the meat to brown faster; salting in advance can also help with creating a crispier crust.
Step 2 – Preheat and start the Vegetables
- Preheat the oven to 180°C fan (200°C conventional/392°F).
- Toss onions, carrots, parsnips and thyme with 2 tbsp olive oil; season with Maldon Sea Salt and black pepper. Spread on a large roasting tray and roast 5–10 minutes while you sear the beef.
Step 3 – Sear the Beef
- Heat a large frying pan over high heat with oil or beef fat. Sear the beef on all sides until well browned.
Step 4 – Roast Over the Vegetables
- Set the browned beef on top of the vegetables, pour in the glass of red wine.
- Roast for about 20 minutes per kilo at 180°C fan (≈9 minutes per lb) — around 40 minutes for a 2kg joint — turning the tray halfway for even cooking.
Step 5 – Check Temperature and Rest
- For best accuracy, use a meat thermometer in the centre of the thickest part:
- Rare: remove at 48-50°C (118–122°F)
- Medium-rare: remove at 51–53°C (124–127°F)
2. Temperatures rise during resting to ~51–53°C (124–127°F) rare or 54–56°C (129–133°F) medium‑rare.
3. Transfer beef to a warm plate, tent loosely with foil and rest 20 minutes. Keep veg warm in the oven if needed.
Step 6 – Serve
Slice against the grain. Serve with the roasted vegetables, creamed horseradish and mustard. Spoon over the red wine pan juices.
Tips & FAQs
- Best cut for Christmas roast beef? Sirloin roasting joint is tender with a good fat cap; ribeye or rump also work.
- How long to cook a 2kg sirloin at 180°C fan? Approximately 40 minutes after searing, or until thermometer hits 51–53°C (124–127°F) for medium‑rare.
- Do I need to cover the beef? No. Roast uncovered for a better crust; tent with foil during the 20‑minute rest.
- Can I make this ahead? Roast up to doneness −5°C (−9°F), rest and cool. Reheat slices gently in hot pan juices or gravy to serve.
- How do I get a great crust? Pat very dry, salt early, sear in a hot pan, and avoid over‑crowding the tray so veg can caramelise.
- Gravy vs jus? Deglaze the tray with extra wine/stock; simmer to reduce. Season with Maldon Sea Salt to finish.
Serving Suggestions
- Add Yorkshire puddings and crispy roast potatoes; a green like buttered sprouts or steamed greens with lemon.
- Festive extras: homemade red wine gravy, cranberry relish, or a drizzle of horseradish cream over slices.
- Scale up: For 10–12 guests, use a 3kg joint (increase roast time to ~60 minutes; monitor with thermometer).
Storage & Reheating
- Leftover beef: Cool quickly, refrigerate in an airtight container up to 3–4 days. Reheat slices gently in simmering pan juices or covered in a 160°C/320°F oven until just warm.
- Roasted vegetables: Refrigerate up to 3 days; reheat on a hot tray at 200°C/392°F to re‑crisp.
- Freezing: Sliced beef and veg can be frozen up to 1 month; thaw overnight in the fridge before reheating.
Have You Tried this Christmas Roast Beef?
Share your tips in the comments and tag #MaldonSalt. For more festive mains and sides, browse our Christmas recipes collection.
If you’re looking for the ultimate side dish to elevate steaks, roast chicken, or even your Christmas dinner, fondant potatoes are pure luxury on a plate! Using Maris Piper potatoes (or Yukon Gold as an US alternative), these beauties are cut into thick rounds, about 1.5-inch slices, to create the perfect balances of golden crust and a creamy, fluffy centre.
The magic begins in a heavy-based pan or cast iron skillet, where butter foaming gently kisses the potatoes as you baste them to perfection. Aromatic garlic cloves, rosemary sprigs, and thyme sprigs infuse every layer with deep, savoury notes. After searing, you’ll reduce stock until it forms a rich glaze that clings to each piece like velvet.
Season generously, finishing with a pinch of smoked sea salt – Maldon Smoked Sea Salt flakes add a subtle, earthy whisper that makes this dish unforgettable.
How to Make Fondant Potatoes with Garlic, Rosemary & Thyme
Step 1 – Prep and Sear
- Pat the potato rounds dry. Preheat a large heavy‑based or cast‑iron pan over medium‑high.
- Add olive oil; when shimmering, arrange potatoes cut‑side down in a single layer.
Step 2 – Brown Both Sides
- Fry 5–7 minutes until deeply golden.
- Turn and brown the second side 3–5 minutes. Season generously with Maldon Smoked Sea Salt.
- Tip: Don’t crowd the pan; work in batches if needed for even crust.
Step 3 -Add Flavour and Baste
- Add butter; when foaming, add crushed garlic, rosemary and thyme.
- Tilt the pan and baste the potatoes for 30–60 seconds.
Step 4 – Simmer in Stock
- Carefully pour in stock around the potatoes (aim for liquid to come halfway up the sides).
- Cover and gently simmer 20–25 minutes until fork‑tender and the stock has reduced to a glossy, buttery glaze.
- Cue: A skewer should slide in easily; edges remain intact with a creamy centre.
Step 5 – Finish and Serve
Discard woody herb stalks. Taste the glaze; finish with a pinch of Maldon Smoked Sea Salt. Serve immediately.
Tips & FAQs
Tips
- Use evenly sized rounds for consistent cooking; trim ends to create flat surfaces.
- If your pan is oven‑safe, you can finish covered at 200°C/180°C fan (400°F) for 15–20 minutes instead of stovetop.
- Stock should reach halfway up the potatoes; increase slightly if using a wider pan.
- For extra smokiness, finish with a light sprinkle of Maldon Smoked Sea Salt flakes just before serving.
FAQs
- What are the best potatoes for fondant potatoes
- Floury/waxy‑all‑rounders like Maris Piper or Yukon Gold hold shape yet turn creamy inside
- How long do fondant potatoes take to cook?
- About 30 minutes total: 8–12 minutes to brown, then 20–25 minutes to simmer until tender.
- Can you make fondant potatoes ahead of time?
- Yes—brown and simmer until just tender, cool in the glaze, then reheat gently with a splash of stock and a fresh knob of butter.
- Can this be vegetarian or vegan?
- Vegetarian: use vegetable stock.
- Vegan: swap butter for plant‑based block and use vegetable stock.
Serving Suggestions
- Serve alongside steak, roast chicken, lamb, or festive mains.
- Spoon over pan juices; add chopped chives or parsley for freshness.
- For entertaining, cut smaller 2.5 cm / 1‑inch rounds and present on a platter with extra smoked sea salt.
Storage & Reheating
- Fridge: Store in an airtight container with leftover glaze for up to 3 days.
- Reheat: Pan with a splash of stock over medium‑low, basting until hot; or oven at 180°C/160°C fan (350°F) covered for 10–12 minutes. Avoid microwaving to keep edges crisp.
Bring warmth and depth to your Christmas dinner with this classic side dish: tender red cabbage, gently braised low and slow in a heavy-based pot until glossy and fragrant. The secret lies in the sweet-sour balance – a splash of red wine vinegar and a touch of soft brown sugar, paired with apple slices for natural sweetness. Finish with a generous sprinkle of Maldon Original Sea Salt flakes for that perfect crunch and freshness.
This dish is a make-ahead dream – leftovers reheat gently and taste even better than next day. A vibrant, spiced companion to roast meats, it’s the side that completes the festive table.
How to Make Red Cabbage with Christmas Spices
Step 1 – Soften the Onion
- Warm olive oil and half the butter in a large heavy‑based pot over medium heat.
- Add onion and a pinch of Maldon Sea Salt; cook 10–15 minutes, stirring occasionally, until softened and lightly browned.
Step 2 – Bloom the Spices
- Add cinnamon, grated nutmeg and ground cloves; fry 1 minute until fragrant.
Step 3 – Add Cabbage and Coat
- Add sliced red cabbage; toss to coat in the spiced, buttery mixture.
Step 4 – Add Apple, Sugar and Vinegar
- Stir in apples, soft brown sugar and red wine vinegar until evenly combined.
Step 5 – Braise Gentle
- Reduce heat to low, cover and cook 30–40 minutes, stirring now and then, until the cabbage is tender but not mushy and the liquid has reduced to a light glaze.
Step 6 – Finish and Season
- Stir in the remaining 25g butter. Taste and adjust with more sugar, vinegar or Maldon Sea Salt to balance sweet‑sour seasoning.
Tips & FAQs
Tips
- Slice cabbage evenly for consistent cooking; remove the tough core.
- Sweet‑sour balance: start with the listed sugar and vinegar, then adjust at the end.
- To prevent bitterness, keep heat low and cook gently; add a splash of water if the pan looks dry.
- Make‑ahead friendly: flavours deepen after resting.
FAQs:
- How long to cook braised red cabbage?
- About 1 hour total: 10–15 minutes to soften the onion, then 30–40 minutes covered on low until tender.
- Can you freeze braised red cabbage?
- Yes. Cool completely, pack in airtight containers and freeze up to 3 months. Thaw overnight in the fridge and reheat gently.
- What apples work best?
- Firm, sweet‑tart eating apples (e.g., Braeburn, Gala, Jazz) hold shape and balance acidity.
- Can I make this vegan?
- Absolutely—use olive oil or plant‑based butter instead of dairy butter and season with Maldon Original Sea Salt.
Serving Suggestions
- Serve alongside roast turkey, ham, pork belly or goose; it cuts through rich mains.
- Add to festive buns or leftover sandwiches with cold cuts.
- Finish with a final pinch of Maldon flakes for sparkle, or stir in a handful of raisins for extra sweetness.
Storage & Reheating
- Fridge: Cool, then refrigerate in an airtight container for 4–5 days.
- Reheat: Pot over low heat with a splash of water or apple juice; stir until steaming.
- Freeze: Up to 3 months; reheat from thawed for best texture.
Tried This Recipe?
Rate it and share your tips in the comments. For more festive sides and make‑ahead recipes, browse our Christmas collection.
Ed Cudlipp, also known as ‘Cud Cooks’, brings the heat with his Hot Honey Wings with Maldon Chilli Salt – the perfect balance of crisp, spicy, sweet, and savoury. Coated in a buttery hot honey glaze and finished with Maldon Chilli Sea Salt flakes, these wings are as fiery as they are addictive. It’s the kind of recipe that turns a casual night in into a feast.
Step 1 – Prep the wings
- Preheat the oven to 170°C.
- Toss the wings in olive oil, garlic powder, onion powder, smoked paprika, and a generous pinch of Maldon Chilli Sea Salt.
Step 2 – Roast until crispy
- Arrange the wings on a wire rack set over a baking tray.
- Roast for 1 hour until golden, crisp, and cooked through.
Step 3 -Make the glaze
- In a small saucepan, melt the butter.
- Add honey, hot sauce, apple cider vinegar, and Maldon Chilli Sea Salt.
- Stir and warm gently until smooth and combined.
Step 4 – Toss and finish
- Once the wings are cooked, transfer them to a bowl and pour over the hot honey glaze. Toss until the wings are evenly coated and sticky.
- Finish with a squeeze of lemon, sprinkle of chives, and a final pinch of Maldon Chilli Sea Salt for an extra chilli kick.
- Sticky, spicy perfection – wings that balance sweetness, heat, and Maldon’s signature salt crunch.
How Did You Find This Recipe?
Tag @cud_cooks on Instagram when you make them – he’d love to see your take on it. Comment below how this recipe went for you in the comment’s section below!
Recipe created by Romy Gill
Bring bold flavours and vibrant colour to your Diwali table with Romy Gill’s whole roasted spiced cauliflower, a showstopping dish that’s as nourishing as it is festive. Marinated in a fragrant homemade spice blend and roasted until golden and tender, the cauliflower is served atop of a creamy bed of homemade hummus, creating a beautiful contrast of textures and tastes. .
The final flourish – a sprinkle of Himalayan Pink Salt, Selected by Maldon – adds a delicate mineral depth that enhances every bite. This dish is a celebration of spice, warmth, and togetherness, perfect for sharing with loves ones during the Festival of Lights.
How To Make a Whole Roasted Spiced Cauliflower Served on Hummus?

- Start by making the spice blend. Place all the listed ingredients into a blender, blitzing until it becomes a fine powder. Pour into a small dish and keep aside.
- In a bowl, add the spice blend and oil together and whisk it. Rub the blend all over the cauliflower evenly. Transfer to a baking tray with parchment paper underneath, and leave aside for 15 minutes at room temperature, to marinate.
- In the meantime, pre-heat the oven at 200 degrees.
- Cover the marinated cauliflower with foil before placing in the oven. Cook for 25 minutes. After 25 minutes remove the foil and cook for another 20 minutes. Please note, that all ovens are different, so if it needs another 5 minutes then please do give an extra 5 minutes to ensure the cauliflower is roasted evenly.
- Whilst the cauliflower is cooling, make the hummus. Place all the listed ingredients into a a blender and blitz until it becomes a creamy thick paste.
- Add a generous spoonful of hummus onto the plate, placing the whole roasted cauliflower on top.
- Serve with roasted cauliflower and small handful of green roasted pumpkin seeds.
Recipe created by Romy Gill
Celebrate Diwali with a burst of spice and tradition in every bite – Romy Gill’s spicy Bonda balls are the ultimate festive snack. These golden, crispy potato balls are packed with red onions, coriander, green chillies, and warming spices, then deep-fried to perfection. What makes them truly special is the finishing touch: a pinch of Maldon Sea Salt flakes, which enhances the bold flavours and adds a delicate crunch.
Inspired by Romy’s Indian heritage and love for vibrant, seasonal cooking, these naturally vegan treats are perfect for sharing with friends and family during the Festival of Lights. Serve them with your favourite chutney and let the celebrations begin.
How To Make Spicy Bonda Balls

- Peel and diced the potatoes and then boil until they are soft and cooked. Drain the water, place them in a large mixing bowl and leave it cool down. Once the potatoes are cooled down, mash them.
- Add rest of the ingredients into the bowl, expect the oil. Mix them well and shape them into 20 golf sized balls.
- Place them on a baking tray and leave them in the fridge from 15 minutes.
- After 15 minutes remove the tray from the fridge and leave it outside. Pour oil in a heavy-based medium size saucepan. Heat the oil over medium heat to 180 degrees. Add the Bonda balls to the hot oil, in batches. Cook evenly all sides for 3-4 minutes until golden brown on all sides.
- Serve hot with any chutney of your choice. Romy serves her Bonda balls with mint and coriander chutney.
Ed Cudlipp, also known as ‘Cud Cooks’, brings roast chicken perfection to the table with this timeless recipe – a golden, crispy bird seasoned with Maldon Garlic Sea Salt, served alongside a rich, homemade garlic and tarragon mayonnaise. It’s the kind of dish that makes a Sunday roast feel effortless but special, with all the comfort and flavour of classic cooking elevated by Maldon’s fragrant garlic salt.
How to Make the Perfect Roast Chicken
Step 1 – Prepare the Chicken
- Preheat the oven to 180°C. Stuff the chicken cavity with shallots, garlic cloves, and thyme.
- Pat the skin dry, brush generously with olive oil, and season all over with Maldon Garlic Sea Salt.
Step 2 – Roast
- In a large ovenproof pan, scatter shallots, garlic, thyme, and rosemary, then drizzle with oil. Place a wire rack over the top and set the chicken on it.
- Roast for 1 hour 15 minutes until golden and cooked through.
Step 3 – Make the Mayonnaise
- In a food processor, combine egg yolks, mustard, lemon juice, vinegar, sugar, Maldon Garlic Sea Salt, and grated garlic.
- Blend briefly, then slowly drizzle in the oils with the motor running until thick.
- Stir through chopped tarragon.
Step 4 Make the Gravy
- Remove the chicken to rest in a warm place. Pour cider into the roasting pan, scraping up the caramelised bits.
- Add chicken stock, bring to a boil, then strain. Return to a clean pan, whisk in butter, and simmer until reduced and glossy.
Step 5 – Serve
- Carve the chicken and serve with the tarragon mayonnaise and pan gravy.
- A crisp-skinned, succulent roast with layers of garlic, herbs, and Maldon’s unmistakable saltiness – the perfect roast chicken, elevated.
How did you find this recipe?
Tag @cud_cooks on Instagram when you make it – he’d love to see your roast. Comment below how this recipe went for you in the comment’s section below!
- Set a large, heavy-based pot over a medium heat. Add 3 tbsp olive oil and once warm add the onions and celery. Season with a punch of Maldon Chilli Sea Salt and cook for 12-15 minutes over a medium heat until soft and lightly golden. Add the garlic, ginger, cumin, coriander and cubed pumpkin. Cook for a few minutes, stirring regularly, until fragrant then pour in the stock.
- Bring to a simmer and cook for 25-30 minutes until the pumpkin is very tender. Leave to cool a little then transfer to a blender and blitz until smooth.
- For the topping, set a small frying pan over a medium heat. Add the olive oil and pumpkin seeds and fry for a few minutes until the seeds are beginning to pop. Add the garlic and fry for a minute or two, stirring and keeping a close eye, until the garlic is lightly golden and fragrant. Remove from the heat and stir in a pinch of Maldon Chilli Sea Salt.
- To serve, ladle the soup into deep bowls, drizzle with yoghurt/sour cream and top with the seedy garlic mix.