Season: Winter
Originating from the French city of Lyon, this classic side dish transforms humble ingredients into a restaurant-quality centrepiece. Lyonnaise potatoes are the perfect marriage of textures and flavours: waxy potato slices pan-fried in butter and olive oil until golden and crisp, tossed together with deeply caramelised, sweet white onions. To elevate this traditional recipe, we finish the pan with a generous pinch of Maldon Garlic Sea Salt flakes, perfectly complementing the sweet onions and rich butter with a burst of savoury, roasted garlic flavour.
Why You’ll Love This Lyonnaise Potatoes Recipe
- The Perfect Texture: Parboiling the potatoes first ensures they are beautifully tender on the inside, while frying them in batches guarantees a golden, crispy exterior.
- Incredible Flavor: Slowly caramelising the onions in the leftover potato cooking oils creates a sweet, savory depth that coats every single bite.
- Elevated Simplicity: It requires only a few basic pantry staples to create an impressive, classic French dish that pairs perfectly with almost any main course.
How to Make Lyonnaise Potatoes (Step-by-Step)
Step 1 – Parboil the potatoes
- Start by slicing the waxy potatoes into 2cm thick slices, discarding the very small, uneven ends.
- Place the slices into a pot of cold water and bring to the boil. Let the potatoes boil for just 2 minutes—you want them to start becoming tender but remain uncooked and firm in the middle. This crucial step ensures they won’t break down and turn to mash when sautéed later.
Step 2 – Dry and fry in batches
- Drain the potatoes well and allow them to sit for a few minutes to ensure they are fully dry. In a large frying pan, add half of the butter and olive oil.
- Once hot, begin frying the potato slices in batches to ensure they all get nice and golden crisp on each side.
- Remove the slices from the pan as they finish cooking.
Step 3 – Caramelise the onions
- Once all the potato slices are fried and set aside, add the remaining butter and olive oil to the pan.
- Toss in the finely sliced white onions along with the Maldon Garlic Sea Salt flakes. Fry over medium heat for about 8 minutes until the onions are soft, golden, and beautifully caramelised.
Step 4 – Combine and serve
- Finally, add the golden potatoes back to the pan with the onions to warm them through. Season with cracked black pepper.
- Transfer the Lyonnaise potatoes to a serving dish and garnish with an extra sprinkle of Maldon Garlic Sea Salt flakes and the freshly chopped parsley.
Tips for the Perfect Potatoes a la Lyonnaise
- Use Waxy Potatoes: It is vital to use waxy potatoes (like new potatoes, Charlotte, or Yukon Gold) rather than floury baking potatoes. Waxy potatoes hold their shape when boiled and fried; floury ones will disintegrate in the pan.
- Dry Thoroughly: Moisture is the enemy of a crispy crust. After draining your parboiled potatoes, let them steam dry completely before they hit the hot fat.
- Don’t Rush the Onions: The magic of a true recipe for potatoes Lyonnaise comes from the sweet, jammy onions. Take your time during the 8-minute frying stage to ensure they caramelise properly without burning.
What to Serve with Lyonnaise Potatoes
Garlic and Tarragon Chicken
This rich, buttery side dish is incredibly robust and pairs beautifully with classic, protein-heavy mains. It is the ultimate side dish for a perfectly seared steak, a roasted rack of lamb, or crispy-skinned roast chicken.
Frequently Asked Questions
What are Lyonnaise potatoes?
Lyonnaise potatoes (or pommes de terre à la lyonnaise) is a traditional French dish originating from the city of Lyon. It consists of sliced, pan-fried potatoes mixed with thinly sliced, butter-caramelised onions, typically finished with fresh parsley.
Do I have to peel the potatoes first?
This comes down to personal preference. Traditionally, the potatoes are peeled. However, if you are using thin-skinned new potatoes, you can absolutely leave the skins on for extra texture and rusticity.
Can I make Lyonnaise potatoes ahead of time?
While they are best served fresh and crispy straight from the frying pan, you can do the prep work ahead of time. You can parboil the potatoes and slice the onions hours in advance, leaving only the frying and caramelising for right before dinner.
When you need an elegant, restaurant-quality vegetable side dish but are short on time, this sauteed asparagus with mushrooms is the perfect solution. Earthy, wild mushrooms meet vibrant, tender-crisp asparagus in a hot pan, soaking up rich olive oil and aromatic crushed garlic. The entire dish comes together in under 15 minutes from prep to plate. The secret to elevating this simple pan-fry? A generous pinch of Maldon Smoked Sea Salt flakes tossed through right at the end to enhance the savoury, umami flavours of the mushrooms.
Why You’ll Love This Sautéed Asparagus Recipe
- Lightning Fast: With just 5 minutes of prep and 10 minutes in the pan, this is the ultimate speedy side dish for busy weeknights or stress-free dinner parties.
- Incredible Texture: Pan-frying the mushrooms on a high heat gives them a beautiful, golden-crisp edge, while the asparagus stays perfectly vibrant and tender-crisp.
- Earthy & Smoky: Using a blend of wild mushrooms (like shiitake or chanterelle) paired with our signature smoked sea salt creates a deep, complex flavour profile that punches far above its simple ingredients.
How to Make Sauteed Asparagus with Mushrooms (Step-byStep)
Step 1 – Prepare the vegetables
- Start by preparing your asparagus. Remove the tough, woody ends from the spears, then cut the remaining tender stems in half to create two shorter pieces per spear. Next, take your mixed mushrooms and brush them clean. Keep any smaller mushrooms whole, but cut larger varieties in half so everything cooks at the same rate.
Step 2 – Fry the mushrooms
- Heat the olive oil in a large frying pan over a high heat. Add the prepared mushrooms and fry until they soften, release their moisture, and develop a nicely golden, crisp exterior.
Step 3 – Add the asparagus and garlic
- Once the mushrooms are golden, toss the prepared asparagus pieces into the hot pan. Sauté the asparagus in the olive oil alongside the mushrooms for a couple of minutes until they turn bright green.
Step 4 – Finish and season
- Add the crushed garlic cloves to the pan. Fry for another minute or so until the garlic becomes beautifully fragrant and the asparagus is perfectly tender. The whole cooking process should take 10 minutes or less. Remove the pan from the heat, season generously with Maldon Smoked Sea Salt flakes, and serve immediately.
Tips for the Perfect Pan-Fried Vegetables
- Brush, Don’t Wash: Mushrooms are like sponges. If you rinse them under water, they will absorb it and steam in the pan rather than getting crispy. Always use a dry pastry brush or a damp piece of kitchen paper to gently brush away any dirt.
- Keep the Heat High: To get that lovely golden-brown sear on the mushrooms without overcooking the asparagus, make sure your frying pan and olive oil are nice and hot before you start.
- Add Garlic Last: Crushed garlic burns very quickly over high heat, turning bitter. By adding the garlic during the final minute of cooking, you infuse the dish with its fragrant flavour without risking a burnt taste.
What to Serve with Sautéed Asparagus
This garlicky, earthy side dish is incredibly versatile. It is a classic pairing for a pan-seared steak, a juicy roast chicken breast, or a thick-cut pork chop. For a vegetarian option, try serving these savoury vegetables stirred through a creamy Parmesan risotto or simply tossed with fresh pasta and an extra drizzle of good quality olive oil.
Frequently Asked Questions
Can I use butter instead of olive oil
Yes, you can absolutely use butter instead of olive oil! While our recipe calls for asparagus sautéed in olive oil for a lighter, Mediterranean finish, you can absolutely substitute it with butter. Butter will add a rich, nutty flavour that pairs beautifully with the mushrooms.
How do I know where to trim the asparagus
The easiest way to find where the tough, woody end stops and the tender stem begins is to take one spear of asparagus and gently bend it near the bottom. It will naturally snap at the exact point where it becomes tender. You can use that snapped piece as a length guide to slice the rest of your bunch with a knife.
Can I use standard button mushrooms?
You certainly can use button mushrooms instead of mixed mushrooms. However, we highly recommend using a “mixed wild” pack (containing varieties like shiitake, oyster, or chanterelle) if you can find them. They offer a much meatier texture and a deeper, more complex flavour than standard white button mushrooms.
- Cut the squid into a mixture of rings or thick slices with the skin scored in a crisscross pattern. Keep the tentacles left whole or cut into two pieces. In a large bowl mix together the Shaoxing wine, soy sauce and grated ginger. Add the prepared squid to the bowl and toss it through the marinade so it is well coated. Cover the bowl in clingfilm and set aside in the fridge for 15 minutes.
- In a second large bowl, mix the plain flour, cornflour and Maldon Pepper Sea Salt.
- Place the vegetable oil in a deep saucepan, so it comes 3 inches up the sides. Place it on a medium heat and let the oil come up to 180c.
- Take the squid out of the fridge and lift each piece out, shaking off any excess marinade and then transferring it into the flour bowl. Toss each piece well in the flour, again shaking off any excess, before dropping them into the hot oil. Do this in smaller batches so as not to overcrowd the pan.
- Use a slotted spoon to lift the fried squid out of the oil when it is golden brown (after 2 – 3 minutes), and place onto a tray with some kitchen paper to absorb any excess oil.
- In a small bowl mix together the mayonnaise, finely chopped coriander and dill, and lime juice.
- Serve the fried squid immediately with the herbed mayonnaise and some extra Maldon Pepper Sea Salt.
- Preheat the oven to 180c.
- Cut the butternut squash down the middle from the stem to base. Scoop out the seeds using a spoon. Then use a sharp knife to score the butternut squash flesh in a crisscross pattern. Place each half into a roasting tray with the flesh facing up, and drizzle both with half of the olive oil. Season with Maldon Garlic Sea Salt, black pepper and the smoked paprika. Then place into the oven for 40 minutes until soft and tender but still holding its shape.
- While the squash is roasting, prepare the rice filling. Start by adding the remaining olive oil to a small frying pan, and place onto a medium heat to heat up. Then add the sliced red onion and fry for 8 – 10 minutes, stirring consistently until the onions are very soft and starting to caramelise. Remove from the heat and set aside.
- Prepare the rice according to the packet instructions and then tip into a large bowl.
- Add the finely chopped dill and the caramelized onions and stir through. Then season with Maldon Garlic Sea Salt and black pepper. When the butternut squash has cooked, remove it from the oven and divide the rice between the two halves, pressing the rice into the cavity. Then top with some crumbled feta, pomegranate seeds and chopped pistachios. Drizzle over a little pomegranate molasses and a final sprinkle of Maldon Garlic Sea Salt.
- Start by placing the pistachios into a food processor and blitzing until they are very finely ground. Tip these into a shallow bowl and set aside. Wipe out the excess from the food processor, but there is no need to clean it.
- Then add the walnuts to the food processor and pulse these until finely ground. Then add the medjool dates, flaxseed, chia seeds, Maldon Smoked Sea Salt, cocoa powder and orange zest and juice. Blitz this until everything is well ground and mixed to a thick paste.
- With slightly damp hands, roll out small golf ball sized balls of the mixture. Then roll each ball in the ground pistachios from earlier. Set these onto a tray and into the fridge for 15 minutes to firm up.
- Remove from the fridge when you are ready to enjoy them.
- Preheat the oven to 140c.
- Place the thinly sliced sweet potato on tray and spread the out in an even layer. Do the same on a separate tray for the beetroot (otherwise it will stain the other vegetables), and the carrots. Place these into the oven for about 2 – 2.5 hours, add the parsnip ribbons for the final 45 minutes. Bake the vegetables until they have dried out and gone crisp. They will go darker in the oven but make sure they don’t burn or catch too much.
- While the vegetables are baking, make the beetroot dip. Place the cooked beetroot into a food processor along with the Greek yoghurt, grated garlic and Maldon Pepper Sea Salt. Then blitz until smooth and vibrant pink. Tip this into a bowl and set aside.
- When the vegetable crisps are done, remove from the oven and pile into a large bowl. Sprinkle over some Maldon Pepper Sea Salt and serve alongside the beetroot dip.
Although it’s pretty easy to make your own puff pastry, shop-bought is a good vehicle for piling high with an assortment of delicious toppings, and you can get it in most supermarkets. A tart made with this is also a great snack or starter for when you have friends around as you can make something relatively easy but impressive. Just cut it up into smaller wedges and serve it. I don’t know why, I always want puff pastry to be cold before cooking it, as this will give you the best puff, so leave it in the refrigerator until just before you need it.
How to Make Wild Mushroom, Ricotta and Caramelised Onion Tart
Preheat the oven to 200°C (400°F) and line a baking sheet with baking parchment (use a drizzle of oil under the parchment to secure it).
Put 2 tablespoons of the oil, the balsamic vinegar and onions into a frying pan over a low heat, season with salt and cook for 20–30 minutes until very soft and sweet. The key is to keep your heat low as the onions will want to catch and burn. If the onions start to burn, add about 1 tablespoon of water and give them a stir.
While the onions are cooking, clean, trim and slice the mushrooms into halves or thirds – you want to keep the mushrooms quite big to give the tart some body and texture. Put the remaining 2 tablespoons of oil into a heavy-based frying pan over a medium heat along with the garlic, mushrooms and wine vinegar. Season with sea salt and pepper, then cook for around 10 minutes until the mushrooms have softened and reduced in size.
Once everything is ready, lightly flour a surface and roll out the pastry slightly, just one roll on all four sides. Slide the pastry onto the prepared baking sheet, then spread the ricotta onto the pastry, leaving a border of about 3cm (1¼ inches) on all sides. Score a border of about 1cm. Top the ricotta with the caramelised onions, followed by the mushrooms. Season with salt and pepper. Brush the beaten egg onto the scored pastry borders, then bake the tart in the oven for 10–15 minutes, or until the pastry is golden brown. Slice and serve immediately.
Nothing says festive comfort quite like a Christmas Sticky Toffee Pudding – rich, indulgent, and full of seasonal flavour. This show-stopping dessert combines Medjool dates, Bramley apple, and a warming blend of mixed spice and nutmeg for a pudding that’s as aromatic as it is delicious. Sweetened with golden syrup and lifted by a hint of orange zest and brand, this recipe delivers a gooey centre, moist crumb, and that all-important skewer test perfection!
Perfect for your holiday table or Boxing Day feast, this pudding is a make-ahead marvel – simply reheat gently before serving. Whether you’re a seasoned bake or trying something new, this recipe guarantees festive magic with every spoonful.
How to Make Christmas Sticky Toffee Pudding with Salted Caramel Sauce
Step 1 – Prep the Basin and Oven
- Butter and line the base of a 1.5‑litre pudding basin with greaseproof paper.
- Heat oven to 140°C fan (160°C conventional / 320°F). Place the basin on a tray.
- Tip: Lining helps the sponge release cleanly.
Step 2 – Combine Dry Ingredients
- In a large bowl, whisk flour, mixed spice, grated nutmeg and 1 tsp Maldon Original Sea Salt.
Step 3 – Cream Butter and Sugar, Add Egg
- In a stand mixer or with electric whisks, beat butter and light brown sugar until soft and fluffy.
- Beat in eggs one at a time, mixing well after each.
- Tip: If the mixture looks split, beat in 1 tbsp of the flour.
Step 4 – Fold in Fruit and Flavourings
- Fold in dates, walnuts, grated Bramley apple, orange zest, then the golden syrup and brandy.
Step 5 – Add Dry Ingredients
- Gently fold in the dry ingredients until just combined. Do not overmix.
Step 6 – Bake
- Spoon mixture into the prepared basin, level the top.
- Bake 1 hr 20 min–1 hr 30 min, until a skewer inserted into the centre comes out with just a few moist crumbs.
- Cue: Top should be risen and springy; edges pull slightly from the sides.
Step 7 – Make the Salted Caramel Sauce
- Add sugar, butter, double cream and 1 tsp Maldon Original Sea Salt to a medium pan.
- Warm over low heat, stirring until the sugar dissolves.
- Increase heat and bubble 2–3 minutes until syrupy and golden.
Tip: For a silkier finish, don’t stir once boiling; swirl the pan.
Step 8 – Serve
- Turn out the pudding, pour over warm salted caramel sauce and finish with a pinch of Maldon flakes for sparkle.
Tips & FAQs
Tips
- For extra moisture, don’t overbake—use the skewer cue (few crumbs).
- Medjool dates give a plush texture; if using drier dates, briefly soak in hot water, then drain.
- Alcohol‑free: swap brandy for orange juice or apple juice.
- Nut‑free: omit walnuts and add 50g extra dates.
- Make‑ahead: bake a day ahead, cool, cover and reheat; keep sauce separate until serving.
FAQs
- How long to cook sticky toffee pudding?
- At 140°C fan (160°C conventional / 320°F), bake for 1 hr 20–30 min until a skewer comes out with a few moist crumbs.
- Can you make sticky toffee pudding ahead of time?
- Yes. Bake, cool, and refrigerate for up to 3 days. Reheat slices at 160°C for 10–15 min or microwave 30–45 sec; warm the sauce gently.
- Can you freeze sticky toffee pudding?
- Freeze the baked pudding (without sauce) well‑wrapped for up to 3 months. Thaw overnight in the fridge, reheat as above, and add freshly warmed sauce.
- Why is my caramel sauce grainy?
- Ensure sugar fully dissolves before boiling. Once bubbling, avoid stirring; swirl the pan and remove from heat as soon as it’s glossy and thickened.
Storage & Reheating
- Fridge: Pudding up to 3 days; sauce in a sealed jar up to 5 days.
- Reheat: Oven 160°C for 10–15 min (cover loosely); microwave individual slices 30–45 sec. Warm sauce gently; if too thick, loosen with a splash of cream.
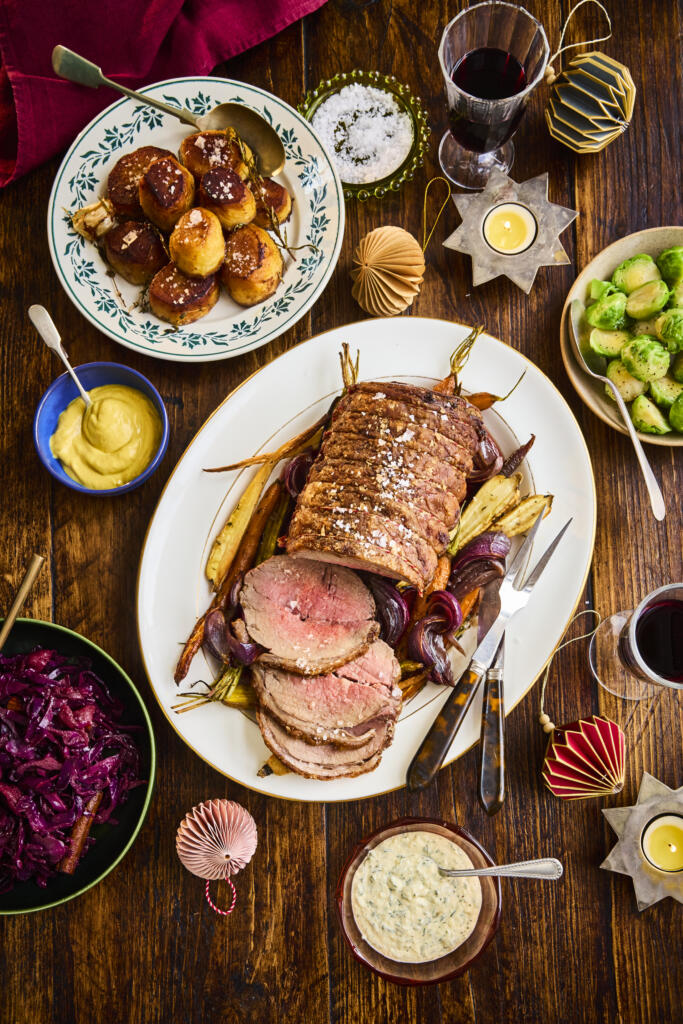
Make Christmas roast beef the easy way. A 2kg sirloin roasting joint is seared for a flavourful crust, then roasted over a tray of carrots, parsnips and onions. Finished with a quick red wine jus and seasoned with Maldon Sea Salt, this roast beef recipe delivers tender, medium‑rare slices and caramelised vegetables—perfect for a show‑stopping festive main.
How to Make Christmas Roast Beef with Easy Veg Medley
Step 1 – Temper and Season the Beef
- Remove the beef from the fridge 2 hours before cooking. Pat dry and season all over with Maldon Sea Salt. Drying is important as it allows the meat to brown faster; salting in advance can also help with creating a crispier crust.
Step 2 – Preheat and start the Vegetables
- Preheat the oven to 180°C fan (200°C conventional/392°F).
- Toss onions, carrots, parsnips and thyme with 2 tbsp olive oil; season with Maldon Sea Salt and black pepper. Spread on a large roasting tray and roast 5–10 minutes while you sear the beef.
Step 3 – Sear the Beef
- Heat a large frying pan over high heat with oil or beef fat. Sear the beef on all sides until well browned.
Step 4 – Roast Over the Vegetables
- Set the browned beef on top of the vegetables, pour in the glass of red wine.
- Roast for about 20 minutes per kilo at 180°C fan (≈9 minutes per lb) — around 40 minutes for a 2kg joint — turning the tray halfway for even cooking.
Step 5 – Check Temperature and Rest
- For best accuracy, use a meat thermometer in the centre of the thickest part:
- Rare: remove at 48-50°C (118–122°F)
- Medium-rare: remove at 51–53°C (124–127°F)
2. Temperatures rise during resting to ~51–53°C (124–127°F) rare or 54–56°C (129–133°F) medium‑rare.
3. Transfer beef to a warm plate, tent loosely with foil and rest 20 minutes. Keep veg warm in the oven if needed.
Step 6 – Serve
Slice against the grain. Serve with the roasted vegetables, creamed horseradish and mustard. Spoon over the red wine pan juices.
Tips & FAQs
- Best cut for Christmas roast beef? Sirloin roasting joint is tender with a good fat cap; ribeye or rump also work.
- How long to cook a 2kg sirloin at 180°C fan? Approximately 40 minutes after searing, or until thermometer hits 51–53°C (124–127°F) for medium‑rare.
- Do I need to cover the beef? No. Roast uncovered for a better crust; tent with foil during the 20‑minute rest.
- Can I make this ahead? Roast up to doneness −5°C (−9°F), rest and cool. Reheat slices gently in hot pan juices or gravy to serve.
- How do I get a great crust? Pat very dry, salt early, sear in a hot pan, and avoid over‑crowding the tray so veg can caramelise.
- Gravy vs jus? Deglaze the tray with extra wine/stock; simmer to reduce. Season with Maldon Sea Salt to finish.
Serving Suggestions
- Add Yorkshire puddings and crispy roast potatoes; a green like buttered sprouts or steamed greens with lemon.
- Festive extras: homemade red wine gravy, cranberry relish, or a drizzle of horseradish cream over slices.
- Scale up: For 10–12 guests, use a 3kg joint (increase roast time to ~60 minutes; monitor with thermometer).
Storage & Reheating
- Leftover beef: Cool quickly, refrigerate in an airtight container up to 3–4 days. Reheat slices gently in simmering pan juices or covered in a 160°C/320°F oven until just warm.
- Roasted vegetables: Refrigerate up to 3 days; reheat on a hot tray at 200°C/392°F to re‑crisp.
- Freezing: Sliced beef and veg can be frozen up to 1 month; thaw overnight in the fridge before reheating.
Have You Tried this Christmas Roast Beef?
Share your tips in the comments and tag #MaldonSalt. For more festive mains and sides, browse our Christmas recipes collection.
Nothing says Christmas quite like a tray of Spiced Orange Mince Pies, their buttery shortcrust pastry baked to flaky, crisp edges and dusted with a whisper of icing sugar. These festive treats combine sweet citrus and warm spice with a hint of grated apple for extra juiciness, all tucked beneath star lids or elegant diamond lids for that classic holiday look. A pinch of Maldon Smoked Sea Salt flakes creates a subtle depth that balances the sweetness beautifully.
You can serve these warm with brandy butter or brandy cream. These pies are a make-ahead marvel – they freeze and reheat like a dream, making them ideal for stress-free entertaining. Glossy, spiced and utterly irresistible, they’re the ultimate festive treat.
How to Make Spiced Orange Mince Pies
Step 1 – Make and Chill the Pastry
- In a processor, pulse flour, icing sugar and Maldon Original Sea Salt to combine.
- Add butter; pulse to fine breadcrumbs.
- Add egg and ice water; pulse just until the dough clumps.
- Shape into a disc, wrap and chill 1 hour.
- By hand: rub butter into dry ingredients, then “cut in” egg and water with a knife; bring together gently and chill.
Step 2 – Prepare Cases and Lids
- Roll pastry on a lightly floured surface to pound‑coin thickness (≈3 mm).
- Cut 12 rounds slightly larger than the bun‑tin holes; press in gently.
- Cut lids (smaller rounds, stars, or a Maldon diamond).
Step 3 – Mix the Filling
In a bowl, combine mincemeat, grated apple, orange zest and Maldon Smoked Sea Salt.
Step 4 – Fill and Seal
- Spoon a heaped teaspoon of filling into each case.
- Brush lid undersides with egg; position and press edges to seal. Chill 30 minutes.
Step 5 – Bake
- Heat oven to 170°C fan (190°C conventional / 375°F).
- Brush tops with egg, sprinkle with demerara; bake 25–30 minutes until golden brown and crisp.
Step 6 – Cool and Serve
- Cool 10 minutes in the tin, then transfer to a rack. Serve warm with brandy butter or brandy cream; dust with icing sugar if you like.
Tips & FAQs
Tips
- Keep everything cold for flaky pastry; chill twice to prevent shrinkage.
- Don’t overfill—leave a small headspace to avoid leaks.
- For extra citrus, add 1–2 tsp orange juice to the filling; if mincemeat is very wet, stir in 1–2 tsp fine breadcrumbs.
- Prevent sticking by lightly greasing or using a non‑stick bun tin.
FAQs
- How long to bake mince pies?
- 25–30 minutes at 170°C fan (190°C / 375°F) until the pastry is golden and crisp.
- Can you freeze mince pies?
- Yes. Freeze unbaked, assembled pies on a tray, then bag for up to 3 months; bake from frozen at the same temperature for 28–32 minutes. Or freeze baked pies and reheat 8–10 minutes.
- Can I make mince pies ahead?
- Make pastry up to 2 days ahead; store chilled. Assembled pies can be chilled 24 hours before baking. Baked pies keep 3–4 days in an airtight tin.
- Are mince pies vegetarian?
- Use vegetarian mincemeat (made with vegetable suet) and serve with your preferred cream or dairy‑free alternative.
Serving Suggestions
- Serve warm with brandy butter, brandy cream, clotted cream or vanilla ice cream.
- Finish with a light dusting of icing sugar and a pinch of Maldon Smoked Sea Salt flakes for a sweet‑salty contrast.
- Add to festive dessert boards with clementines and chocolate truffles.
Storage & Reheating
- Room temperature: Store baked pies in an airtight tin up to 3–4 days.
- Fridge: Up to 5 days if you prefer; rewarm before serving.
- Reheat: 160°C fan (180°C / 350°F) for 6–8 minutes until just warm and crisp.
- Freeze: See FAQs; always reheat from chilled/frozen until piping hot.
Baked These Already?
Rate the recipe and share your tips in the comments. For more Christmas baking ideas, browse our festive collection.