Take your festive favourite to the next level with these irresistible pigs in blankets, glazed in sweet heat and finished with a pinch of Maldon Chilli Sea Salt flakes. Imagine smoky sausages wrapped in crisp bacon, roasted until deeply golden with crisp edges, then coated in a sticky glaze of warm honey infused with a pinch of fiery chilli sea salt…pretty delicious, right?
Always start by lining a roasting tray with parchment for easy clean-up, then roast until sizzling. While they cook, gently dissolve the chilli sea salt into the honey for a fiery-sweet drizzle that clings beautifully as you baste the sausages wrapped in bacon.
Pile these beauties high on a buffet, or make them your make-ahead hero – they freeze and reheat like a dream. Whether it’s Christmas, game day, or a casual gathering with friends and family, these pigs in blankets deliver bold flavour in every bite.
How to Make Pigs in Blankets with Hot Honey
Step 1 – Heat the Oven and Wrap
Heat oven to 180°C fan (200°C conventional / 400°F).
Wrap each chipolata with a rasher of streaky bacon; place seam‑side down on a lined roasting tray.
Tip: Use parchment for easy clean-up and to prevent sticking.
Step 2 – Roast Until Golden
Roast 25–30 minutes until the bacon is deeply golden and sausages are cooked through (juices run clear; 74°C/165°F internal).
Step 3 – Make the Hot Honey
Add honey, Aleppo pepper and Maldon Chilli Sea Salt to a small saucepan.
Warm gently, stirring until the salt dissolves and the honey smells fragrant. Remove from heat; stir in the vinegar. Cool slightly to thicken.
Step 4 – Finish and Serve
Drizzle 2–3 tbsp hot honey over the pigs in blankets. Serve the rest alongside so people can add extra heat.
Tips & FAQs
Tips
For extra crispness, elevate sausages on a rack set over the tray.
Like it hotter? Add a pinch more Maldon Chilli Sea Salt or a dash of chilli flakes.
Mild version: reduce Aleppo pepper by half and add 1 tsp smoked paprika.
Batch cooking: use two trays and rotate halfway for even browning.
FAQs
How long to cook pigs in blankets?
Roast at 180°C fan (200°C / 400°F) for 25–30 minutes until deeply golden and cooked through (74°C/165°F internal).
Can you make pigs in blankets ahead of time?
Yes. Wrap up to 24 hours ahead and refrigerate. Or freeze raw on a tray, then bag for up to 3 months; cook from frozen at 180°C fan, 30–35 minutes.
How do you reheat pigs in blankets?
Oven at 180°C fan (350–400°F) for 8–10 minutes until sizzling. Re‑drizzle with warm hot honey to refresh.
Can I air‑fry pigs in blankets?
Yes. Air fry at 190°C/375°F for 12–15 minutes, shaking once; check doneness, then drizzle with hot honey.
Serving Suggestions
Add to Christmas dinner plates, grazing boards or canapé platters.
Pair with mustard mayo, garlicky yogurt, or cranberry dip.
Garnish with finely chopped chives or parsley; finish with a pinch of Maldon Chilli Sea Salt flakes for sparkle.
Storage & Reheating
Fridge: Cool and refrigerate within 2 hours; store up to 3 days. Keep hot honey in a sealed jar up to 2 weeks.
Freeze: Raw (preferred) up to 3 months. Cooked up to 1 month.
Reheat: Oven 180°C fan (350–400°F) until piping hot (74°C/165°F). Warm the honey gently before drizzling.
Accessibility & Dietary Notes
Contains pork; not suitable for halal/kosher. Contains honey (not for infants under 1). Gluten content depends on sausages used. If vegetarian, ready-made options from brands include Beyond Meat and Quorn. If Vegan, ready-made options from brands include Richmondand Linda McCartney.
Tried this recipe?
Rate it and share your tips in the comments. For more easy Christmas canapés and sides, browse our festive collection.
Celebrate winter flavours in style with this stunning vegetable pithivier, a French-inspired centrepiece that’s as beautiful as it is delicious. It’s essentially a doomed filling of sweet caramelised onions, earthy cooked chestnuts, and vibrant winter veg – think tender butternut squash slices, jewel-toned beetroot slices and wilted spinach with grated nutmeg. All encased in buttery puff pastry lid and base, baked until golden and crisp with flaky layers.
The recipe is all about low and slow, caramelising onions in a heavy-based pot, layering in vegetables for depth and colour. Season generously with Maldon Original Sea Salt flakes for a delicious crunch. Once assembled, you can score the pastry with a lattice or spiral pattern, crush with egg wash for that irresistible shine, and bake on a preheated tray in a fan oven until the pastry in bronzed nicely.
Serve warm with a dollop of horseradish crème fraiche and a sprinkle of fresh dill for brightness. Perfect for a festive table or an elegant vegetarian main.
How to Make a Vegetable Pithivier
Equipment needed:
Heavy‑based pot, 2 large roasting trays, large frying pan or wide pot with lid, pastry brush, sharp knife for scoring, baking sheet (preferably preheated), 30 cm and 25 cm guides/plates for cutting circles, parchment
Step 1 – Caramelise the Onions
Heat 2 tbsp olive oil in a heavy‑based pot over medium‑low.
Add onions and a generous pinch of Maldon Sea Salt; cook 40–50 minutes, stirring occasionally, until deeply caramelised.
Stir in butter, caraway seeds and chestnuts; cook 5 minutes until fragrant and lightly browned. Cool.
Step 2 – Roast the Root Vegetables
Heat oven to 200°C fan (220°C conventional / 425°F).
Arrange squash on one tray, beetroot on another. Drizzle with olive oil, season with Maldon Sea Salt, and roast 30–35 minutes until tender and golden. Cool.
Step 3 – Wild and Season the Spinach
In a large pan over medium heat, add washed spinach (with residual water). Cook until just wilted and bright.
Cool, squeeze out excess liquid thoroughly, then season with grated nutmeg, black pepper and Maldon Sea Salt.
Step 4 – Cut the Pastry
Roll pastry sheets to ~2 mm thick. Cut one 25 cm circle (base) and one 30 cm circle (lid).
Step 5 – Build the Dome
Place the 25 cm base on parchment. Spread onion‑chestnut mixture inside, leaving a 2 cm border.
Layer squash, then beetroot, then spinach, shaping into a compact dome.
Step 6 – Enclose, Score and Chill
Brush border with beaten egg. Drape the 30 cm lid over the filling, smoothing to encase with no air pockets.
Seal edges firmly; trim neatly.
Lightly score from top to edge in curved lines to create the classic spiral. Chill 20 minutes while you heat oven to 180°C fan (200°C conventional / 400°F).
Step 7 – Bake and Serve
Brush all over with egg wash. Bake 40–45 minutes until deep golden and crisp.
Mix horseradish, crème fraîche, dill and black pepper. Slice and serve with the dill horseradish crème.
Texture/Doneness cues: Pastry is richly golden with defined layers; base is crisp; filling hot throughout.
Tips & FAQs
Tips:
Keep fillings cool and relatively dry to avoid a soggy base—squeeze spinach well and cool onions/veg completely.
Build a stable dome: heavier veg (onion/chestnut, squash, beetroot) beneath, drier spinach on top.
For extra shine and lift, egg‑wash twice: once before chilling and again just before baking.
Bake on a preheated tray or baking steel for a crisp bottom.
FAQs:
What is a pithiver?
A pithivier is a round, enclosed pie made with puff pastry and filled with either sweet almond cream (frangipane) or savoury ingredients. It’s signature look comes from the domed shape and decorative scoring on top, which helps the pastry rise beautifully and give it that elegant, spiral finish.
What did the pithivier originate from?
The pithivier originates from France, specifically from the town of Pithiviers in the Loiret region. The pie was a way to showcase rich fillings and buttery pastry for special occasion, which is why it’s often associated with festive or celebratory meals.
What pastry is best for a pithivier?
All‑butter puff pastry gives superior lift and flavour. Roll to ~2 mm for clean layers without blow‑outs.
How do I prevent a soggy bottom?
Cool fillings fully, squeeze spinach dry, seal edges well, and bake on a preheated tray at 180°C fan.
Can I make this ahead?
Cook onions and roast veg up to 1 day ahead. Assemble and chill the unbaked pithivier for up to 24 hours, then bake fresh.
Can I freeze a pithivier?
Yes. Freeze assembled but unbaked on a tray, then wrap. Bake from frozen at 180°C fan, adding 10–15 minutes; tent with foil if over‑browning.
How long does it take to bake?
40–45 minutes at 180°C fan (200°C / 400°F), until deep golden and piping hot.
Pair with the dill horseradish crème or a light gravy.
Finish slices with a pinch of Maldon flakes for sparkle and seasoning at the table.
Storage & Reheating
Fridge: Cool, then refrigerate slices up to 3 days.
Reheat: 170°C fan (190°C / 375°F) 12–15 minutes on a tray until hot and crisp.
Freeze: See FAQ; reheat from frozen until pastry is crisp and centre is steaming.
Made This Already?
Rate the recipe and share your tips in the comments. For more festive vegetarian mains, browse our Christmas collection.
Indulge in the ultimate festive sharing experience with this stunning baked Camembert with a cheese bread wreath – a show-stopping party centrepiece perfect for your Christmas Canape spread or grazing board. A bubbly cheese centre is surrounded by golden pull-apart rolls made from strong white bread flour, shaped into dough balls, brushed with egg wash, and seasoned with fragrant Maldon Garlic Sea Salt flakes, garlic slices, and thyme sprigs. Proved in a warm place to rise and baked to perfection, these golden rolls are ideal for dipping bread into the molten Camembert, especially when paired with chive butter, chutney, or relish.
How to Make Baked Camembert with Sharing Bread
Step 1 – Make the Dough
Add flour, yeast, Maldon Garlic Sea Salt, thyme leaves, olive oil and warm water to a stand mixer bowl.
Mix on low with a dough hook until combined, then medium for 5–7 minutes until smooth and stretchy. You know the dough is ready when it’s elastic and passes a gentle ‘windowpane’ test.
Step 2 – First Rise
Transfer to a lightly oiled bowl, cover with a tea towel and prove in a warm place for 1–1.5 hours, until doubled. The dough should feel pillowy and leave a slight indent when pressed.
Step 3 – Shape the Sharing Bread
Knock back the dough briefly. Divide into 20 balls (about 40–45g each) for even baking.
Step 4 – Arrange and Second Prove
Line a large baking sheet with parchment. Place a heatproof bowl in the centre (a few cm wider than the camembert).
Arrange dough balls around the bowl with a little space between each. Cover and prove 30 minutes, until puffed.
Step 5 – Bake the Rolls
Preheat oven to 200°C fan. Brush dough with beaten egg.
Bake 25–30 minutes until risen and golden on top and underneath. Cool slightly on the tray. The baked rolls should sound hollow when tapped on the base.
Step 6 – Bake the Camembert
Unwrap the camembert and place back in its (oven‑safe) wooden box, lid off. Score the top and insert garlic slices and thyme. You should only bake in a wooden box that states it’s oven-safe; remove all plastic/foil.
Place on a small tray and bake 10–15 minutes until the centre is melted and oozy.
Step 7 – Make the Chive Butter
Melt butter in a small pan. Stir through chives and a pinch of Maldon Garlic Sea Salt.
Step 8 – Finish and Serve
Brush warm rolls with chive butter. Set the baked camembert in the middle and serve immediately with chutney or relish for dipping.
Tips & FAQs
Tips
Keep the Camembert in the box. Bake the Camembert in it’s wooden cheese box (without the plastic wrap) to help it hold it’s shape and contain the melted cheese. Make sure that the box is marked oven-safe.
Score the top of the Camembert. Lightly score the top of the cheese and insert garlic slices and thyme sprigs for extra flavour.
Egg wash your rolls for shine. Brush the rolls with egg wash before baking to get that beautiful golden roll finish.
Season the rolls generously. Sprinkle Maldon Garlic Sea Salt flakes over the dough before baking for a punch of flavour and crunch.
FAQs
Best cheese for baked camembert? Use a 250g camembert in a wooden, oven‑safe box. Brie works, but camembert melts more evenly and has a stronger aroma.
What temperature and how long to bake camembert? Bake at 200°C fan for 10–15 minutes until the centre is soft; timing varies by brand and fridge temperature.
Can you bake camembert in the box? Yes, if it’s a wooden box marked oven‑safe. Otherwise, place the cheese in a small ovenproof dish.
Make‑ahead options? Shape the dough balls, cover and refrigerate up to 12 hours. Bring to room temp, then prove 30–45 minutes before baking. Rolls can also be baked earlier in the day and rewarmed.
Freezing the bread? Freeze baked, cooled rolls up to 1 month. Reheat from frozen at 180°C for 8–10 minutes.
How to keep the centre gooey for longer? Serve immediately, pre‑warm the serving plate, and keep the camembert on a small tray to retain heat.
Serving Suggestions
Pile onto a large board with chutney, cornichons, grapes and cured meats for a party centrepiece.
Add roasted garlic cloves, honey‑roasted nuts or a drizzle of hot honey over the camembert.
Scale up: Bake two wheels of camembert in separate boxes and double the dough for larger gatherings.
Storage & Reheating
Bread rolls: Store in an airtight container at room temperature for 1–2 days. Reheat at 180°C for 5–7 minutes until warm and crisp.
Leftover camembert: Best enjoyed fresh. If needed, cool quickly, refrigerate up to 2 days and reheat gently until molten. Always follow food safety best practice.
Have You Tried This Festive Baked Camembert with Sharing Bread?
Tell us how it went in the comments and tag your creations with #MaldonSalt. For more crowd‑pleasing party starters, browse our Christmas recipes collection.
If you’re looking for the ultimate side dish to elevate steaks, roast chicken, or even your Christmas dinner, fondant potatoes are pure luxury on a plate! Using Maris Piper potatoes (or Yukon Gold as an US alternative), these beauties are cut into thick rounds, about 1.5-inch slices, to create the perfect balances of golden crust and a creamy, fluffy centre.
The magic begins in a heavy-based pan or cast iron skillet, where butter foaming gently kisses the potatoes as you baste them to perfection. Aromatic garlic cloves, rosemary sprigs, and thyme sprigs infuse every layer with deep, savoury notes. After searing, you’ll reduce stock until it forms a rich glaze that clings to each piece like velvet.
Season generously, finishing with a pinch of smoked sea salt – Maldon Smoked Sea Salt flakes add a subtle, earthy whisper that makes this dish unforgettable.
How to Make Fondant Potatoes with Garlic, Rosemary & Thyme
Step 1 – Prep and Sear
Pat the potato rounds dry. Preheat a large heavy‑based or cast‑iron pan over medium‑high.
Add olive oil; when shimmering, arrange potatoes cut‑side down in a single layer.
Tip: Don’t crowd the pan; work in batches if needed for even crust.
Step 3 -Add Flavour and Baste
Add butter; when foaming, add crushed garlic, rosemary and thyme.
Tilt the pan and baste the potatoes for 30–60 seconds.
Step 4 – Simmer in Stock
Carefully pour in stock around the potatoes (aim for liquid to come halfway up the sides).
Cover and gently simmer 20–25 minutes until fork‑tender and the stock has reduced to a glossy, buttery glaze.
Cue: A skewer should slide in easily; edges remain intact with a creamy centre.
Step 5 – Finish and Serve
Discard woody herb stalks. Taste the glaze; finish with a pinch of Maldon Smoked Sea Salt. Serve immediately.
Tips & FAQs
Tips
Use evenly sized rounds for consistent cooking; trim ends to create flat surfaces.
If your pan is oven‑safe, you can finish covered at 200°C/180°C fan (400°F) for 15–20 minutes instead of stovetop.
Stock should reach halfway up the potatoes; increase slightly if using a wider pan.
For extra smokiness, finish with a light sprinkle of Maldon Smoked Sea Salt flakes just before serving.
FAQs
What are the best potatoes for fondant potatoes
Floury/waxy‑all‑rounders like Maris Piper or Yukon Gold hold shape yet turn creamy inside
How long do fondant potatoes take to cook?
About 30 minutes total: 8–12 minutes to brown, then 20–25 minutes to simmer until tender.
Can you make fondant potatoes ahead of time?
Yes—brown and simmer until just tender, cool in the glaze, then reheat gently with a splash of stock and a fresh knob of butter.
Can this be vegetarian or vegan?
Vegetarian: use vegetable stock.
Vegan: swap butter for plant‑based block and use vegetable stock.
Serving Suggestions
Serve alongside steak, roast chicken, lamb, or festive mains.
Spoon over pan juices; add chopped chives or parsley for freshness.
For entertaining, cut smaller 2.5 cm / 1‑inch rounds and present on a platter with extra smoked sea salt.
Storage & Reheating
Fridge: Store in an airtight container with leftover glaze for up to 3 days.
Reheat: Pan with a splash of stock over medium‑low, basting until hot; or oven at 180°C/160°C fan (350°F) covered for 10–12 minutes. Avoid microwaving to keep edges crisp.
Bring warmth and depth to your Christmas dinner with this classic side dish: tender red cabbage, gently braised low and slow in a heavy-based pot until glossy and fragrant. The secret lies in the sweet-sour balance – a splash of red wine vinegar and a touch of soft brown sugar, paired with apple slices for natural sweetness. Finish with a generous sprinkle of Maldon Original Sea Salt flakes for that perfect crunch and freshness.
This dish is a make-ahead dream – leftovers reheat gently and taste even better than next day. A vibrant, spiced companion to roast meats, it’s the side that completes the festive table.
How to Make Red Cabbage with Christmas Spices
Step 1 – Soften the Onion
Warm olive oil and half the butter in a large heavy‑based pot over medium heat.
Add onion and a pinch of Maldon Sea Salt; cook 10–15 minutes, stirring occasionally, until softened and lightly browned.
Step 2 – Bloom the Spices
Add cinnamon, grated nutmeg and ground cloves; fry 1 minute until fragrant.
Step 3 – Add Cabbage and Coat
Add sliced red cabbage; toss to coat in the spiced, buttery mixture.
Step 4 – Add Apple, Sugar and Vinegar
Stir in apples, soft brown sugar and red wine vinegar until evenly combined.
Step 5 – Braise Gentle
Reduce heat to low, cover and cook 30–40 minutes, stirring now and then, until the cabbage is tender but not mushy and the liquid has reduced to a light glaze.
Step 6 – Finish and Season
Stir in the remaining 25g butter. Taste and adjust with more sugar, vinegar or Maldon Sea Salt to balance sweet‑sour seasoning.
Tips & FAQs
Tips
Slice cabbage evenly for consistent cooking; remove the tough core.
Sweet‑sour balance: start with the listed sugar and vinegar, then adjust at the end.
To prevent bitterness, keep heat low and cook gently; add a splash of water if the pan looks dry.
Make‑ahead friendly: flavours deepen after resting.
FAQs:
How long to cook braised red cabbage?
About 1 hour total: 10–15 minutes to soften the onion, then 30–40 minutes covered on low until tender.
Can you freeze braised red cabbage?
Yes. Cool completely, pack in airtight containers and freeze up to 3 months. Thaw overnight in the fridge and reheat gently.
What apples work best?
Firm, sweet‑tart eating apples (e.g., Braeburn, Gala, Jazz) hold shape and balance acidity.
Can I make this vegan?
Absolutely—use olive oil or plant‑based butter instead of dairy butter and season with Maldon Original Sea Salt.
Serving Suggestions
Serve alongside roast turkey, ham, pork belly or goose; it cuts through rich mains.
Finish with a final pinch of Maldon flakes for sparkle, or stir in a handful of raisins for extra sweetness.
Storage & Reheating
Fridge: Cool, then refrigerate in an airtight container for 4–5 days.
Reheat: Pot over low heat with a splash of water or apple juice; stir until steaming.
Freeze: Up to 3 months; reheat from thawed for best texture.
Tried This Recipe?
Rate it and share your tips in the comments. For more festive sides and make‑ahead recipes, browse our Christmas collection.
Ed Cudlipp, also known as ‘Cud Cooks’, transforms a simple cabbage into something spectacular with this smoky, umami-rich recipe. His Charred Hispi Cabbage with Miso Butter and Maldon Smoked Sea Salt is a masterclass in balance – sweet caramelised edges, buttery richness, bright lime, and a deep, savoury hit of smoke. A perfect side for grilled meat, or a vegetarian showstopper in its own right.
Step 1 – Char the Cabbage
Heat a large frying pan over high heat and add olive oil. Place the cabbage halves cut-side down and fry hard for 4-5 minutes until deep golden and charred.
Step 2 –Roast until Tender
Transfer to a baking tray, cut-side up, and roast at 200°C for 25-30 minutes until the leaves are tender and slightly crisped at the edges.
Step 3 – Make the Miso Butter
While the cabbage roasts, combine butter, miso paste, lime juice, lime zest, and a pinch of Maldon Smoked Sea Salt. Mix until smooth.
Step 4 –Baste and Finish
Return the cabbage to the frying pan over medium heat. Add a generous spoonful of the miso butter and baste for 1-2 minutes until coated and caramelised.
Step 5 –Serve
Transfer to a serving plate. Spoon over extra miso butter, a squeeze of lime juice, and finish with a final sprinkle of Maldon Smoked Sea Salt.
Smoky, buttery, and irresistibly moreish – a perfect showcase for Maldon’s Smoked Sea Salt.
How did you find this recipe?
Tag @cud_cooks on Instagram when you make it – he’d love to see your version. Comment below how this recipe went for you in the comment’s section below!
Preheat the oven to 180C fan.
Toss the sausages, squash wedges, onion wedges, leek chunks, apples, oregano and olive oil in your largest roasting tray. Season with Maldon Sea Salt and lay the sausages on top of the vegetables.
Roast for 25 minutes then remove from the oven and add the stock to the base of the tray. Return to the oven for a further 25 minutes until the sausages are well browned and cooked through.
Meanwhile, for the mash, put the potatoes and parsnips in a large pot of cold salted water. Bring to the boil and cook for 10-15 minutes until the potatoes and parsnips fall off an inserted fork. Drain and leave to steam dry in the colander for a few minutes then return to the pot and mash with the butter. Once at your preferred consistency, stir in the sour cream and season to taste with Maldon Garlic Sea Salt and black pepper.
Scatter the chives over the mash and serve the sausages and vegetables straight from the tray.
Put the potatoes in a large pot of salted water, bring up to a boil then reduce to a lively simmer for 5 minutes. Drain and leave to steam dry in the colander.
Preheat the air fryer/oven to 190C fan.
If using the oven, drizzle the oil in your largest roasting tray and put it in the oven for 10 minutes for the oil to heat up. Once hot, carefully add the potatoes, gently toss and season with a good pinch of Maldon garlic salt. Roast for 20 minutes then then add the garlic and herbs to the tray, toss gently, and return to the oven for a further 10-15 minutes until golden and crisp.
If using the air fryer, toss the potatoes with the oil and a good pinch of Maldon Garlic Sea Salt. Tip into the bottom of the air fryer and cook for 25 minutes before adding the garlic and herbs, tossing gently, and returning to the air fryer for a further 10-20 minutes until golden and crisp.
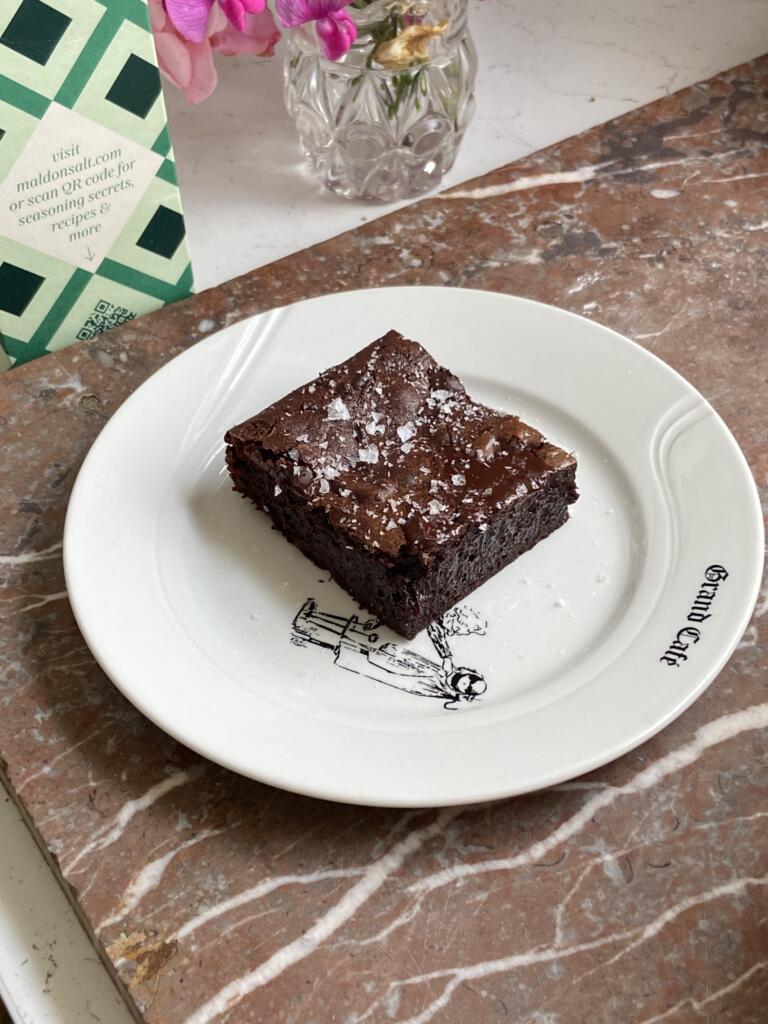
This isn’t just a brownie. It’s a love letter to chocolate.
There are brownies – and then there are Caitlin Carrick-Varty brownies…Known to her loyal followers as @cake.onmyface, Caitlin doesn’t just bake; she creates flavour sensations. Her Chocolate Brownies with Maldon Sea Salt are a masterclass in contrasts: they look like the picture of classic fudgy indulgence, they smell like pure cocoa bliss, yet the moment they touch your tongue, they melt in your mouth – like a decadent chocolate mousse.
Making them is as delicious as eating them: silky pools of melted chocolate folding into sugar, eggs and butter in slow, glossy swirls; batter pouring into the tin; a final, confident sprinkling of Maldon Sea Salt flakes over the top. The sea salt flakes strikes first – bright and sharp against the rich bitterness – before melting into a sweetness that lingers. Caitlin likes hers dark, leaning into that bittersweet edge, but if your heart beats for milder chocolate, you can swap 80g of the dark chocolate for milk. Whatever you do, don’t skip the Maldon Sea Salt flakes. It’s the soul of this brownie.
How to make Chocolate Brownies with Maldon Sea Salt
Caitlin Carrick-Varty, @cake.onmyface
Grease and line a 19cm / 7.5-inch square tin. Preheat the oven to 180/160 fan.
Roughly chop the extra 20g dark chocolate, if you are using, then set aside.
Chop the (180g) chocolate and butter roughly into chunks, then place in a large glass or metal bowl. Fill a small saucepan with a little water. Set the bowl of chocolate over the saucepan, making sure the bottom of the bowl does not come into direct contact with the water when it rests over the pan. Heat the pan on low/medium, stirring the chocolate mixture occasionally, to help it melt.
Meanwhile, whisk the sugar, eggs, Maldon Sea Salt flakes, and vanilla in a large bowl. When the egg mixture is a bit frothy and lighter in colour, pour in the melted chocolate and butter – whisk just until you feel the glossy mixture become thicker.
Now sift the flour and cocoa powder into the eggs and chocolate. Whisk until you feel the batter become thicker again, then immediately pour the batter into the prepared tin. Top with the reserved chopped chocolate and a generous pinch of Maldon Sea Salt flakes. Bake for 20 minutes, or until the top of the brownies are set but there is a wobble underneath.
Allow to cool in the fridge before slicing. If you can wait, these brownies do well left in the fridge covered tightly with clingfilm overnight.
Heat 3 tbsp olive oil in a large, heavy based pot. Once hot, add the minced beef and season with Maldon Original Sea Salt and pepper. Fry over a medium-high for about 10 minutes, breaking up the meat with your wooden spoon until well browned. You don’t want the pot to be too crowded otherwise the meat will steam rather than brown, so work in two batches if needed.
Scoop the meat out of the pot into a bowl and set aside. Add another 3 tbsp olive oil to the pot, along with the onions, peppers and garlic. Season with Maldon salt and pepper and cook gently over a medium low heat for about 15 minutes, stirring every so often, until soft.
Add the meat back into the pot, along with the tomatoes. Fill each tin halfway with water, swill it around to get every last bit of tomato, then add the liquid to the pot. Bring up to a simmer then leave to blip away for 45 minutes, stirring every so often to ensure it’s not sticking on the bottom of the pot, until thickened and reduced. Stir through the oregano and basil, then taste for seasoning.
Bring a large pot of salted water to the boil and cook the lasagne sheets in a few batches for just 2 minutes until no longer rigid but still very al dente, then transfer to an oiled baking tray. Drizzle the sheets with a little olive oil so they don’t stick to one another.
Preheat the oven to 180C fan.
To assemble the lasagne, spoon a couple of ladles of the meat sauce into a large, rectangular baking dish (about 30cm by 20cm). Cover with lasagne sheets then add a single layer of courgette slices. Season the courgettes with a small pinch of Maldon Original Sea Salt and pepper. Dot with roughly a third of the torn mozzarella, grate over roughly a third of the parmesan, and drizzle over roughly a third of the double cream. Repeat this layering process (meat sauce, lasagne sheets, courgette slices, seasoning, cheeses and cream) twice more. Drizzle the top with a little olive oil and cover the dish with foil. Put the dish on a baking tray (this will catch any spill over while baking).
Bake for 20 minutes then remove the foil and bake a further 20 minutes until golden and bubbling. Leave to stand for 20-30 minutes before serving (this allows the layers to settle and makes it easier to slice).