A showstopping plate that comes together in minutes. These chilli, lime and feta watermelon wedges char sweet, juicy watermelon on the griddle, then top it with salty feta, fresh chilli, zesty lime and cooling mint – all finished with a flake of Maldon Chilli Sea Salt. Sweet, salty, smoky and fresh all at once, it’s the easiest way to bring a wow factor to a summer BBQ or picnic spread.
Why You’ll Love These Watermelon Wedges
Sweet Meets Salty: Charred watermelon, salty feta and a flake of Maldon Chilli Sea Salt create an irresistible sweet-salty balance.
Ready in Minutes: Just 10 minutes of prep and a quick char on the griddle or BBQ – no cooking skills required.
A Real Crowd-Pleaser: Vibrant, colourful and served as easy-to-grab wedges, it’s made for sharing outdoors.
How to Make Watermelon Wedges (Step-by-Step)
Char the watermelon: Place the watermelon wedges onto a hot griddle pan or BBQ. Char for a few minutes on each side until you have clear grill marks and a lightly smoky edge – this concentrates the sweetness and adds a subtle smokiness.
Arrange and top: Arrange the charred wedges across a large platter, then scatter over the diced chilli, crumbled feta and lime zest.
Season and finish: Finish with a generous pinch of Maldon Chilli Sea Salt and the picked mint leaves. Add the lime wedges to the platter to squeeze over just before eating.
Tips for the Perfect Watermelon Wedges
Get the griddle hot: A properly hot griddle or BBQ gives clean char marks quickly, without turning the watermelon mushy.
Pat the wedges dry: Blot the cut surfaces before grilling so they char rather than steam.
Balance the heat: Maldon Chilli Sea Salt brings gentle warmth, so go easy on the fresh chilli if you’re serving a crowd.
Char the watermelon a few hours ahead and keep it chilled, then add the feta, chilli, mint and Maldon Chilli Sea Salt just before serving so nothing goes soggy.
What if I don’t have a BBQ or griddle?
A hot, dry frying pan works just as well for charring, or you can skip the char altogether for a fresh, no-cook version.
How do I pick a ripe watermelon?
Look for one that feels heavy for its size with a creamy-yellow patch where it sat in the field – a sign it ripened on the vine.
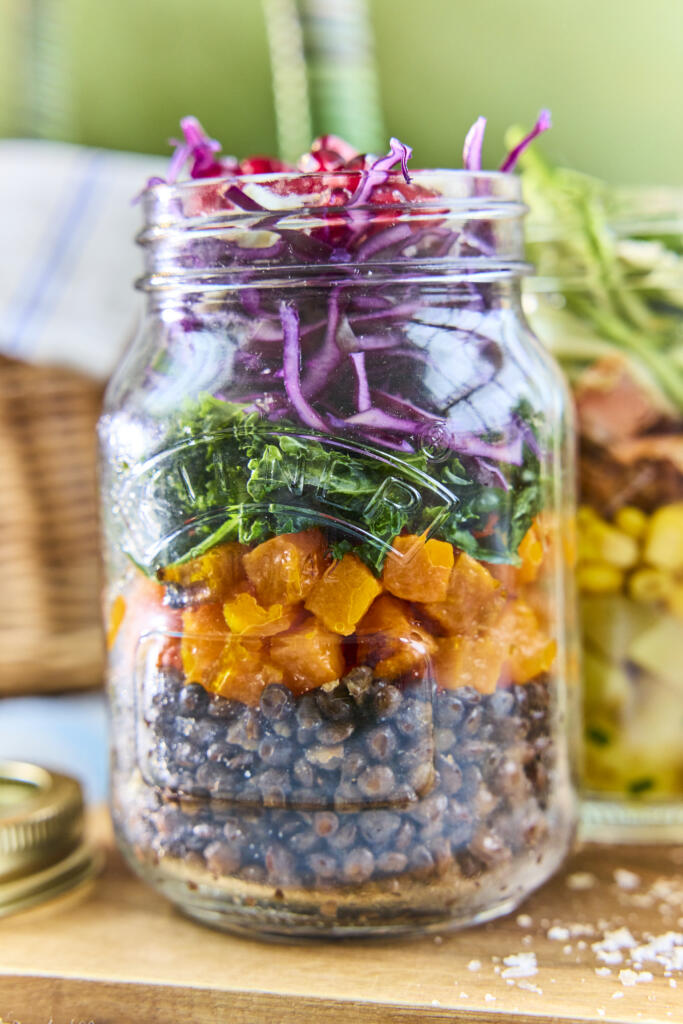
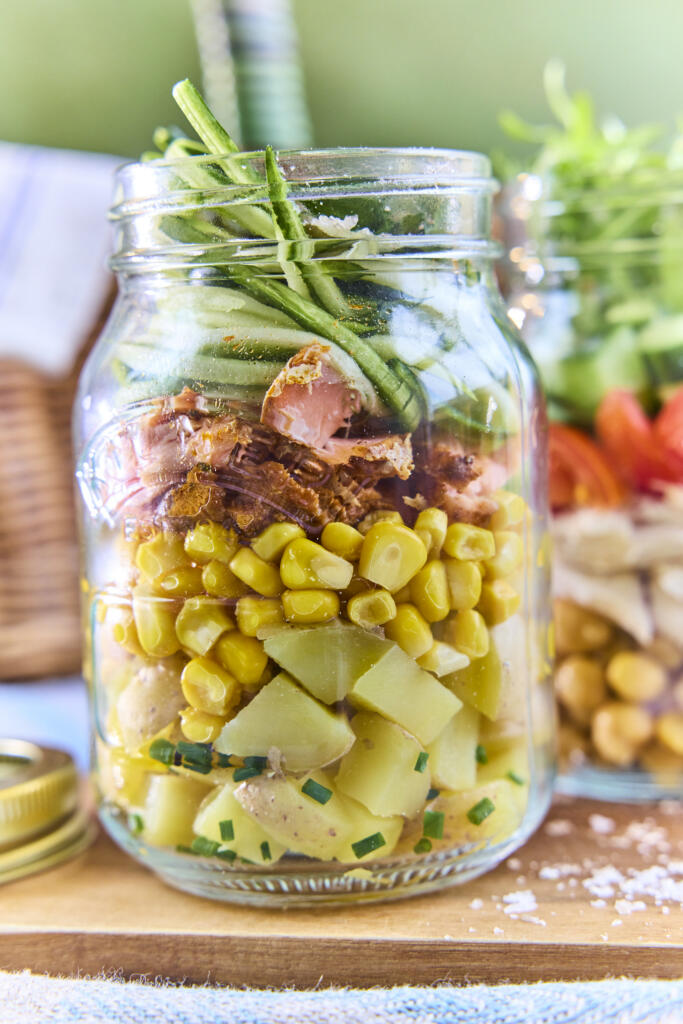
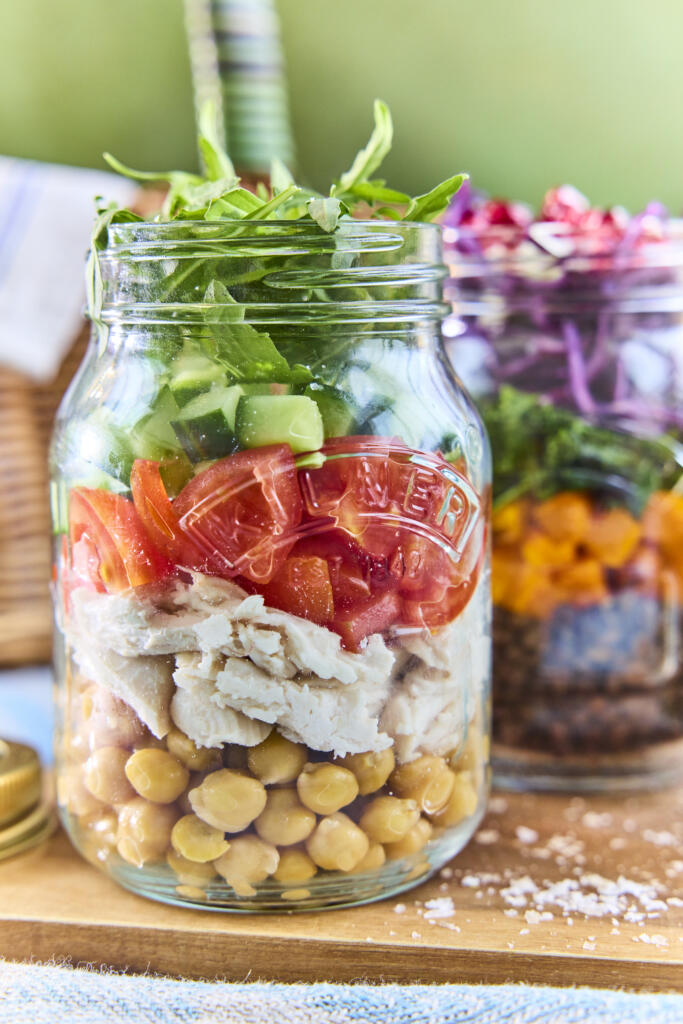
One simple method, three vibrant salads and a single versatile dressing that ties them all together. These layered summer salads – chicken and chickpea, lentil and butternut squash, and salmon and new potato – are built to be made ahead, so they’re ideal for picnics, lunchboxes and easy meal prep. A Maldon Smoked Sea Salt dressing brings the whole trio to life.
Why You’ll Love These Layered Summer Salads
Three Salads, One Dressing: Mix and match all week – every salad is dressed with the same quick, smoky Maldon vinaigrette.
Genuinely Make-Ahead: Layered in jars with the dressing kept separate, these stay crisp and fresh in the fridge for days.
Effortlessly Portable: Jars travel beautifully, making these the ultimate grab-and-go picnic or desk lunch.
How to Make Layered Summer Salads (Step-by-Step)
Prep each salad’s components: Roast the butternut squash and cook the lentils for the lentil salad; boil and cool the new potatoes for the salmon salad. Massage the kale with a pinch of Maldon Smoked Sea Salt flakes to soften it. Everything can be batch-prepped ahead to make assembly quick.
Layer up each salad: For each salad, layer the elements into a jar or container in the order they’re listed. Heavier, sturdier ingredients go at the bottom, with delicate leaves and herbs on top – keeping them away from the dressing is what keeps everything fresh.
Make the versatile dressing: Add all the dressing ingredients to a jar, screw the lid on tightly and shake well until thickened and emulsified. The Maldon Smoked Sea Salt gives a subtle depth that works across all three salads.
Store or take on the go: Keep the layered salads in the fridge or pack them up for a picnic, with the dressing in a separate jar until serving.
Dress and serve: Just before eating, drizzle over some dressing, add the lid and shake again to coat. Tip out onto a plate or eat straight from the jar.
Tips for the Perfect Layered Summer Salads
Layer in the right order: Build from sturdy to delicate so leaves and herbs never sit in the dressing until you’re ready to eat.
Dress at the last minute: Keep the dressing in its own jar and shake it through just before serving to keep everything crisp.
Batch the dressing: The Maldon Smoked Sea Salt dressing keeps for up to a week in the fridge – make double for the week ahead.
Layered salads keep well in sealed jars in the fridge for up to 3 days, as long as the dressing is kept separate and added only when you’re ready to eat.
Why layer the salad in a jar?
Layering keeps the heavier, wetter ingredients at the bottom and the leaves on top, so nothing wilts. Jars also travel upright without spilling – ideal for picnics and packed lunches.
Can I make these vegetarian or vegan?
Easily. Skip the chicken, salmon, parmesan and feta, or swap in extra roasted veg, beans and seeds. The dressing is naturally vegetarian – use maple syrup in place of honey to make it vegan.
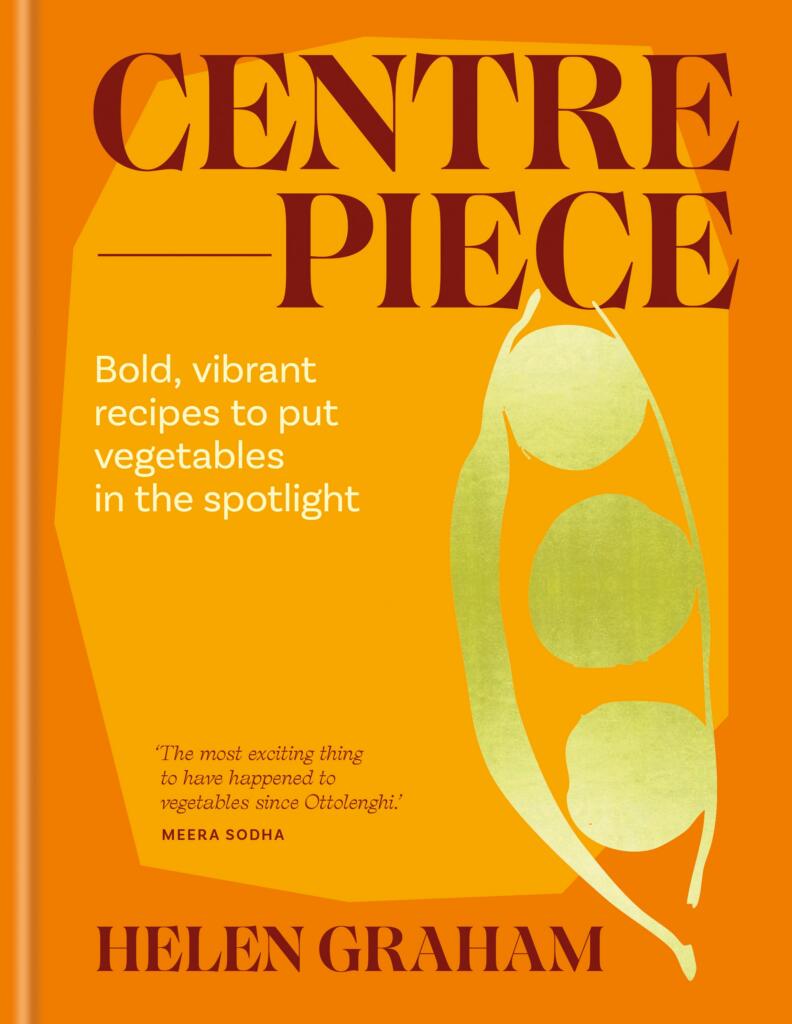
Centrepiece by Helen Graham
Helen Graham. Captured by Yuki Sugiura
Vegetables take their well-deserved moment in the spotlight in Centrepiece, the beautiful debut cookbook from chef and food writer Helen Graham. Known for her bold, generous flavours and deeply considered approach to plant-forward cooking, Graham celebrates vegetables not as an afterthought, but as the heart of the table. Drawing inspiration from the Middle East, North Africa, and her Ashkenazi Jewish heritage, Centrepiece is a vibrant collection of recipes designed to be cooked, shared and lingered over – dishes that feel just as fitting for a dinner party as a relaxed weekend meal at home.
In this feature, we’re diving into one of the book’s standout recipes: Pilpil-style Roast Cabbage with Shiitake and Preserved Lemon. It’s a dish that perfectly captures the spirit of Centrepiece. – humble ingredients transformed through thoughtful technique and fearless seasoning. Roasted until deeply caramelised, the cabbage is paired with savoury mushrooms, sharp preserved lemon and a spicy pilpil-inspired oil that brings warmth and depth to every bite. It’s a simple yet striking, and a brilliant example of how Graham elevates everyday vegetables into something truly special.
Why Maldon Salt is important in pilpil-style dishes
Pilpil-style cooking (inspired by Basque methods) is all about emulsification, heat and purity of ingredients. Maldon Sea Salt isn’t just seasoning here – it’s structure.
Draws out moisture – Maldon Sea Salt helps pull excess water from the cabbage and mushrooms as they roast. This encourages deep caramelised, intensifying sweetness in the cabbage and umami in the shiitake rather than steaming them.
Balances bold elements – Preserved lemon is intensely salty and citrusy; chilli oil brings heat. A good pinch of Maldon Sea Salt lets you season precisely, so those assertive flavours stay bright and balanced, not muddled or flat.
Supports emulsification – In pilpil-style oils, Maldon Sea Salt helps stabilise the emulsion between oil, vegetable juices, and aromatics – giving you that glossy, clinging finish instead of a split or greasy sauce.
How to make Pilpil-style Roast Cabbage with Shiitake & Preserved Lemon
The word pilpil actually refers to a Basque sauce for fish in which oil and garlic come together with the cooking juices, emulsifying into a thick sauce. The sauce is named pilpil after the way it sputters in the pan. This is my homage to that sauce, with the addition of persevered lemon.
Preheat the oven to 180c, Gas Mark 6.
Line a baking tray with nonstock baking paper.
Place all the ingredients for the shiitake marinade in a bowl and whisk until thoroughly combined; it will form a stiff paste.
Cut the cabbages in half through the cores and place on the lined tray. Spoon one-quarter of the marinade on the cut side of each cabbage and use the back of the spoon to press it into all the crevices, ensuring the cut side is evenly covered. If any areas look a little dry, give them a drizzle of olive oil. Toast for 30-35 minutes until the marinade is starting to look caramelised and you can slide a knife easily through the cores.
Meanwhile, for the sauce, place all the ingredients except the oil in a jug and use a stick blender to blitz it into a fine, paste. With the blender still on, slowly add the olive oil, a trickle at a time, until it’s all combined and you have a thickened, pale yellow sauce.
Make the spiced parsley by stirring all the ingredients together in a small bowl.
Smooth the pilpil sauce on to a serving dish, top with the warm cabbage halves sprinkled over the spiced parsley to serve.
Have You Tried it?
Centrepiece, debut cookbook by Helen Graham
If you try this recipe at home, we’d love to see it – tag us in your creations so we can share your wonderful cooking with our community. And if you’re feeling inspired to whip up delicious recipes in your kitchen, you can purchase Centrepiece by Helen Graham here.
Cabbage has become one of the biggest trends in modern cooking – loved for it’s affordability, versatility, and incredible ability to transform under high heat. When roasted, Savoy cabbage turns golden at the edges, rich and buttery at the core, and the perfect canvas for bold flavours. It’s no surprise that cabbage steak recipes are trending across Instagram and TikTok as cooks rediscover this once-humble vegetable.
Why are cabbages becoming popular again in food?
Cabbage is experiencing a major comeback as one of the biggest food trends of 2026, and there are several reasons for it’s rise in popularity.
It’s highly budget-friendly – Food prices have pushed home cooks towards ingredients that are affordable, versatile, and yield a lot per purchase. Cabbage fits this perfectly, making it a hero for cost-conscious cooing.
It’s an incredibly versatile ingredient – Chefs and creators highlight that cabbage can be roasted, sautéed, braised, fermented, grilled or served raw, making it one of the most adaptable vegetables available.
Social media trends are boosting it’s appeal – Pinterest Predicts and TikTok have reported major strikes in searches for cabbage dishes – from cabbage dumplings to fermented cabbage. Home cooks are incredibly inspired by visually striking cabbage steaks and charred wedges.
It offers strong nutritional benefits – Cabbage is a nutrient-dense cruciferous vegetable rich in vitamin C, folate, and potassium. It also has anti-inflammatory and gut-supportive properties, making it a go-to ingredient for health-focused cooks.
‘Simple Ingredients Done Well’ trend = Food analysts say the cabbage trend reflects a cultural shift toward everyday ingredients that deliver comfort, flavour, and a sense of home.
How to Cook Cabbage Steaks?
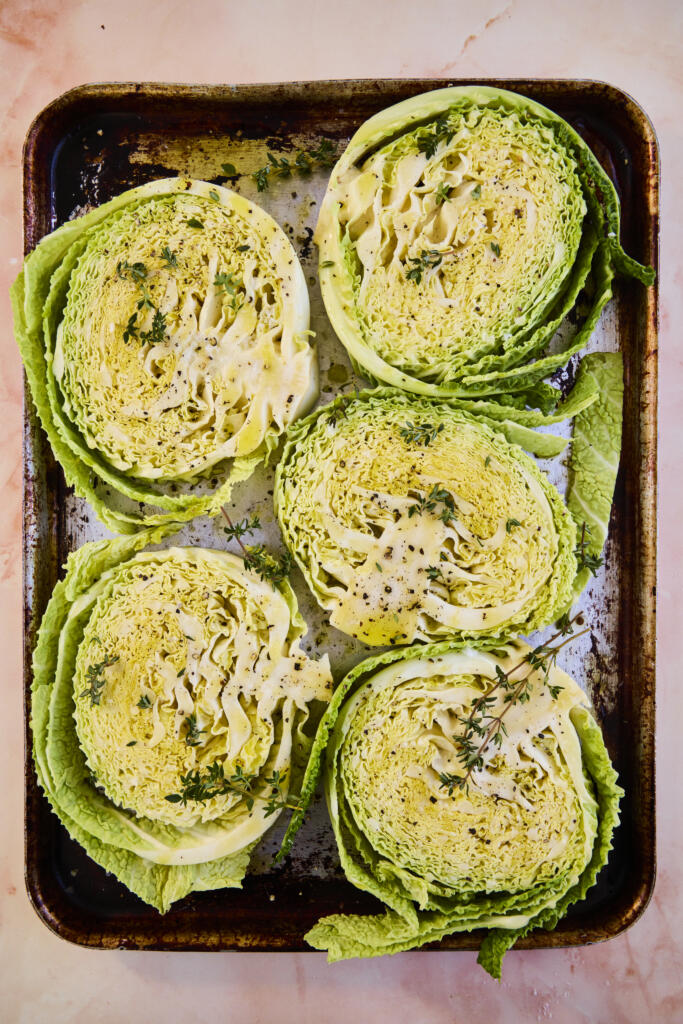
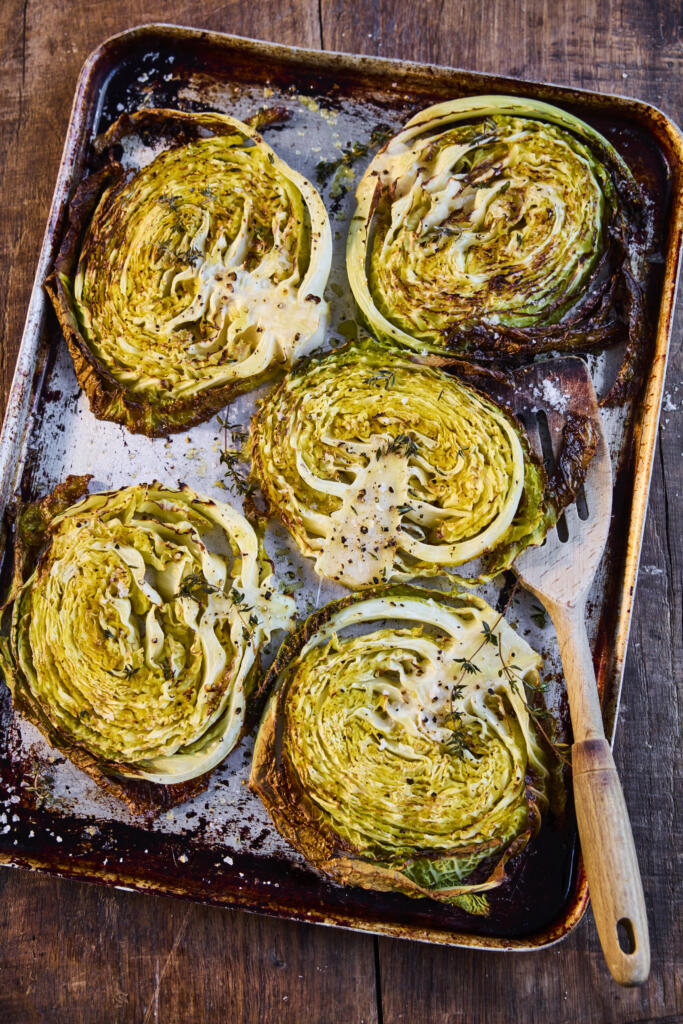
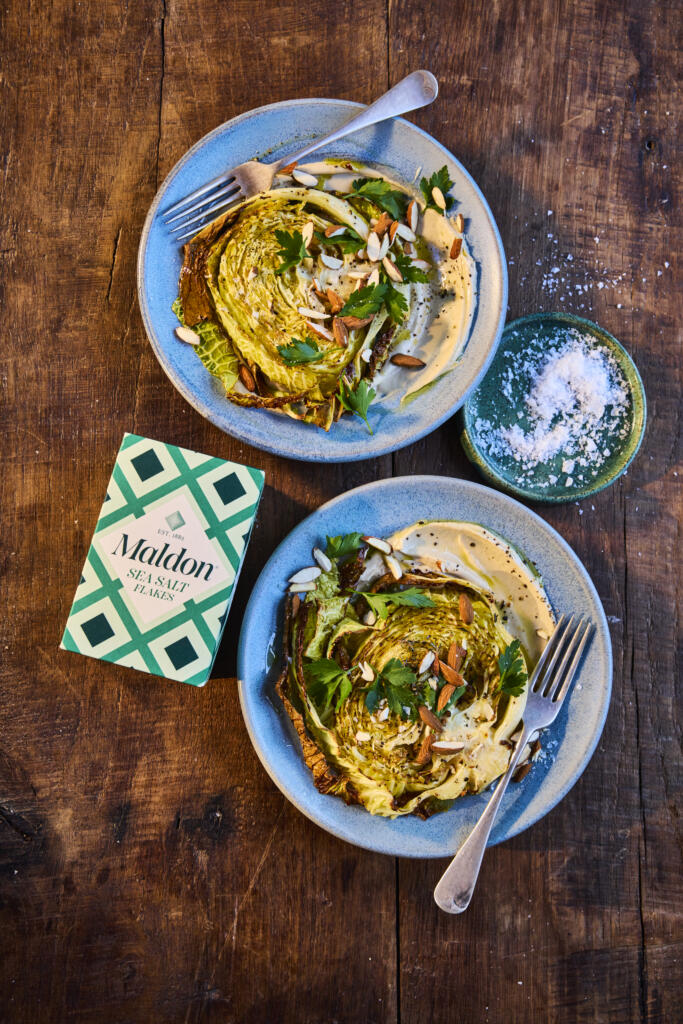
Raw Savoy cabbage steaks on a trayClose-up of the roasted edges + Maldon Sea Salt flakesFinal plated dish with tahini drizzle and toppings
This recipe brings together deeply caramelised roasted cabbage, a silky tahini sauce, and the clean, crisp finish of Maldon Original Sea Salt flakes. Topped with almonds and parsley, it’s a modern, plant-forward dish that punches fat above it’s simplicity.
Perfect as a side, centrepiece, or a hearty weeknight vegan dish – and ideal for sharing on Instagram thanks to those charred, crinkled Savoy leaves.
1. Prepare the cabbage steaks
Preheat the oven to 180c.
Take each savoy cabbage and slice into 1inch (roughly 2cm) ‘steaks’ to make 4 individual cabbage steaks. Discard the smaller pieces of cabbage from the ends – this can be used in another dish.
2. Roast until golden
Place the 4 cabbage steaks onto a baking tray and drizzle with the olive oil, some Maldon Original Sea Salt and cracked black pepper. Add some sprigs of thyme to the tray and then place into the preheated oven to roast for 25 minutes.
3. Make the tahini sauce
To make the tahini sauce, add the tahini to a mixing bowl along with the olive oil, lemon juice and Maldon Original Sea Salt flakes and pepper. It will be very thick so gradually add the water until it reaches a thick creamy consistency – you can add more water if you want it to be looser.
4. Plate and finish
To serve, place some of the creamy tahini sauce onto a place and then top with a roasted cabbage steak.
Garnish with some roasted chopped almonds and some parsley.
What to serve with cabbage steaks
A gain base: quinoa, bulgur, couscous, or wild race
Savoy cabbage works beautifully because it’s crinkled leaves roast into crisp, caramelised layers with soft centres. You can also use a classic green cabbage for a more neutral flavour. For a more vibrant, festive colour, you can use a red cabbage, but it may take slightly longer to cook and has a firmer texture.
Why are my cabbage steaks not crispy?
Make sure the steaks are well coated in oil and have space on the roasting tray – overcrowding causes steaming, not browning. More steam being produced means the cabbage is getting wet and will not get crispy.
Can I make cabbage steaks ahead of time?
You can part-roast cabbage steaks and finish just before serving. Add the tahini sauce and additional garnishes only at the end.
How do I store leftovers?
Store in an airtight container for up to 2 days. Reheat in the oven to restore crispness.
Can I make this recipe vegan and gluten-free?
This cabbage steaks recipe is naturally vegan and gluten-free – just make sure the topping (like nuts) are suitable for your guests.
How thick should I cut cabbage steaks?
We recommend cutting your cabbage steaks 2-3cm in thickness. This ensures a nice crispy edge and tender centres.
Make It, Taste It, Love It!
We’d love to see how you cabbage steaks turned out. Share your creation and tag us on Instagram at @maldonsalt so we can celebrate your seasoning mastery.
Originating from the French city of Lyon, this classic side dish transforms humble ingredients into a restaurant-quality centrepiece. Lyonnaise potatoes are the perfect marriage of textures and flavours: waxy potato slices pan-fried in butter and olive oil until golden and crisp, tossed together with deeply caramelised, sweet white onions. To elevate this traditional recipe, we finish the pan with a generous pinch of Maldon Garlic Sea Salt flakes, perfectly complementing the sweet onions and rich butter with a burst of savoury, roasted garlic flavour.
Why You’ll Love This Lyonnaise Potatoes Recipe
The Perfect Texture: Parboiling the potatoes first ensures they are beautifully tender on the inside, while frying them in batches guarantees a golden, crispy exterior.
Incredible Flavor: Slowly caramelising the onions in the leftover potato cooking oils creates a sweet, savory depth that coats every single bite.
Elevated Simplicity: It requires only a few basic pantry staples to create an impressive, classic French dish that pairs perfectly with almost any main course.
How to Make Lyonnaise Potatoes (Step-by-Step)
Step 1 – Parboil the potatoes
Start by slicing the waxy potatoes into 2cm thick slices, discarding the very small, uneven ends.
Place the slices into a pot of cold water and bring to the boil. Let the potatoes boil for just 2 minutes—you want them to start becoming tender but remain uncooked and firm in the middle. This crucial step ensures they won’t break down and turn to mash when sautéed later.
Step 2 – Dry and fry in batches
Drain the potatoes well and allow them to sit for a few minutes to ensure they are fully dry. In a large frying pan, add half of the butter and olive oil.
Once hot, begin frying the potato slices in batches to ensure they all get nice and golden crisp on each side.
Remove the slices from the pan as they finish cooking.
Step 3 – Caramelise the onions
Once all the potato slices are fried and set aside, add the remaining butter and olive oil to the pan.
Toss in the finely sliced white onions along with the Maldon Garlic Sea Salt flakes. Fry over medium heat for about 8 minutes until the onions are soft, golden, and beautifully caramelised.
Step 4 – Combine and serve
Finally, add the golden potatoes back to the pan with the onions to warm them through. Season with cracked black pepper.
Transfer the Lyonnaise potatoes to a serving dish and garnish with an extra sprinkle of Maldon Garlic Sea Salt flakes and the freshly chopped parsley.
Tips for the Perfect Potatoes a la Lyonnaise
Use Waxy Potatoes: It is vital to use waxy potatoes (like new potatoes, Charlotte, or Yukon Gold) rather than floury baking potatoes. Waxy potatoes hold their shape when boiled and fried; floury ones will disintegrate in the pan.
Dry Thoroughly: Moisture is the enemy of a crispy crust. After draining your parboiled potatoes, let them steam dry completely before they hit the hot fat.
Don’t Rush the Onions: The magic of a true recipe for potatoes Lyonnaise comes from the sweet, jammy onions. Take your time during the 8-minute frying stage to ensure they caramelise properly without burning.
This rich, buttery side dish is incredibly robust and pairs beautifully with classic, protein-heavy mains. It is the ultimate side dish for a perfectly seared steak, a roasted rack of lamb, or crispy-skinned roast chicken.
Frequently Asked Questions
What are Lyonnaise potatoes?
Lyonnaise potatoes (or pommes de terre à la lyonnaise) is a traditional French dish originating from the city of Lyon. It consists of sliced, pan-fried potatoes mixed with thinly sliced, butter-caramelised onions, typically finished with fresh parsley.
Do I have to peel the potatoes first?
This comes down to personal preference. Traditionally, the potatoes are peeled. However, if you are using thin-skinned new potatoes, you can absolutely leave the skins on for extra texture and rusticity.
Can I make Lyonnaise potatoes ahead of time?
While they are best served fresh and crispy straight from the frying pan, you can do the prep work ahead of time. You can parboil the potatoes and slice the onions hours in advance, leaving only the frying and caramelising for right before dinner.
Wild garlic season brings one of the most anticipated flavours of the year—vibrant, aromatic, and beautifully green. When blended into creamy, high-quality softened butter, it creates an irresistible condiment that elevates everything it touches. Learning how to make wild garlic butter is incredibly simple, taking only 5 minutes and a quick blitz in a food processor. To truly bring out the punchy, earthy flavours of the foraged leaves, we season this compound butter with our signature Maldon Garlic Sea Salt flakes, adding the perfect savoury crunch and an extra layer of roasted garlic depth.
Why You’ll Love This Wild Garlic Butter Recipe
Lightning Fast: With zero cooking required, this impressive, vibrant green butter comes together in just 5 minutes of prep time.
The Ultimate Flavour Enhancer: It is incredibly versatile. Melt it over a hot steak, stir it through freshly cooked pasta, or simply spread it thickly onto warm sourdough.
Preserve the Season: Wild garlic has a notoriously short season. Making a batch of this compound butter and rolling it into a log allows you to freeze it and enjoy the taste of spring all year round.
How to Make Wild Garlic Butter (Step-by-Step)
Step 1 – Blitz the garlic and salt
Start by placing the thoroughly washed and dried wild garlic leaves and the Maldon Garlic Sea Salt flakes into a food processor. Pulse the machine a few times to break up the wild garlic until it is very finely chopped.
Step 2 – Add the butter
Add the room-temperature, softened butter to the food processor. Pulse again until the finely chopped wild garlic is evenly dispersed throughout the butter, turning the entire mixture a stunning, vibrant green colour.
Step 3 – Shape the butter
Place a large, rectangular piece of baking parchment onto your kitchen surface. Spoon the bright green butter directly into the centre of the paper.
Step 4 – Roll and chill
Fold the parchment paper over the butter and roll it to shape the mixture into a neat, tight sausage shape. Twist the ends of the parchment paper tightly to seal it (like a Christmas cracker). You can either serve the butter immediately while soft, or place it into the fridge for 1 hour to firm up into a sliceable log.
Tips for the Perfect Compound Butter
Use Softened Butter: This is the most important step! If your butter is straight from the fridge and too cold, it will not blend smoothly with the wild garlic, leaving you with unpleasant, chunky lumps. Leave the butter out on the counter for a few hours before starting.
Dry the Leaves Thoroughly: If you have washed your foraged wild garlic, ensure every drop of water is dried off (using a salad spinner or kitchen towel) before adding it to the food processor. Excess water will cause the butter to split.
Don’t Over-Process: Pulse the butter just until it turns green and is combined. If you leave the food processor running on high for too long, the friction will melt the butter completely.
What to Serve with Wild Garlic Butter
The simplest and often best way to enjoy this is sliced thickly and smeared over a warm, crusty sourdough baguette. However, it also makes an incredible “melt” for hot food. Try placing a disc of chilled wild garlic butter on top of a resting steak, stirring a spoonful into a pan of sautéed mushrooms, or tossing it through freshly boiled new potatoes.
Frequently Asked Questions
How to make garlic butter wild wild garlic without a food processor?
If you don’t have a food processor, you can easily make butter by hand. Simply use a sharp knife to mince the wild garlic leaves as finely as humanly possible. Add the minced leaves and the Maldon Garlic Sea Salt to a mixing bowl with your softened butter and beat vigorously with a wooden spoon until fully incorporated.
Can you freeze wild garlic butter?
Yes, you can absolutely freeze wild garlic butter! Freezing is the best way to extend the short wild garlic season. Keep the butter wrapped tightly in its parchment paper sausage, place it in an airtight freezer bag, and freeze for up to 3 months. You can slice off individual discs straight from frozen whenever you need them.
Where can I find wild garlic?
Wild garlic typically grows in damp, ancient woodlands across the UK from late winter until the end of spring. If you aren’t keen on foraging, you can often find bunches of it at local farmers’ markets or premium greengrocers during the peak season (March to May).
When you need an elegant, restaurant-quality vegetable side dish but are short on time, this sauteed asparagus with mushrooms is the perfect solution. Earthy, wild mushrooms meet vibrant, tender-crisp asparagus in a hot pan, soaking up rich olive oil and aromatic crushed garlic. The entire dish comes together in under 15 minutes from prep to plate. The secret to elevating this simple pan-fry? A generous pinch of Maldon Smoked Sea Salt flakes tossed through right at the end to enhance the savoury, umami flavours of the mushrooms.
Why You’ll Love This Sautéed Asparagus Recipe
Lightning Fast: With just 5 minutes of prep and 10 minutes in the pan, this is the ultimate speedy side dish for busy weeknights or stress-free dinner parties.
Incredible Texture: Pan-frying the mushrooms on a high heat gives them a beautiful, golden-crisp edge, while the asparagus stays perfectly vibrant and tender-crisp.
Earthy & Smoky: Using a blend of wild mushrooms (like shiitake or chanterelle) paired with our signature smoked sea salt creates a deep, complex flavour profile that punches far above its simple ingredients.
How to Make Sauteed Asparagus with Mushrooms (Step-byStep)
Step 1 – Prepare the vegetables
Start by preparing your asparagus. Remove the tough, woody ends from the spears, then cut the remaining tender stems in half to create two shorter pieces per spear. Next, take your mixed mushrooms and brush them clean. Keep any smaller mushrooms whole, but cut larger varieties in half so everything cooks at the same rate.
Step 2 – Fry the mushrooms
Heat the olive oil in a large frying pan over a high heat. Add the prepared mushrooms and fry until they soften, release their moisture, and develop a nicely golden, crisp exterior.
Step 3 – Add the asparagus and garlic
Once the mushrooms are golden, toss the prepared asparagus pieces into the hot pan. Sauté the asparagus in the olive oil alongside the mushrooms for a couple of minutes until they turn bright green.
Step 4 – Finish and season
Add the crushed garlic cloves to the pan. Fry for another minute or so until the garlic becomes beautifully fragrant and the asparagus is perfectly tender. The whole cooking process should take 10 minutes or less. Remove the pan from the heat, season generously with Maldon Smoked Sea Salt flakes, and serve immediately.
Tips for the Perfect Pan-Fried Vegetables
Brush, Don’t Wash: Mushrooms are like sponges. If you rinse them under water, they will absorb it and steam in the pan rather than getting crispy. Always use a dry pastry brush or a damp piece of kitchen paper to gently brush away any dirt.
Keep the Heat High: To get that lovely golden-brown sear on the mushrooms without overcooking the asparagus, make sure your frying pan and olive oil are nice and hot before you start.
Add Garlic Last: Crushed garlic burns very quickly over high heat, turning bitter. By adding the garlic during the final minute of cooking, you infuse the dish with its fragrant flavour without risking a burnt taste.
What to Serve with Sautéed Asparagus
This garlicky, earthy side dish is incredibly versatile. It is a classic pairing for a pan-seared steak, a juicy roast chicken breast, or a thick-cut pork chop. For a vegetarian option, try serving these savoury vegetables stirred through a creamy Parmesan risotto or simply tossed with fresh pasta and an extra drizzle of good quality olive oil.
Frequently Asked Questions
Can I use butter instead of olive oil
Yes, you can absolutely use butter instead of olive oil! While our recipe calls for asparagus sautéed in olive oil for a lighter, Mediterranean finish, you can absolutely substitute it with butter. Butter will add a rich, nutty flavour that pairs beautifully with the mushrooms.
How do I know where to trim the asparagus
The easiest way to find where the tough, woody end stops and the tender stem begins is to take one spear of asparagus and gently bend it near the bottom. It will naturally snap at the exact point where it becomes tender. You can use that snapped piece as a length guide to slice the rest of your bunch with a knife.
Can I use standard button mushrooms?
You certainly can use button mushrooms instead of mixed mushrooms. However, we highly recommend using a “mixed wild” pack (containing varieties like shiitake, oyster, or chanterelle) if you can find them. They offer a much meatier texture and a deeper, more complex flavour than standard white button mushrooms.
If you have never tried cooking radishes before, you are in for a treat. While raw radishes are famous for their sharp, peppery bite, learning how to roast radishes completely transforms them. The oven mellows their heat, turning them incredibly sweet, tender, and juicy. Paired with earthy, vibrant baby rainbow carrots and a drizzle of honey, this dish is the ultimate celebration of seasonal root vegetables. We finish the whole tray with a generous pinch of Maldon Pepper Sea Salt flakes to perfectly balance the natural sweetness with a subtle, savoury, peppered flavour.
Why You’ll Love This Roasted Radishes and Rainbow Carrots Recipe
A Transformation of Flavor: Roasting radishes is a revelation, swapping their raw spice for a mellow, turnip-like sweetness that pairs flawlessly with caramelised carrots.
Visually Stunning: The mix of vibrant pinks, purples, oranges, and yellows makes this a beautiful side dish that will elevate any dinner table or Sunday roast.
Minimal Prep: With only 5 minutes of prep work required, you simply toss the vegetables on a tray and let the oven do the hard work.
How to Make Roasted Radishes and Rainbow Carrots (Step-by-Step)
Step 1 – Preheat the oven
Preheat your oven to 180°C.
Step 2 – Prepare the vegetables
Lightly scrub the rainbow carrots to remove any dirt and place them whole onto a large baking tray. Take your mixed radishes and keep the smaller ones whole, while halving any larger ones so everything cooks evenly. Add them to the tray.
Step 3 – Prepare the garlic
Cut the whole garlic bulb in half horizontally right through the middle, creating two cross-sections. Nestle both halves onto the baking tray among the vegetables.
Step 4 – Season and toss
Drizzle the carrots, radishes, and garlic generously with the olive oil. Season well with Maldon Pepper Sea Salt flakes and cracked black pepper. Give everything a light toss on the tray to ensure the vegetables are evenly coated, then place into the preheated oven.
Step 5 – Roast and garnish
Roast the vegetables for 35 minutes, or until they are fork-tender and beautifully caramelised around the edges. Remove from the oven, arrange on a serving platter, and finish with fresh thyme leaves and a sweet drizzle of honey.
Tips for the Perfect Roasted Root Vegetables
Don’t Overcrowd the Pan: Make sure your radishes and rainbow carrots have plenty of space on the baking tray. If they are piled on top of each other, they will steam instead of caramelising and getting those delicious, crispy edges.
Squeeze the Garlic: Once roasted, those halved garlic bulbs become incredibly sweet and spreadable. Squeeze the soft garlic cloves out of their papery skins directly over the vegetables before serving for an extra punch of flavor.
The Pepper Salt is Key: Because the carrots and radishes both become quite sweet in the oven—especially with the honey drizzle—the Maldon Pepper Sea Salt is vital. It cuts through the sweetness and adds a complex, savoury depth.
What to Serve with Roasted Radishes
This vibrant mix is incredibly versatile. It serves as a fantastic, colourful side dish for a classic Sunday roast chicken or beef. It also pairs beautifully with grilled fish, thick-cut pork chops, or as part of a larger vegetarian feast alongside grains like quinoa or farro.
Frequently Asked Questions
Can you roast radishes?
You can absolutely roast radishes! While often eaten raw in salads, roasting is arguably the best way to eat radishes. The heat breaks down their spicy compounds, turning them mild, juicy, and deliciously sweet.
Do I need to peel baby rainbow carrots?
No, there is no need to peel baby rainbow carrots! Their skins are very thin and hold a lot of nutrients. Simply give them a good scrub under cold water to remove any dirt before tossing them on your baking tray.
Can I use regular carrots or standard red radishes?
Yes. While the mixed colours of rainbow carrots and mixed radishes look stunning on a platter, the recipe works exactly the same with standard orange carrots and classic red globe radishes. Just ensure you cut any larger standard carrots into batons so they cook at the same rate as the radishes.
Preheat the oven to 180c.
Cut the butternut squash down the middle from the stem to base. Scoop out the seeds using a spoon. Then use a sharp knife to score the butternut squash flesh in a crisscross pattern. Place each half into a roasting tray with the flesh facing up, and drizzle both with half of the olive oil. Season with Maldon Garlic Sea Salt, black pepper and the smoked paprika. Then place into the oven for 40 minutes until soft and tender but still holding its shape.
While the squash is roasting, prepare the rice filling. Start by adding the remaining olive oil to a small frying pan, and place onto a medium heat to heat up. Then add the sliced red onion and fry for 8 – 10 minutes, stirring consistently until the onions are very soft and starting to caramelise. Remove from the heat and set aside.
Prepare the rice according to the packet instructions and then tip into a large bowl.
Add the finely chopped dill and the caramelized onions and stir through. Then season with Maldon Garlic Sea Salt and black pepper. When the butternut squash has cooked, remove it from the oven and divide the rice between the two halves, pressing the rice into the cavity. Then top with some crumbled feta, pomegranate seeds and chopped pistachios. Drizzle over a little pomegranate molasses and a final sprinkle of Maldon Garlic Sea Salt.
Preheat the oven to 180c.
To make the cauliflower steaks, remove the leaves from the cauliflower and then cut into thick 1-inch slices – the end pieces won’t hold together to they need to be closer to the root. Any leftover cauliflower pieces or leaves can be saved for roasting another time!
Place the cauliflower steaks onto a roasting tray. In a small bowl mix together the olive oil, ground coriander, sumac and Maldon Chilli Sea Salt. Then use a pastry brush to brush the spiced oil across the steaks, making sure they are evenly coated. Place them into the preheated oven to roast for 40 minutes until soft and tender and starting to char on the edges.
To make the romesco sauce, place the toasted nuts into a food processor along with the roasted red peppers, crushed garlic, paprika, Maldon Chilli Sea Salt and sherry vinegar. Blitz this and then while the motor is running drizzle in the olive oil until you have a lovely smooth sauce. Set aside.
Once the cauliflower steaks are cooked, remove from the oven.
To serve, spread the romesco sauce on the base of a large platter. Then top with the cauliflower steaks and garnish with some mint leaves.