Step 1 – Make the Saffron Risotto Heat the olive oil in a large pan and fry the rice for 2 minutes. Add the vegetable stock and saffron, stirring continuously until the rice is tender and creamy. Stir through the butter, parmesan and Sicilian Fine Sea Salt, Selected by Maldon. Spread onto baking trays, cool completely, then chill until firm.
Step 2 – Prepare the Beef Ragu Filling Heat the olive oil in a large pan and gently cook the onion, carrot and celery for 15 minutes until softened. Add the beef mince and cook until browned. Stir in the tomato purée and chopped tomatoes, then simmer for 30–40 minutes until rich and thick. Season with oregano, Sicilian Fine Sea Salt, Selected by Maldon and black pepper. Leave to cool completely.
Step 3 – Shape the Arancini Place a handful of chilled risotto in your palm and create a well in the centre. Add a teaspoon of ragu, then seal with more rice and shape into a traditional cone. Repeat with the remaining mixture and chill for 15 minutes.
Step 4 – Coat the Arancini Place flour, beaten egg and breadcrumbs in three separate bowls. Coat each arancini in flour, then egg, then breadcrumbs until evenly covered.
Step 5 – Fry Until Golden and Crisp Heat the vegetable oil to 180°C in a deep, heavy-based pan. Fry the arancini in batches for 2–3 minutes until golden brown and crisp. Drain on kitchen paper.
Step 6 – Serve and Enjoy Serve warm with seasoned passata for dipping, finished with grated parmesan and fresh basil.
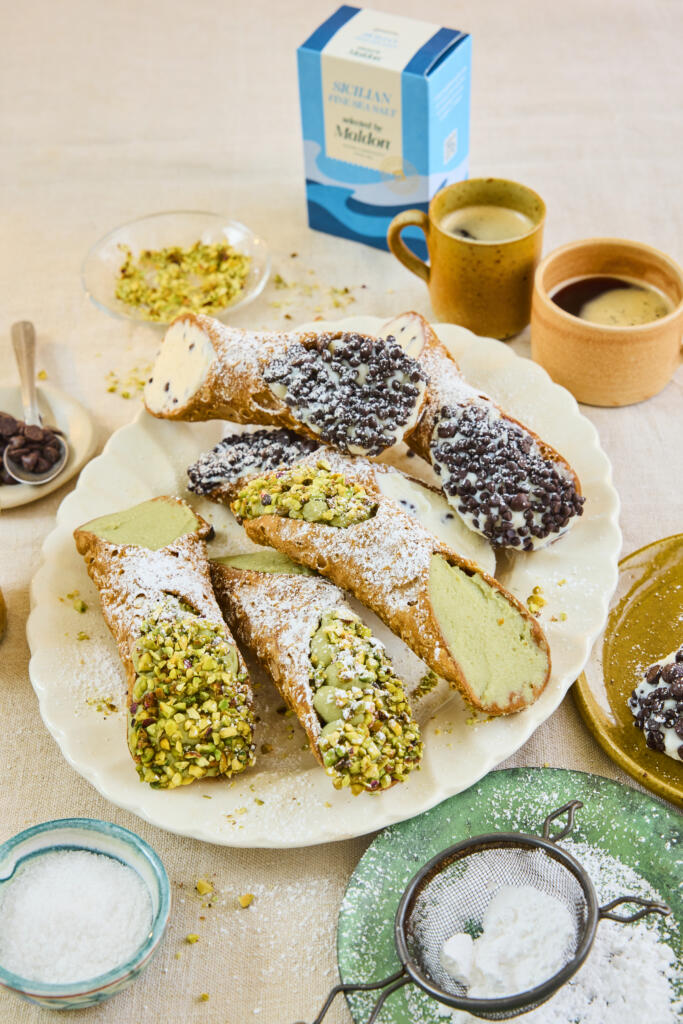
Crisp, blistered shells and a cool, creamy ricotta filling – these Sicilian cannoli are the island’s most famous sweet, made at home. The Marsala-spiked dough fries up golden and bubbly, while a pinch of Sicilian Fine Sea Salt, Selected by Maldon sharpens the sweetness. This recipe makes two classic fillings in one batch: pistachio, and chocolate and ricotta.
Why You’ll Love These Sicilian Cannoli
Two Fillings, One Batch: Make both the pistachio and the chocolate-and-ricotta cannoli at once for a proper Sicilian dessert platter.
Crisp, Bubbly Shells: A splash of Marsala in the dough gives the shells their signature blistered, shatteringly crisp texture.
A True Sicilian Classic: Few desserts feel as special as a freshly piped cannolo dusted with icing sugar.
How to Make Sicilian Cannoli (Step-by-Step)
Drain the ricotta: Place the ricotta for the fillings in a muslin cloth set in a sieve and squeeze out any excess liquid. Set aside – this keeps the fillings thick and the shells crisp.
Make the dough: In a large bowl, mix the plain flour, caster sugar, Sicilian Fine Sea Salt, Selected by Maldon and bicarbonate of soda. Rub in the cubed butter with your fingers until it resembles fine breadcrumbs.
Bring it together: Add the beaten egg and Marsala wine and mix. Tip onto a lightly floured surface and knead until you have a smooth dough.
Roll and shape: Roll the dough as thinly as possible with a rolling pin or pasta machine, then cut out 15cm circles. Wrap each tightly around a cannoli mould, sealing the join with a little beaten egg.
Fry the shells: Heat the vegetable oil to 180°C, deep enough to submerge the cannoli. Fry the wrapped moulds for around 30 seconds at a time, turning with tongs, until golden and bubbly. Drain on kitchen paper and carefully slide the shells off the moulds once cool. Repeat for all 6.
Make the fillings: Whisk the drained ricotta with the rest of each filling’s ingredients, holding back the chocolate chips and chopped pistachios. Stir the chocolate chips into the chocolate filling, then transfer each filling to its own piping bag.
Fill and finish: Snip the ends of the bags and pipe the fillings into the shells – 3 of each flavour. Dip the ends of the pistachio cannoli into the chopped pistachios, dust everything with icing sugar and serve.
Tips for the Perfect Sicilian Cannoli
Drain the ricotta well: Squeezing out excess liquid is the difference between a thick, luscious filling and a soggy shell.
Fill just before serving: Pipe the filling in at the last minute so the shells stay crisp rather than softening.
Roll it thin: The thinner you roll the dough, the more delicate and blistered the fried shells will be.
What to Serve with Sicilian Cannoli
Cannoli are the perfect finale to a Sicilian feast – serve them after Sicilian arancini or homemade cavatelli, with strong espresso to cut the sweetness. They also make a beautiful centrepiece for a dessert grazing board alongside fresh fruit and the blood orange and fennel salad to start the meal.
Frequently Asked Questions
What if I don’t have cannoli moulds?
You can improvise with metal cannoli tubes, or wrap the dough around clean, foil-covered wooden dowels. Just make sure whatever you use is oven- and oil-safe.
Can I make cannoli ahead?
Fry the shells and make the fillings up to a day ahead, storing them separately. Pipe the filling in only when you’re ready to serve so the shells stay crisp.
What is pistachio paste and can I substitute it?
Pistachio paste is finely ground pistachios, sometimes lightly sweetened. If you can’t find it, blitz shelled pistachios to a smooth butter, or use a good-quality pistachio butter.
Fresh Burrata with Tomatoes and Maldon Chilli Sea Salt
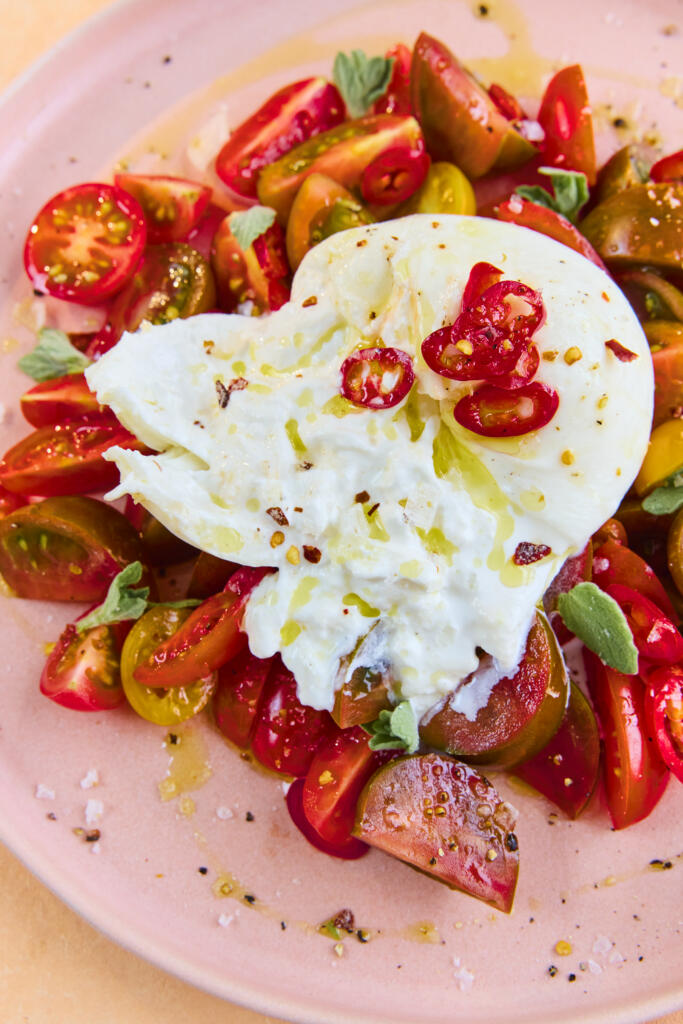
This simple burrata with tomatoes recipe is a fresh, no-cook dish perfect for summer. Creamy burrata pairs beautifully with sweet heritage tomatoes, a kick of fresh chilli, and the distinctive heat of Maldon Chilli Sea Salt. Finished with olive oil and balsamic vinegar, it’s an elegant starter or light lunch ready in minutes.
How To Make Burrata and Tomatoes Salad with Chilli Sea Salt
Pace the chopped tomatoes in a bowl and toss gently with a splash of balsamic vinegar and extra virgin olive oil.
Arrange the tomatoes on a serving plate.
Place the burrata in the centre. If vegan or diary free, we recommend using Julienne Bruno’s Burrella.
Drizzle with additional olive oil.
Garnish with oregano leaves and sliced chilli.
Finished generously with Maldon Chilli Sea Salt and cracked black pepper.
Slice into the burrata and allow the creamy centre to spill over the tomato. Servce immediatley.
Bring burrata to room temperature before serving to ensure maximum creaminess.
Add crusty bread to mop up any of the juices, or to make the dish more filling in general.
Don’t skip the Maldon Chilli Sea Salt – it adds layered heat with the Aleppo pepper and bird’s eye chilli and texture.
What Makes Maldon Chilli Sea Salt different from regular salt?
Maldon Chilli Sea Salt combines the brand’s signature pyramid-shaped sea salt flakes with Aleppo pepper and bird’s eye chilli, adding both a delicate texture and a gentle heat, ideal for finishing dishes like burrata.
Can I use Maldon Chilli Sea Salt in salads?
Yes, Maldon Chilli Sea Salt is perfect for salads. It enhances flavour while adding a subtle kick, especially in fresh dishes like tomatoes and burrata.
What goes well with burrata and tomatoes?
Burrata and tomatoes pairs well with:
Fresh herbs like oregano or basil
Olive oil and balsamic vinegar
Cracked black pepper for depth
Crusty bread or sourdough for mopping up the fresh juices
Is This Burrata Recipe Healthy?
This dish is relatively healthy, packed with fresh tomatoes and healthy fats from olive oil, though burrata is rich and best enjoyed in moderation.
Can I Make Burrata and Tomato Salad in Advance?
It’s best served immediately, but you can prepare the tomatoes ahead and assemble just before serving.
How Spicy Is Maldon Chilli Sea Salt?
It provides a mild to moderate heat, designed to enhance ingredients rather than overpowering them.
What Type of Tomatoes Are Best For Burrata?
Heritage or heirloom tomatoes are ideal as they offer varied sweetness, acidity and colour.
A showstopping plate that comes together in minutes. These chilli, lime and feta watermelon wedges char sweet, juicy watermelon on the griddle, then top it with salty feta, fresh chilli, zesty lime and cooling mint – all finished with a flake of Maldon Chilli Sea Salt. Sweet, salty, smoky and fresh all at once, it’s the easiest way to bring a wow factor to a summer BBQ or picnic spread.
Why You’ll Love These Watermelon Wedges
Sweet Meets Salty: Charred watermelon, salty feta and a flake of Maldon Chilli Sea Salt create an irresistible sweet-salty balance.
Ready in Minutes: Just 10 minutes of prep and a quick char on the griddle or BBQ – no cooking skills required.
A Real Crowd-Pleaser: Vibrant, colourful and served as easy-to-grab wedges, it’s made for sharing outdoors.
How to Make Watermelon Wedges (Step-by-Step)
Char the watermelon: Place the watermelon wedges onto a hot griddle pan or BBQ. Char for a few minutes on each side until you have clear grill marks and a lightly smoky edge – this concentrates the sweetness and adds a subtle smokiness.
Arrange and top: Arrange the charred wedges across a large platter, then scatter over the diced chilli, crumbled feta and lime zest.
Season and finish: Finish with a generous pinch of Maldon Chilli Sea Salt and the picked mint leaves. Add the lime wedges to the platter to squeeze over just before eating.
Tips for the Perfect Watermelon Wedges
Get the griddle hot: A properly hot griddle or BBQ gives clean char marks quickly, without turning the watermelon mushy.
Pat the wedges dry: Blot the cut surfaces before grilling so they char rather than steam.
Balance the heat: Maldon Chilli Sea Salt brings gentle warmth, so go easy on the fresh chilli if you’re serving a crowd.
Char the watermelon a few hours ahead and keep it chilled, then add the feta, chilli, mint and Maldon Chilli Sea Salt just before serving so nothing goes soggy.
What if I don’t have a BBQ or griddle?
A hot, dry frying pan works just as well for charring, or you can skip the char altogether for a fresh, no-cook version.
How do I pick a ripe watermelon?
Look for one that feels heavy for its size with a creamy-yellow patch where it sat in the field – a sign it ripened on the vine.
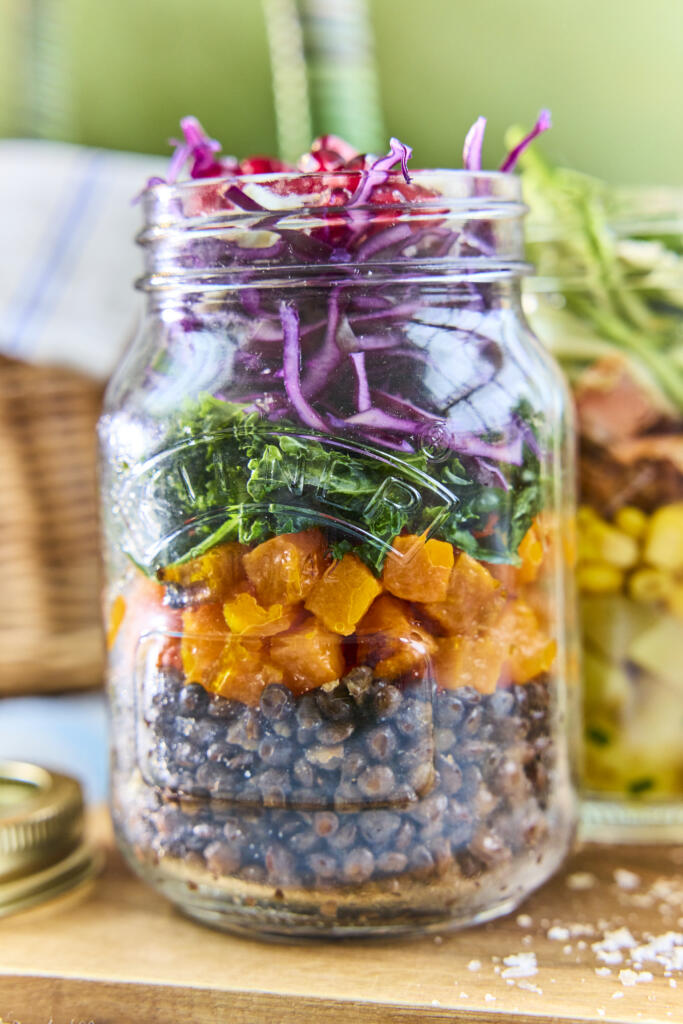
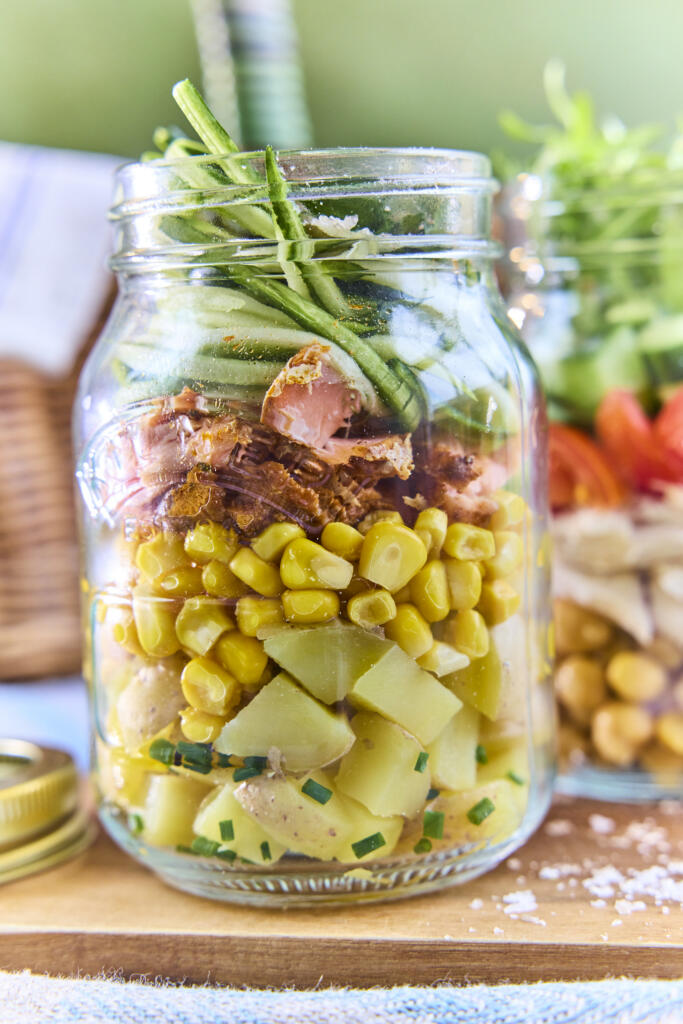
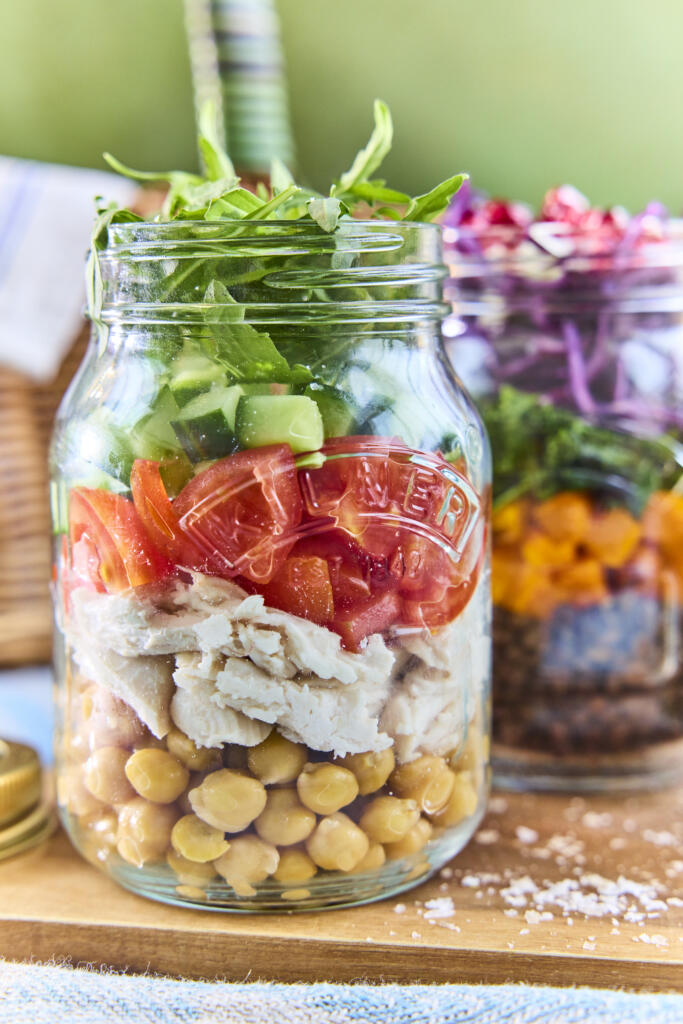
One simple method, three vibrant salads and a single versatile dressing that ties them all together. These layered summer salads – chicken and chickpea, lentil and butternut squash, and salmon and new potato – are built to be made ahead, so they’re ideal for picnics, lunchboxes and easy meal prep. A Maldon Smoked Sea Salt dressing brings the whole trio to life.
Why You’ll Love These Layered Summer Salads
Three Salads, One Dressing: Mix and match all week – every salad is dressed with the same quick, smoky Maldon vinaigrette.
Genuinely Make-Ahead: Layered in jars with the dressing kept separate, these stay crisp and fresh in the fridge for days.
Effortlessly Portable: Jars travel beautifully, making these the ultimate grab-and-go picnic or desk lunch.
How to Make Layered Summer Salads (Step-by-Step)
Prep each salad’s components: Roast the butternut squash and cook the lentils for the lentil salad; boil and cool the new potatoes for the salmon salad. Massage the kale with a pinch of Maldon Smoked Sea Salt flakes to soften it. Everything can be batch-prepped ahead to make assembly quick.
Layer up each salad: For each salad, layer the elements into a jar or container in the order they’re listed. Heavier, sturdier ingredients go at the bottom, with delicate leaves and herbs on top – keeping them away from the dressing is what keeps everything fresh.
Make the versatile dressing: Add all the dressing ingredients to a jar, screw the lid on tightly and shake well until thickened and emulsified. The Maldon Smoked Sea Salt gives a subtle depth that works across all three salads.
Store or take on the go: Keep the layered salads in the fridge or pack them up for a picnic, with the dressing in a separate jar until serving.
Dress and serve: Just before eating, drizzle over some dressing, add the lid and shake again to coat. Tip out onto a plate or eat straight from the jar.
Tips for the Perfect Layered Summer Salads
Layer in the right order: Build from sturdy to delicate so leaves and herbs never sit in the dressing until you’re ready to eat.
Dress at the last minute: Keep the dressing in its own jar and shake it through just before serving to keep everything crisp.
Batch the dressing: The Maldon Smoked Sea Salt dressing keeps for up to a week in the fridge – make double for the week ahead.
Layered salads keep well in sealed jars in the fridge for up to 3 days, as long as the dressing is kept separate and added only when you’re ready to eat.
Why layer the salad in a jar?
Layering keeps the heavier, wetter ingredients at the bottom and the leaves on top, so nothing wilts. Jars also travel upright without spilling – ideal for picnics and packed lunches.
Can I make these vegetarian or vegan?
Easily. Skip the chicken, salmon, parmesan and feta, or swap in extra roasted veg, beans and seeds. The dressing is naturally vegetarian – use maple syrup in place of honey to make it vegan.
Give the classic caprese a fresh, nutty twist. This caprese sandwich layers creamy mozzarella, sweet vine tomatoes and peppery rocket onto pillowy focaccia, all lifted by a vibrant homemade pistachio pesto and a pinch of Maldon Original Sea Salt flakes. It needs no cooking and wraps up beautifully, making it the perfect no-fuss picnic lunch for warm summer days.
Why You’ll Love These Caprese Sandwiches
A Fresh Take on a Classic: Nutty pistachio pesto brings something new to the familiar tomato, mozzarella and basil combination.
No Cooking Required: Just blitz, layer and wrap – ready in 15 minutes with zero time at the stove.
Picnic-Perfect: Sturdy focaccia and a firm pesto base make this sandwich travel brilliantly without going soggy.
How to Make Caprese Sandwiches (Step-by-Step)
Blitz the pistachios: Add the pistachios and crushed garlic to a food processor and pulse a few times to break them down. Keep it coarse for texture, or blitz further for a finer pesto – it’s entirely down to preference.
Build the pesto: Add the grated parmesan and basil leaves and pulse to a thick paste. Pour in the olive oil, lemon zest and juice, a pinch of Maldon Original Sea Salt flakes and cracked black pepper, then give it a final blend, loosening with a little more oil if needed.
Slice and spread the focaccia: Slice the focaccia in half horizontally through the middle, then spread the pistachio pesto generously across the cut side of the base.
Add the filling: Layer over the sliced tomatoes and mozzarella, then add a handful of fresh rocket. Season the tomato and mozzarella with a final pinch of Maldon Original Sea Salt flakes to draw out their flavour.
Cut and wrap: Place the focaccia lid on top, then cut the whole thing in half vertically to give two sandwiches. Wrap well and they’re ready to take away for the perfect picnic lunch.
Tips for the Perfect Caprese Sandwiches
Make extra pesto: The pistachio pesto keeps for a few days in the fridge under a thin layer of oil – it’s just as good tossed through pasta or spooned over salads.
Drain the mozzarella well: Pat the slices dry before layering so the sandwich stays firm rather than soggy in transit.
Season the tomatoes: A pinch of Maldon Original Sea Salt flakes draws out the tomatoes’ natural sweetness and balances the rich cheese.
Make the pistachio pesto up to 3 days ahead and keep it chilled. Assemble the sandwiches a few hours before eating so the focaccia stays in great shape, then wrap tightly until serving.
What can I use instead of pistachios?
Classic pine nuts, walnuts or almonds all work well in the pesto if you’d prefer – each gives a slightly different flavour and texture.
How do I stop the sandwich going soggy?
Drain and pat the mozzarella dry, and spread the pesto as a barrier on the bread. Keeping the sandwich cool until serving also helps the layers hold.
Indulge in the ultimate festive sharing experience with this stunning baked Camembert with a cheese bread wreath – a show-stopping party centrepiece perfect for your Christmas Canape spread or grazing board. A bubbly cheese centre is surrounded by golden pull-apart rolls made from strong white bread flour, shaped into dough balls, brushed with egg wash, and seasoned with fragrant Maldon Garlic Sea Salt flakes, garlic slices, and thyme sprigs. Proved in a warm place to rise and baked to perfection, these golden rolls are ideal for dipping bread into the molten Camembert, especially when paired with chive butter, chutney, or relish.
How to Make Baked Camembert with Sharing Bread
Step 1 – Make the Dough
Add flour, yeast, Maldon Garlic Sea Salt, thyme leaves, olive oil and warm water to a stand mixer bowl.
Mix on low with a dough hook until combined, then medium for 5–7 minutes until smooth and stretchy. You know the dough is ready when it’s elastic and passes a gentle ‘windowpane’ test.
Step 2 – First Rise
Transfer to a lightly oiled bowl, cover with a tea towel and prove in a warm place for 1–1.5 hours, until doubled. The dough should feel pillowy and leave a slight indent when pressed.
Step 3 – Shape the Sharing Bread
Knock back the dough briefly. Divide into 20 balls (about 40–45g each) for even baking.
Step 4 – Arrange and Second Prove
Line a large baking sheet with parchment. Place a heatproof bowl in the centre (a few cm wider than the camembert).
Arrange dough balls around the bowl with a little space between each. Cover and prove 30 minutes, until puffed.
Step 5 – Bake the Rolls
Preheat oven to 200°C fan. Brush dough with beaten egg.
Bake 25–30 minutes until risen and golden on top and underneath. Cool slightly on the tray. The baked rolls should sound hollow when tapped on the base.
Step 6 – Bake the Camembert
Unwrap the camembert and place back in its (oven‑safe) wooden box, lid off. Score the top and insert garlic slices and thyme. You should only bake in a wooden box that states it’s oven-safe; remove all plastic/foil.
Place on a small tray and bake 10–15 minutes until the centre is melted and oozy.
Step 7 – Make the Chive Butter
Melt butter in a small pan. Stir through chives and a pinch of Maldon Garlic Sea Salt.
Step 8 – Finish and Serve
Brush warm rolls with chive butter. Set the baked camembert in the middle and serve immediately with chutney or relish for dipping.
Tips & FAQs
Tips
Keep the Camembert in the box. Bake the Camembert in it’s wooden cheese box (without the plastic wrap) to help it hold it’s shape and contain the melted cheese. Make sure that the box is marked oven-safe.
Score the top of the Camembert. Lightly score the top of the cheese and insert garlic slices and thyme sprigs for extra flavour.
Egg wash your rolls for shine. Brush the rolls with egg wash before baking to get that beautiful golden roll finish.
Season the rolls generously. Sprinkle Maldon Garlic Sea Salt flakes over the dough before baking for a punch of flavour and crunch.
FAQs
Best cheese for baked camembert? Use a 250g camembert in a wooden, oven‑safe box. Brie works, but camembert melts more evenly and has a stronger aroma.
What temperature and how long to bake camembert? Bake at 200°C fan for 10–15 minutes until the centre is soft; timing varies by brand and fridge temperature.
Can you bake camembert in the box? Yes, if it’s a wooden box marked oven‑safe. Otherwise, place the cheese in a small ovenproof dish.
Make‑ahead options? Shape the dough balls, cover and refrigerate up to 12 hours. Bring to room temp, then prove 30–45 minutes before baking. Rolls can also be baked earlier in the day and rewarmed.
Freezing the bread? Freeze baked, cooled rolls up to 1 month. Reheat from frozen at 180°C for 8–10 minutes.
How to keep the centre gooey for longer? Serve immediately, pre‑warm the serving plate, and keep the camembert on a small tray to retain heat.
Serving Suggestions
Pile onto a large board with chutney, cornichons, grapes and cured meats for a party centrepiece.
Add roasted garlic cloves, honey‑roasted nuts or a drizzle of hot honey over the camembert.
Scale up: Bake two wheels of camembert in separate boxes and double the dough for larger gatherings.
Storage & Reheating
Bread rolls: Store in an airtight container at room temperature for 1–2 days. Reheat at 180°C for 5–7 minutes until warm and crisp.
Leftover camembert: Best enjoyed fresh. If needed, cool quickly, refrigerate up to 2 days and reheat gently until molten. Always follow food safety best practice.
Have You Tried This Festive Baked Camembert with Sharing Bread?
Tell us how it went in the comments and tag your creations with #MaldonSalt. For more crowd‑pleasing party starters, browse our Christmas recipes collection.
A dakos salad (also known as koukouvagia in Crete) is a traditional dish that’s made of barley rusk (a hard, dry bread that softens when topped with juicy tomatoes and olive oil), tomatoes (finely chopped or grated), a soft Greek cheese (either feta of mizithra), extra virgin olive oil, oregano and olives.
It’s often eaten as a light meal or appetiser, similar to bruschetta, but uniquely Cretan.
Barley rusks (paximadi) are a key component of this traditional salad from the island of Crete. The rusks are typically broken into smaller pieces to make them easier to enjoy, their dry, hard texture soaks up all those tomato juices nicely.
How to make a dakos salad
Grate half the tomatoes and set aside.
Roughly chop the remaining tomatoes and place in a large serving bowl with the olives and capers.
In a small bowl, whisk together the olive oil and vinegar. Season with Maldon Original Sea Salt flakes and cracked pepper.
Add the rusk pieces to the serving bowl and toss with the grated tomato and the dressing. Allow the rusks to briefly soak up all the beautiful juices – about 5 minutes should do.
To serve, crumble the feta over the salad and scatter with the dried and fresh oregano.
Can you prepare this beforehand?
This salad is best prepared fresh, as you don’t want the rusks to become too soggy.
What to serve with a dakos salad?
You should pair a dakos salad with chicken souvlaki and a handful of Greek-style fries. The dakos salad is light, tangy and refreshing from the tomato, olive oil and cheese. The chicken souvlaki brings savoury, smoky protein that compliments the freshness of the salad. Meanwhile, the Greek-style fries adds that comforting, crispy, herby element that you crave for dinner.
A crisp white wine pairs beautifully with the dish. The acidity helps cut through the richness of the cheese and fries.
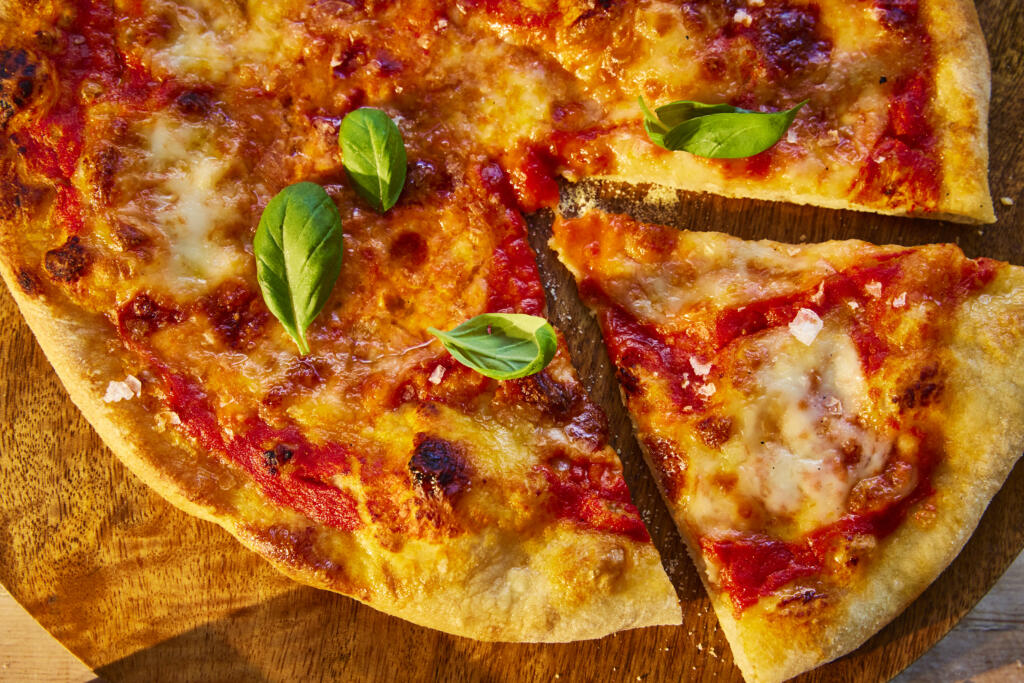
Make pizzeria‑style pizza at home with this easy dough and San Marzano sauce, baked on a Le Creuset BBQ pizza pan for a crisp base and chewy, blistered crust. The dough mixes in minutes, proves until airy, then stretches easily for topping with mozzarella, basil and your favourites. A pinch of Maldon Original Sea Salt in the dough and sauce brings clean, bright flavour — perfect for pizza night or summer BBQs.
How to Cook Pizza on a Le Creuset BBQ Pizza Pan (Quick Steps)
Preheat pan 30 minutes at 250–260°C (480–500°F).
Stretch dough to 30cm; add light toppings.
Launch onto hot pan; bake 8–10 minutes until base is crisp and rim blistered.
Finish with basil and Maldon Original Sea Salt.
How to Make Pizza on a Le Creuset BBQ Pizza Pan (Detailed Version)
Step 1 – Mix and Prove the Dough
In a large bowl, mix flour, Maldon Original Sea Salt and yeast.
Add water; stir until a sticky dough forms. Drizzle a little olive oil over the top and spread to coat.
Cover with a damp tea towel and prove in a warm place 60–90 minutes until doubled.
Optional: ‘stretch & fold’ after 30 minutes (8-10 folds, rotating the bowl) to strengthen a high-hydration dough.
Step 2 – Divide the Ball
Flour the work surface. Tip out dough and divide into 4 equal pieces.
Gather edges to the centre, flip seam‑side down and shape into taut balls.
Rest on a floured tray, covered, for 30 minutes — or refrigerate overnight in a lidded, floured container.
If chilled, remove from the fridge 1 hour before baking.
Step 3 – Make the Sauce
Warm olive oil in a saucepan over low heat.
Add blitzed tomatoes and a generous pinch of Maldon Original Sea Salt.
Simmer uncovered ~30 minutes until thickened. For ultra‑smooth, blitz again.
Step 4 – Preheat the Pan
Set oven to its hottest (250–260°C / 480–500°F) or preheat BBQ to high with lid down.
Place the Le Creuset BBQ pizza pan inside and heat at least 30 minutes. Make sure to follow Le Creuset guidance for maximum temperatures and handling.
Step 5 – Shape, Top and Bake
Dust work surface with semolina. Flatten one dough ball with fingertips, then lift and stretch over knuckles to ~30cm, keeping a thicker rim.
Place on a pizza paddle or flat, parchment‑lined tray.
Spread a thin layer of sauce (don’t overload). Add mozzarella and light toppings. Drizzle crust with olive oil.
Launch onto the preheated pan. Bake/BBQ 8–10 minutes until the base is crisp and the rim blistered. The texture should be crisp underside, airy cornichon, cheese melted with light browning.
Finish with basil and a pinch of Maldon Original Sea Salt. Repeat with remaining dough.
Tips & FAQs
Tips
High heat is everything: preheat the pan for at least 30 minutes.
Keep toppings light and well‑drained (pat mozzarella dry) to avoid soggy centres.
Semolina acts like tiny ball bearings for easy launching; use a thin, even layer.
If dough resists stretching, rest it 5–10 minutes to relax gluten.
For extra flavour, cold‑ferment dough balls 12–24 hours.
FAQs:
What temperature should I set for pizza on a BBQ pizza pan?
Aim for the hottest your oven/BBQ safely reaches (typically 250–300°C / 480–570°F). Keep the lid down on a BBQ to hold heat.
Can I use 00 flour instead of strong white bread flour?
Yes. 00 flour gives a tender chew; strong bread flour adds structure. A 50:50 blend works well.
How do I stop pizza sticking to the pan?
Preheat the pan thoroughly and launch from a paddle/tray dusted with semolina. Avoid wet, heavy toppings.
Can I make the dough ahead?
Yes. Ball and chill up to 24 hours (or freeze balls up to 3 months). Thaw overnight in the fridge, then bring to room temperature for 1 hour before baking.
Stone vs pizza pan — which is better?
Both can deliver a crisp base. A preheated cast‑iron/steel pan often reheats faster between pies and holds heat well on BBQs.
Leftover slices: refrigerate up to 3 days. Reheat on the pizza pan at 220°C (425°F) for 5–7 minutes or in an air fryer at 190°C (375°F) for 3–4 minutes.
Dough: refrigerate balled dough up to 24 hours; freeze up to 3 months (lightly oiled bags).
Sauce: refrigerate up to 5 days or freeze 2 months.
Heat 3 tbsp olive oil in a large, heavy based pot. Once hot, add the minced beef and season with Maldon Original Sea Salt and pepper. Fry over a medium-high for about 10 minutes, breaking up the meat with your wooden spoon until well browned. You don’t want the pot to be too crowded otherwise the meat will steam rather than brown, so work in two batches if needed.
Scoop the meat out of the pot into a bowl and set aside. Add another 3 tbsp olive oil to the pot, along with the onions, peppers and garlic. Season with Maldon salt and pepper and cook gently over a medium low heat for about 15 minutes, stirring every so often, until soft.
Add the meat back into the pot, along with the tomatoes. Fill each tin halfway with water, swill it around to get every last bit of tomato, then add the liquid to the pot. Bring up to a simmer then leave to blip away for 45 minutes, stirring every so often to ensure it’s not sticking on the bottom of the pot, until thickened and reduced. Stir through the oregano and basil, then taste for seasoning.
Bring a large pot of salted water to the boil and cook the lasagne sheets in a few batches for just 2 minutes until no longer rigid but still very al dente, then transfer to an oiled baking tray. Drizzle the sheets with a little olive oil so they don’t stick to one another.
Preheat the oven to 180C fan.
To assemble the lasagne, spoon a couple of ladles of the meat sauce into a large, rectangular baking dish (about 30cm by 20cm). Cover with lasagne sheets then add a single layer of courgette slices. Season the courgettes with a small pinch of Maldon Original Sea Salt and pepper. Dot with roughly a third of the torn mozzarella, grate over roughly a third of the parmesan, and drizzle over roughly a third of the double cream. Repeat this layering process (meat sauce, lasagne sheets, courgette slices, seasoning, cheeses and cream) twice more. Drizzle the top with a little olive oil and cover the dish with foil. Put the dish on a baking tray (this will catch any spill over while baking).
Bake for 20 minutes then remove the foil and bake a further 20 minutes until golden and bubbling. Leave to stand for 20-30 minutes before serving (this allows the layers to settle and makes it easier to slice).