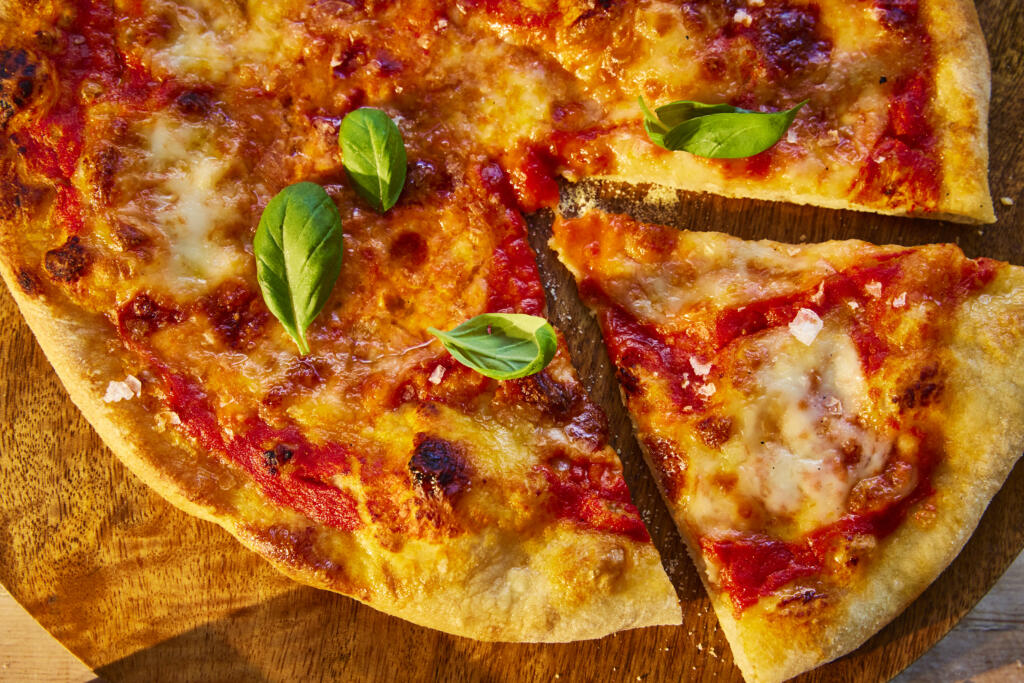
Make pizzeria‑style pizza at home with this easy dough and San Marzano sauce, baked on a Le Creuset BBQ pizza pan for a crisp base and chewy, blistered crust. The dough mixes in minutes, proves until airy, then stretches easily for topping with mozzarella, basil and your favourites. A pinch of Maldon Original Sea Salt in the dough and sauce brings clean, bright flavour — perfect for pizza night or summer BBQs.
How to Cook Pizza on a Le Creuset BBQ Pizza Pan (Quick Steps)
Preheat pan 30 minutes at 250–260°C (480–500°F).
Stretch dough to 30cm; add light toppings.
Launch onto hot pan; bake 8–10 minutes until base is crisp and rim blistered.
Finish with basil and Maldon Original Sea Salt.
How to Make Pizza on a Le Creuset BBQ Pizza Pan (Detailed Version)
Step 1 – Mix and Prove the Dough
In a large bowl, mix flour, Maldon Original Sea Salt and yeast.
Add water; stir until a sticky dough forms. Drizzle a little olive oil over the top and spread to coat.
Cover with a damp tea towel and prove in a warm place 60–90 minutes until doubled.
Optional: ‘stretch & fold’ after 30 minutes (8-10 folds, rotating the bowl) to strengthen a high-hydration dough.
Step 2 – Divide the Ball
Flour the work surface. Tip out dough and divide into 4 equal pieces.
Gather edges to the centre, flip seam‑side down and shape into taut balls.
Rest on a floured tray, covered, for 30 minutes — or refrigerate overnight in a lidded, floured container.
If chilled, remove from the fridge 1 hour before baking.
Step 3 – Make the Sauce
Warm olive oil in a saucepan over low heat.
Add blitzed tomatoes and a generous pinch of Maldon Original Sea Salt.
Simmer uncovered ~30 minutes until thickened. For ultra‑smooth, blitz again.
Step 4 – Preheat the Pan
Set oven to its hottest (250–260°C / 480–500°F) or preheat BBQ to high with lid down.
Place the Le Creuset BBQ pizza pan inside and heat at least 30 minutes. Make sure to follow Le Creuset guidance for maximum temperatures and handling.
Step 5 – Shape, Top and Bake
Dust work surface with semolina. Flatten one dough ball with fingertips, then lift and stretch over knuckles to ~30cm, keeping a thicker rim.
Place on a pizza paddle or flat, parchment‑lined tray.
Spread a thin layer of sauce (don’t overload). Add mozzarella and light toppings. Drizzle crust with olive oil.
Launch onto the preheated pan. Bake/BBQ 8–10 minutes until the base is crisp and the rim blistered. The texture should be crisp underside, airy cornichon, cheese melted with light browning.
Finish with basil and a pinch of Maldon Original Sea Salt. Repeat with remaining dough.
Tips & FAQs
Tips
High heat is everything: preheat the pan for at least 30 minutes.
Keep toppings light and well‑drained (pat mozzarella dry) to avoid soggy centres.
Semolina acts like tiny ball bearings for easy launching; use a thin, even layer.
If dough resists stretching, rest it 5–10 minutes to relax gluten.
For extra flavour, cold‑ferment dough balls 12–24 hours.
FAQs:
What temperature should I set for pizza on a BBQ pizza pan?
Aim for the hottest your oven/BBQ safely reaches (typically 250–300°C / 480–570°F). Keep the lid down on a BBQ to hold heat.
Can I use 00 flour instead of strong white bread flour?
Yes. 00 flour gives a tender chew; strong bread flour adds structure. A 50:50 blend works well.
How do I stop pizza sticking to the pan?
Preheat the pan thoroughly and launch from a paddle/tray dusted with semolina. Avoid wet, heavy toppings.
Can I make the dough ahead?
Yes. Ball and chill up to 24 hours (or freeze balls up to 3 months). Thaw overnight in the fridge, then bring to room temperature for 1 hour before baking.
Stone vs pizza pan — which is better?
Both can deliver a crisp base. A preheated cast‑iron/steel pan often reheats faster between pies and holds heat well on BBQs.
Leftover slices: refrigerate up to 3 days. Reheat on the pizza pan at 220°C (425°F) for 5–7 minutes or in an air fryer at 190°C (375°F) for 3–4 minutes.
Dough: refrigerate balled dough up to 24 hours; freeze up to 3 months (lightly oiled bags).
Sauce: refrigerate up to 5 days or freeze 2 months.
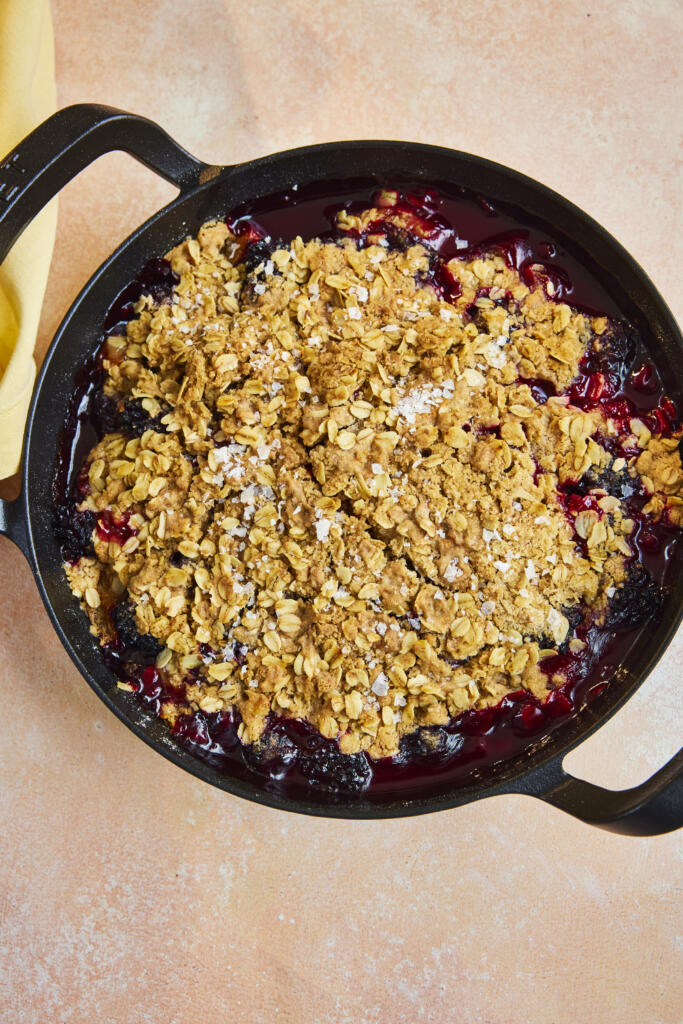
Celebrate late‑season fruit with this plum and blackberry crumble: juicy, tangy fruit baked beneath a buttery oat topping scented with cinnamon and a pinch of Maldon Original Sea Salt. The salt sharpens the fruit and adds balance to the sweet, crunchy crumbs. This easy fruit crumble comes together in minutes and bakes to a golden, bubbling finish — serve warm with ice cream, whipped cream or thick yogurt.
How To Make Blackberry and Plum Crumble (Quick Steps)
Toss plums and blackberries with lemon and sugar to taste.
Rub butter into flour, cinnamon and Maldon Sea Salt; add oats and Demerara.
Scatter over fruit and bake at 180°C fan for 30 minutes until golden and bubbling.
Rest briefly, then serve warm with ice cream or yogurt.
How To Make Blackberry & Plum Crumble (Detailed Version)
Step 1 – Heat the Oven & Prep Fruit
Preheat oven to 180°C fan (200°C conventional / 400°F).
Add plums and blackberries to a skillet or ovenproof dish.
Taste the fruit; add a pinch of sugar only if needed. Squeeze over lemon juice and toss.
Step 2 – Make the Oat Crumble
In a large bowl, mix flour, cinnamon and Maldon Original Sea Salt.
Add butter cubes; toss to coat. Rub in with fingertips to fine breadcrumbs.
Stir in oats and Demerara sugar. The texture should resemble a mix of fin crumbs and small clumps for crunch.
Step 3 – Assemble & Bake
Scatter the crumble evenly over the fruit — don’t press down.
Bake 30 minutes until the top is crisp and golden and the fruit is bubbling at the edges.
Step 4 – Serve
Rest 5–10 minutes to let juices thicken slightly.
Spoon into bowls and serve with ice cream, whipped cream or yogurt.
Optional: finish with a tiny pinch of Maldon Sea Salt flakes for sweet‑salty contrast.
Best served warm.
Tips & FAQs:
Tips
Sweetness control: taste fruit first; late‑summer plums can be very sweet, so add sugar only as needed.
Extra crunch: chill the crumble 10 minutes before baking to keep butter cold and crumbs craggy.
Even browning: bake on the middle rack; rotate the dish after 20 minutes if browning unevenly.
Juicy but set: letting the crumble stand for 10 minutes post‑bake helps juices thicken.
FAQs
What’s the best fruit mix for a crumble?
Tart blackberries balance sweet plums. You can swap in apples, pears or nectarines; aim for a tart‑sweet balance.
Can I use frozen fruit?
Yes. Bake from frozen but toss fruit with 1–2 tsp flour or cornflour to absorb extra juices and add 5–10 minutes to the bake.
Can I make crumble ahead?
Assemble fruit and topping separately up to 24 hours in the fridge. Top and bake just before serving. The raw crumble topping also freezes well.
How do I keep the topping crunchy?
Keep butter cold, don’t over‑mix, and avoid pressing the topping down. If needed, finish with 2–3 minutes under a hot grill/broiler.
Can I make it dairy‑free or vegan?
Use a plant‑based butter with similar fat content. Check that your sugar suits your dietary needs.
Flavour twist: add orange zest to the fruit or swap cinnamon for mixed spice as we move into autumn.
Storage & Reheating
Store leftovers covered in the fridge for up to 3 days.
Reheat in a 170°C (340°F) oven for 12–15 minutes until hot and topping re‑crisped; or air fry at 170°C for 6–8 minutes.
Freeze: cool completely, wrap tightly and freeze up to 2 months. Reheat from frozen at 170°C until piping hot (cover with foil if over‑browning).
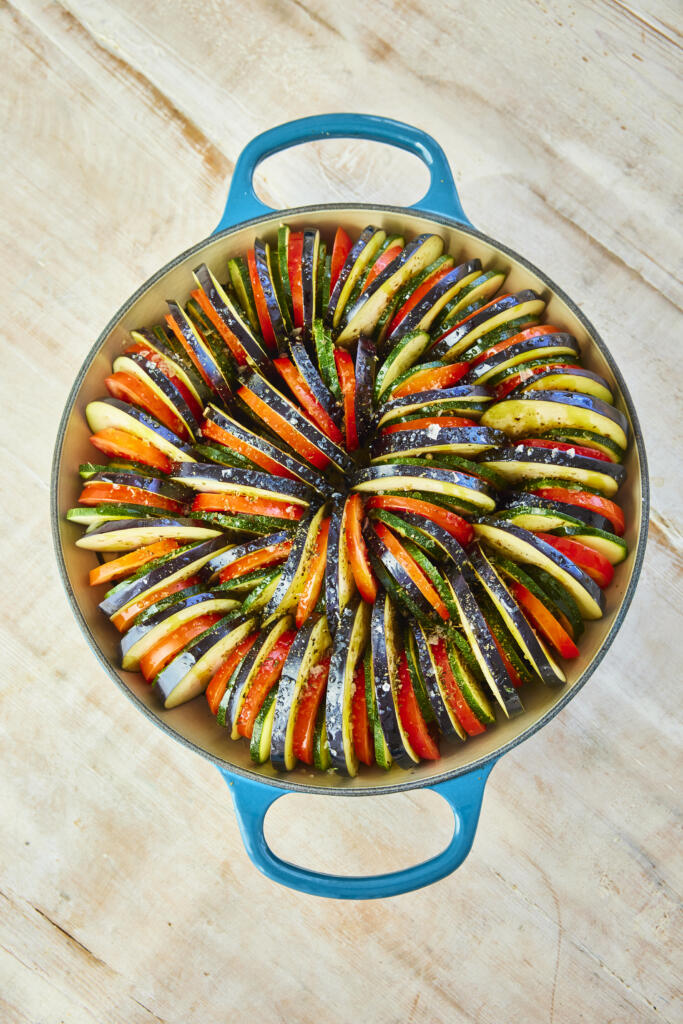
This oven‑baked ratatouille layers thin slices of aubergine, courgette and tomato in neat concentric circles for maximum flavour and a beautiful finish. Seasoned with Maldon Original Sea Salt, oregano and olive oil, the vegetables bake until tender with lightly caramelised edges. It’s an easy ratatouille recipe that celebrates peak‑summer produce, delicious warm or at room temperature and perfect as a vegetarian side or light main with crusty bread.
How to Make Oven-Baked Ratatouille?
Slice aubergine, courgette and tomato to 3 mm; season with Maldon Sea Salt.
Arrange in concentric circles; add oregano and olive oil.
Bake at 180°C fan for 30 minutes until tender and caramelised; finish with basil.
How to Make Oven-Baked Ratatouille (Detailed Version)
Step 1 – Heat the Oven & Slice Evenly
Preheat oven to 180°C fan (200°C conventional / 400°F).
Thinly slice aubergines, courgettes and tomatoes to pound‑coin thickness (~3 mm) using a mandolin or sharp knife for even cooking. Make sure you pat the wet tomatoes slices dry before arranging to avoid pooling which can cause the dish to become soggy!
Sprinkle the slices with Maldon Original Sea Salt to season and draw out a little moisture.
Step 2 – Arrange the Vegetables
In a round baking dish, lay slices in concentric circles, alternating aubergine, courgette and tomato.
Sprinkle over dried oregano and drizzle generously with olive oil.
Step 3 – Bake to Tender & Caramelise
Bake for about 30 minutes until the top is lightly caramelised and vegetables are tender when pierced. The edges of the dish should be lightly browned, centres soft but holding their shape.
Rest 5 minutes; scatter basil leaves and finish with a final pinch of Maldon.
Tips & FAQs
Tips
Even thickness is key: 3 mm slices cook at the same rate and layer neatly.
Season in layers: a light pre‑salt plus a finishing sprinkle of Maldon brightens flavours.
For extra colour, switch to grill/broiler for 1–2 minutes at the end.
If your dish is deep, cover loosely with foil for the first 15 minutes, then uncover to caramelise.
FAQs
What’s the difference between this and classic stewed ratatouille?
This is a sliced, baked version (often called confit byaldi style) with neat layers; classic ratatouille is a chopped, stovetop stew.
Can I add peppers or onions?
Yes—very thinly sliced red pepper or onion can be tucked between layers without changing timing much.
Do I need to salt and drain the aubergine?
Not essential with thin slices and modern aubergines; a light pre‑salt is sufficient.
How thick should I slice the vegetables?
About 3 mm (pound‑coin thickness). Thicker slices may need 5–10 extra minutes.
Can I make ratatouille ahead?
Bake, cool and refrigerate up to 2 days. Reheat covered at 170°C (340°F) for 12–15 minutes or enjoy at room temperature.
Serving Suggestions
Serve as a side with roast chicken, grilled fish, steak or lamb.
Make it a main: add torn mozzarella or crumbled goat’s cheese after baking; serve with crusty bread, couscous or soft polenta.
Finish with a drizzle of good olive oil, extra basil, or a splash of balsamic.
Storage & Reheating
Refrigerate leftovers in an airtight container for up to 3 days.
Reheat at 170°C (340°F) until hot (10–15 minutes) or enjoy room‑temperature.
Not ideal for freezing (tomatoes can become watery), but can be frozen for up to 1 month if needed; reheat from thawed and finish under the grill to re‑caramelise.
Preheat the oven to 160C fan. Grease the bundt tin generously with butter, ensuring you get into every corner of the tin. Dust the greased tin with flour, shaking to coat evenly, then tap off any excess.
In a large bowl, mix the flour, ground almonds, ground pistachios, baking powder, cardamom and Maldon Sea Salt.
Using the KitchenAid 4.3L Stand Mixer, cream the butter and sugar for 5 minutes, scraping down the sides with a spatula about halfway through, until very pale and fluffy. Add the eggs one by one, mixing well and scraping down the sides between each addition. Using a spatula, stir in the the lemon zest, lemon juice, and rosewater.
Fold the dry ingredients into the wet ingredients then spoon the mixture into the prepared tin, distributing it evenly around the tin.
Bake for 35-45 minutes until the cake is risen, golden, and a skewer inserted into the middle comes out clean. Leave to cool in the tin for a few minutes then invert onto a wire rack and leave to cool completely.
Once the cake is completely cool, make the icing (if you try to ice the cake while still warm, it will melt and slip off). Sift the icing sugar into a bowl and whisk in the lemon juice and rosewater. Trickle in just enough cold water to bring the icing to a thick coating consistency. Spoon the icing over the cake, allowing it to run down the sides. Top with the chopped pistachios and rose petals.
Discover a charred broccoli salad with caramelised edges, creamy feta and fresh mint, all tossed in a zesty lemon‑garlic dressing. Roasted at high heat for maximum flavour and tender‑crisp bite, this easy broccoli salad is a vibrant side for weeknights and a standout on festive tables. Finished with a pinch of Maldon Garlic Sea Salt for clean, bright seasoning.
How to char broccoli?
Toss florets with oil and salt, spread on a hot tray in a single layer. Roast at 240°C fan for 15–20 minutes until edges are deeply browned and stems are tender‑crisp. Finish with Maldon Garlic Sea Salt flakes.
How to Make Charred Broccoli Salad with Feta, Almonds & Mint
Step 1 Roast the Broccoli
Preheat oven to 240°C fan (465–480°F) or its highest setting. Preheat the tray for extra char on the broccoli; make sure to rotate the pan halway.
Toss florets with 3 tbsp olive oil and a good pinch of Maldon Original Sea Salt.
Spread in a single layer on your largest baking tray (use two if needed so broccoli browns, not steams).
Roast 15–20 minutes until tender with deeply charred edges. Texture cue: tender‑crisp with caramelised tips.
Step 2 – Make the Lemon-Garlic Dressing
Whisk lemon zest and juice, 5 tbsp olive oil, honey, grated garlic and chilli flakes.
Season with a pinch of Maldon Garlic Sea Salt to taste.
Step 3 – Assemble and Serve
Pile warm broccoli onto a large platter.
Top with crumbled feta, toasted almonds and mint leaves.
Drizzle over half the dressing; serve the rest alongside so guests can add more. You can serve at either warm or room remperature.
Tips & FAQs:
Tips:
Dry broccoli well and cut similar‑sized florets for even charring.
Don’t overcrowd the tray—space equals char.
For extra smoky notes, finish under a hot grill/broiler for 1–2 minutes or on a BBQ.
Finish with a final pinch of Maldon Original Sea Salt at the table for crunch and clean salinity.
FAQs:
How do you char broccoli without burning it?
Use very hot oven, large tray, and oil lightly. Roast until edges caramelise (15–20 mins), then check every 2 minutes.
Can I make charred broccoli salad ahead?
Roast broccoli and make dressing up to 2 days ahead. Dress just before serving; add mint and feta last for freshness.
Can I use frozen broccoli?
Yes. Roast from frozen on a preheated tray at high heat; expect a couple of extra minutes and slightly softer texture.
How do I make it vegan or nut‑free?
Swap feta for a vegan alternative (or omit), honey for maple syrup; replace almonds with toasted seeds (pumpkin/sunflower).
Can I grill instead of roast?
Toss florets with oil and salt, thread onto skewers or use a grill basket. High heat, 8–10 minutes, turning for even char.
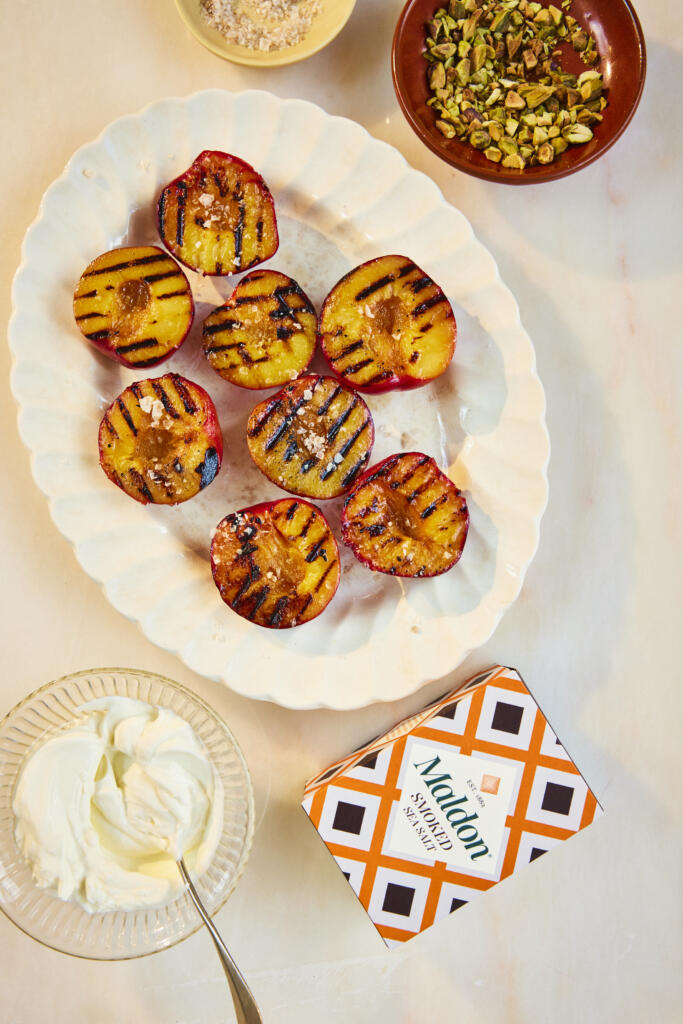
Turn ripe plums into a stunning grilled fruit dessert in minutes. Hot griddle or BBQ heat caramelises the cut sides for deep, smoky‑sweet flavour, while a final sprinkle of Maldon Smoked Sea Salt adds crunchy contrast and subtle smoke. Serve these grilled plums warm with ice cream, yogurt or whipped cream and pistachios for texture — an easy BBQ dessert that feels restaurant‑worthy.
How to Grill Plums?
Heat griddle/BBQ to medium‑high.
Toss halved plums with oil and a pinch of Maldon Smoked Sea Salt.
Grill cut‑side down 2–4 minutes until charred and juicy.
Serve warm with ice cream and pistachios; finish with smoked salt.
How to Make Grilled Plums with Smoked Sea Salt (Detailed Version)
Step 1 – Preheat the Grill/Griddle
Heat a griddle pan over high heat until smoking, or preheat BBQ to medium‑high direct heat (220–260°C / 425–500°F).
Lightly oil the grates if using a BBQ.
Step 2 – Prep the Plums
Toss plum halves with olive oil to coat lightly.
Add a small pinch of Maldon Smoked Sea Salt to enhance sweetness. You should use rip but firm freestone plums so that the halves stay intact.
Step 3 – Grill to Caramelise
Place plums cut‑side down in a single layer.
Cook 2–4 minutes until deeply charred with clear grill marks and juices just begin to bubble. You should see caramelised edges, the texture should be tender but not collapsing.
If desired, flip for 30–60 seconds to warm the skins.
Step 4 – Serve
Plate warm plums. Add ice cream, yogurt or whipped cream.
Sprinkle with pistachios and finish with a pinch more Maldon Smoked Sea Salt.
Optional: drizzle with honey or maple syrup.
Tips & FAQs:
Tips
Don’t overcrowd: space the halves so steam doesn’t soften them.
Oil the fruit, not the pan, to reduce sticking and flare‑ups.
Choose plums that give slightly when pressed; overly soft fruit collapses.
Crosshatch: rotate 90° halfway through for restaurant‑style grill marks.
FAQs
What plums are best for grilling?
Freestone varieties (easier to de‑stone), ripe but firm. Black or red plums both work. This is because their firm flesh holds up well when heated.
How long to grill plums?
Typically 2–4 minutes cut‑side down on a very hot surface; flip briefly to warm through.
Can I make grilled plums on a stovetop?
Yes — use a preheated cast‑iron griddle pan over high heat.
Can I use other stone fruit?
Peaches, nectarines and apricots grill beautifully; timings are similar (smaller fruit needs less time).
How do I prevent sticking?
Preheat thoroughly, brush fruit with oil, and let the sear form before moving.
Lighter: Greek yogurt, honey and fresh thyme leaves.
Indulgent: mascarpone, crushed amaretti and a balsamic reduction drizzle.
Cheese board twist: serve warm plums with burrata or ricotta, olive oil and crusty bread.
Storage & Reheating
Best enjoyed fresh.
Leftovers: refrigerate up to 2 days in an airtight container.
Reheat gently in a skillet over medium heat for 1–2 minutes or serve at room temperature.
Freeze: not recommended (texture turns mushy).
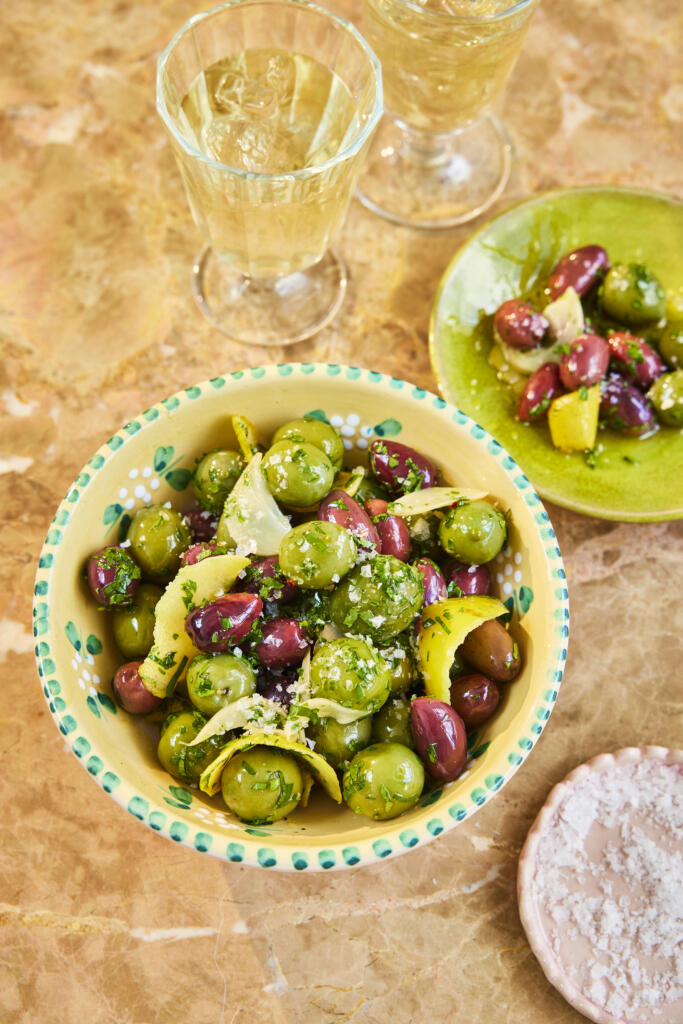
These easy marinated olives take minutes and taste like your favourite tapas bar. Lemon zest, soft garlic and a pinch of chilli infuse warm olive oil, then olives and fresh parsley soak up the flavours. Finished with a pinch of Maldon Original Sea Salt for clean, bright seasoning, this lemon‑garlic olives recipe is ideal for antipasti platters, last‑minute hosting or make‑ahead snacks.
How to Marinate Olives (Quick Steps)
Gently warm olive oil with lemon zest and garlic; add chilli, then cool.
Toss with olives, parsley and a pinch of Maldon Sea Salt.
Marinate 30 minutes to overnight; serve at room temperature.
How to Make Marinated Olives (Detailed Version)
Step 1 – Infuse the Oil
Add olive oil, lemon zest strips and sliced garlic to a small pan.
Warm over medium‑low heat for 3–5 minutes until fragrant and the garlic softens; do not brown. You should see gentle bubbles around the garlic, with the colourisation being pale, not golden.
Step 2 – Add Heat & Cool
Stir in a pinch of chilli flakes.
Immediately remove from the heat and let the oil cool to room temperature.
Step 3 – Toss & Marinate
In a bowl, combine olives, chopped parsley and a pinch of Maldon Original Sea Salt.
Pour over the cooled oil and toss well to coat.
Marinate at least 30 minutes; longer (up to overnight in the fridge) deepens flavour.
Step 4 – Serve
Bring to room temperature. Taste and adjust salt or lemon zest.
Spoon into a serving bowl with some infused oil.
Serving suggestion: finish with a final pinch of Maldon flakes for crunchy contrast.
Tips & FAQs
Tips
Use quality olives. Creamy Castelvetrano or meaty Kalamata work well; mix for colour and texture.
Refrigerate in an airtight container and use within 3–4 days. Keep submerged in oil, and always return leftovers to the fridge. Do not store at room temperature when fresh garlic is used.
Can I reuse the marinade oil?
Use within 3–4 days in salad dressings or to drizzle over feta/roasted veg. Keep refrigerated; discard if in doubt.
Serving Suggestions
Add to antipasti boards with cheeses, cured meats, nuts and crackers.
Spoon over whipped feta or labneh with extra lemon zest and Maldon Sea Salt.
Pair with chilled rosé, lager or a classic martini.
Storage & Make-Ahead
Store refrigerated up to 3–4 days in a clean jar; ensure olives are mostly covered by oil.
Bring to room temperature for 20–30 minutes before serving so the oil loosens.
If the garlic browns during infusion, start again—browned garlic can taste bitter.
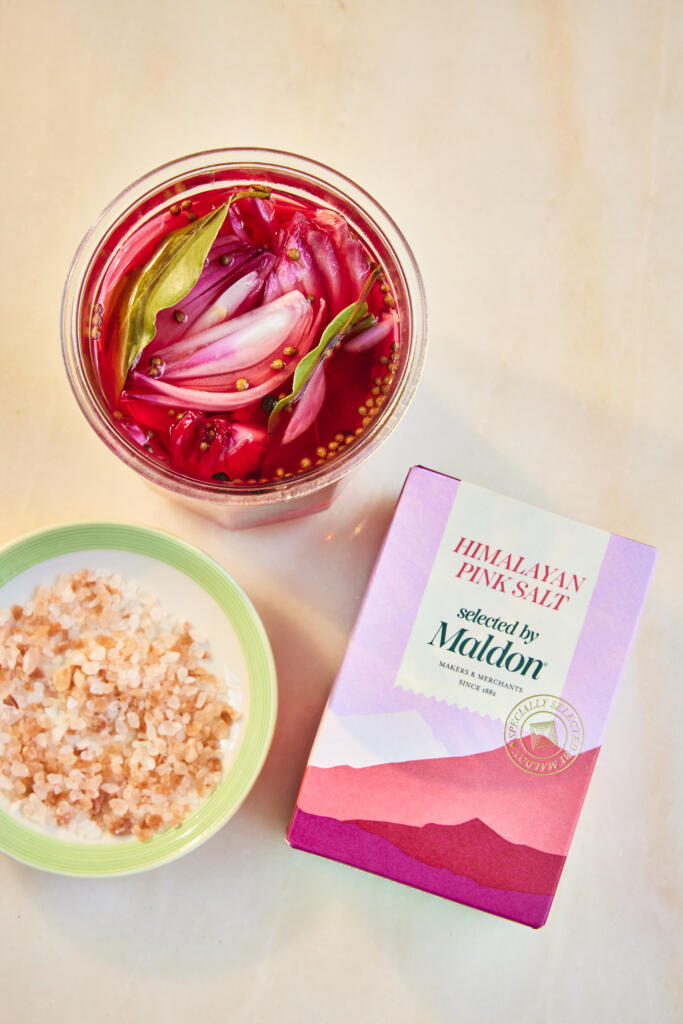
These quick pickled red onions are the easiest way to add tangy crunch and colour to everything from tacos to salads. A hot brine of apple cider vinegar, warm spices and honey is poured over thinly sliced onions, then finished with Himalayan Pink Salt, Selected by Maldon for clean, bright seasoning. They turn vivid pink in just a few hours and keep well in the fridge — an effortless, make‑ahead topping you’ll use all week.
How to Make Quick Pickled Red Onions?
Pack sliced onions in a sterilised jar.
Simmer vinegar, honey, spices and Himalayan Pink Salt, Selected by Maldon; pour over onions.
Seal, cool and refrigerate until bright pink (2–12 hours).
Keep refrigerated; use within 2 weeks.
How to Make Quick Pickled Red Onions (Detailed Version)
Step 1 – Prep the Jar & Onions
Thinly slice red onions (a mandolin helps).
Pack into a large, sterilised heatproof jar. To sterilise quickly, wash, then heat the jar in a 160°C (320°F) oven for 10 minutes; air-dry lids.
Step 2 – Make the Hot Brine
Add vinegar, honey (or sugar), coriander seeds, peppercorns, bay leaves and Himalayan Pink Salt, Selected by Sea Salt to a small pan.
Bring to a gentle simmer, stirring to dissolve, then remove from heat.
Step 3 – Pour & Seal
Immediately pour hot brine over onions to fully submerge.
Seal, cool to room temperature, then refrigerate.
Step 4 – Chill & Serve
Leave to pickle a few hours until bright pink (flavour deepens overnight).
Serve cold; keep onions submerged in brine.
Tips & FAQs
Tips
Slice evenly (1–2 mm) for fast, even pickling.
Pack tightly and submerge fully; top up with a splash more vinegar if needed.
For softer bite, blanch slices in boiling water for 10 seconds; drain before jarring.
Use caster sugar or maple syrup to make the recipe vegan.
FAQs:
How long do pickled red onions last?
Up to 2 weeks refrigerated in a clean, sealed jar. Always use clean utensils and keep onions submerged.
Can I use different vinegar?
Yes. White wine or red wine vinegar work; avoid malt vinegar for this style (overly strong).
Do I need to sterilise the jar?
Recommended for best quality. This is a refrigerator pickle (not canned); always store in the fridge.
Can I reduce the sweetness?
Yes. Adjust honey/sugar to taste; salt and acid provide the primary preservation.
When are they ready to eat?
After 1–2 hours for a quick pickle; best flavour and colour after 12–24 hours.
Can I add other flavours?
Try chilli flakes, fennel seeds, citrus peel, or garlic. Keep the basic acid‑salt ratio.
Serving Suggestions
Tacos, burritos and quesadillas
Burgers, hot dogs and pulled pork sandwiches
Grain bowls, salads and slaws
Avocado toast, fried eggs or shakshuka
Cheese and charcuterie boards (drain lightly, sprinkle Maldon flakes)
Storage & Safety
Refrigerate immediately after cooling; keep onions submerged.
Use within 14 days. Discard if cloudy, fizzy, mouldy or off‑smelling.
Always use clean utensils to avoid contamination.
Do not shelf‑store; this is not a canned product.
Blend up a frozen mango margarita with bold mango sweetness, fresh lime and smooth tequila — finished with a punchy Maldon Chilli Sea Salt rim. This easy blender margarita pours ice‑cold with a perfectly slushy texture, balancing sweet, tart and gently spicy notes in every sip. Ideal for summer parties, BBQs or whenever you need a sunshine‑bright cocktail in minutes.
How to Make a Frozen Mango Margarita with Chilli Salt Rim
Step 1 – Blend the Margarita
Add tequila, triple sec, lime zest and juice, frozen mango, agave (if using) and ice to a blender.
Blend on high until smooth and slushy, 20–40 seconds.
Taste; adjust sweetness or lime to preference.
Texture cue: thick but pourable, like a soft‑serve slush.
Step 2 – Prepare the Chilli Salt Rim
Run a lime wedge around the rim of a chilled margarita glass or coupe.
Tip Maldon Chilli Sea Salt onto a small plate, then dip and roll the rim to coat evenly. Shake off any excess.
Step 3 – Pour & Garnish
Pour the blended margarita into the rimmed glass.
Garnish with a lime wedge or slice and serve immediately.
Tips & FAQs
Tips
Use frozen mango for body and chill; if using fresh mango, add more ice and a few frozen mango cubes.
A pinch of salt inside the blend can lift flavour, but the Maldon Chilli Sea Salt rim adds the perfect finishing contrast.
For a thicker slush, add extra frozen mango or ice; for a looser pour, add a splash of cold water.
Yes. Replace with 15–25ml agave syrup and a splash of water (or orange juice) to balance.
What’s the best tequila for a frozen margarita?
A good 100% agave blanco showcases mango and lime; reposado works if you prefer a rounder, mellow finish.
How do I make it spicy?
Keep the Maldon Chilli Sea Salt rim and optionally blend in 1–2 thin jalapeño slices or a pinch of chilli flakes.
Can I batch this for a party?
Multiply ingredients, blend in batches, and keep a jug in the freezer for 10–15 minutes to hold the slushy texture. Rim glasses to order.
How do I fix a too‑sweet or too‑tart margarita?
Add lime juice for sweetness balance, or a touch of agave for tartness. A small pinch of Maldon Sea Salt enhances balance.
Serving Suggestions
Serve as a welcome drink with salty snacks (salted almonds, tortilla chips with pico de gallo).
Add tropical twists: passion fruit pulp, pineapple or a dash of coconut water.
Create a frozen mango‑chilli “float”: small scoop of mango sorbet on top, dust with Maldon Chilli Sea Salt.
Storage & Reheating
Best enjoyed immediately.
For make‑ahead, blend the base without ice and freeze in ice‑cube trays; blend cubes with fresh ice just before serving.
If the drink separates, pulse the blender a few seconds to re‑slush.
When the heat of summer sets in, nothing hits the spot quite like a chilled bowl of gazpacho. This classic Andalusian soup is a vibrant blend of ripe tomatoes, crisp cucumbers and punchy onions, all pureed to smooth perfect. Light, hydrating, and bursting with garden-fresh flavour. It’s the ultimate warm-weather dish.
What takes this gazpacho to the next level is a finishing touch of Maldon Chilli Sea Salt. It’s delicate flakes and gentle heat from the Aleppo pepper and bird’s eye chilli adds a kick to the natural sweetness of the tomatoes whilst adding a subtle heat that lingers just enough to keep each spoonful exciting. Serve it topped with diced cucumber, juicy tomato halves, a drizzle of extra virgin olive oil, and fresh basil leaves.
How to Make Gazpacho
Step 1 – Tame the Onion
Boil a full kettle. Put the chopped onion in a sieve over the sink.
Pour the boiling water over to soften bite and mellow raw flavour. Drain well and cool.
Step 2 – Blend the Soup
Add onion, tomatoes, peeled cucumber, red pepper, garlic, sherry vinegar and olive oil to a blender.
Season with a big pinch of Maldon Chilli Sea Salt.
Blend until smooth (or leave slightly chunky). Taste and adjust salt and vinegar to balance. The texture should be silky and pourable but not watery.
Step 3 – Chill
Transfer to a jug or container, cover and chill at least 2 hours (longer improves flavour).
Stir before serving as natural separation can occur.
Step 4 – Make the Topping & Serve
Toss diced cucumber, cherry tomatoes, basil and a pinch of Maldon Chilli Sea Salt with a drizzle of olive oil.
Pour soup into bowls or small glasses, add 1–2 ice cubes per serving, spoon over the topping and finish with a little olive oil. Serve the soup well-chilled.
Tips & FAQs:
Tips
Use ripe, in‑season tomatoes for natural sweetness and colour.
Don’t skip chilling — it rounds acidity and lets flavours meld.
For extra body, blend longer to emulsify the olive oil thoroughly.
Prefer a super‑smooth finish? Blend, then pass through a fine sieve.
Adjust heat with Maldon Chilli Sea Salt at the table for clean, crunchy warmth.
FAQs:
What’s the best vinegar for gazpacho?
Sherry vinegar delivers classic depth and balance; red wine vinegar works in a pinch.
Can I make gazpacho ahead?
Yes. Make 1–2 days ahead; flavours improve. Stir and re‑season with salt/vinegar just before serving.
Can you freeze gazpacho?
You can freeze for up to 2 months. Thaw overnight in the fridge and re‑blend to restore texture.
How do I thicken gazpacho without bread?
Emulsify longer, or add extra tomato and a little more olive oil. If desired, blend in a small piece of peeled cucumber for body.
How do I make it spicier?
Add a small fresh chilli to the blend or increase the Maldon Chilli Sea Salt sprinkle when serving.
Is this gazpacho vegan and gluten‑free?
Yes — as written, it’s naturally vegan and gluten‑free.
Serving Suggestions
Serve in small glasses as a canapé shot for summer parties or alongside a tapas spread.
Pair with tortilla Española, grilled prawns, or crusty bread with olive oil.
Garnish variations: diced roasted pepper, finely chopped red onion, or a swirl of basil oil.
For a lighter lunch, add a side of leafy salad with lemon vinaigrette.
Storage & Make-Ahead
Refrigerate in an airtight jug or container for 3–4 days.
Keep toppings separate; add just before serving to maintain crunch.
Not intended for reheating. If separation occurs, stir or briefly re‑blend.