






- Put the potatoes in a large pot of salted water, bring up to a boil then reduce to a lively simmer for 5 minutes. Drain and leave to steam dry in the colander.
- Preheat the air fryer/oven to 190C fan.
- If using the oven, drizzle the oil in your largest roasting tray and put it in the oven for 10 minutes for the oil to heat up. Once hot, carefully add the potatoes, gently toss and season with a good pinch of Maldon garlic salt. Roast for 20 minutes then then add the garlic and herbs to the tray, toss gently, and return to the oven for a further 10-15 minutes until golden and crisp.
- If using the air fryer, toss the potatoes with the oil and a good pinch of Maldon Garlic Sea Salt. Tip into the bottom of the air fryer and cook for 25 minutes before adding the garlic and herbs, tossing gently, and returning to the air fryer for a further 10-20 minutes until golden and crisp.
Category: Uncategorized
Recipe created by Helena and Vikki Moursellas
What is a dakos salad?
A dakos salad (also known as koukouvagia in Crete) is a traditional dish that’s made of barley rusk (a hard, dry bread that softens when topped with juicy tomatoes and olive oil), tomatoes (finely chopped or grated), a soft Greek cheese (either feta of mizithra), extra virgin olive oil, oregano and olives.
It’s often eaten as a light meal or appetiser, similar to bruschetta, but uniquely Cretan.
Barley rusks (paximadi) are a key component of this traditional salad from the island of Crete. The rusks are typically broken into smaller pieces to make them easier to enjoy, their dry, hard texture soaks up all those tomato juices nicely.
How to make a dakos salad
- Grate half the tomatoes and set aside.
- Roughly chop the remaining tomatoes and place in a large serving bowl with the
olives and capers. - In a small bowl, whisk together the olive oil and vinegar. Season with Maldon Original Sea Salt flakes
and cracked pepper. - Add the rusk pieces to the serving bowl and toss with the grated tomato and the
dressing. Allow the rusks to briefly soak up all the beautiful juices – about 5 minutes
should do. - To serve, crumble the feta over the salad and scatter with the dried and
fresh oregano.
Can you prepare this beforehand?
This salad is best prepared fresh, as you don’t want the rusks to become too soggy.
What to serve with a dakos salad?
You should pair a dakos salad with chicken souvlaki and a handful of Greek-style fries. The dakos salad is light, tangy and refreshing from the tomato, olive oil and cheese. The chicken souvlaki brings savoury, smoky protein that compliments the freshness of the salad. Meanwhile, the Greek-style fries adds that comforting, crispy, herby element that you crave for dinner.
A crisp white wine pairs beautifully with the dish. The acidity helps cut through the richness of the cheese and fries.
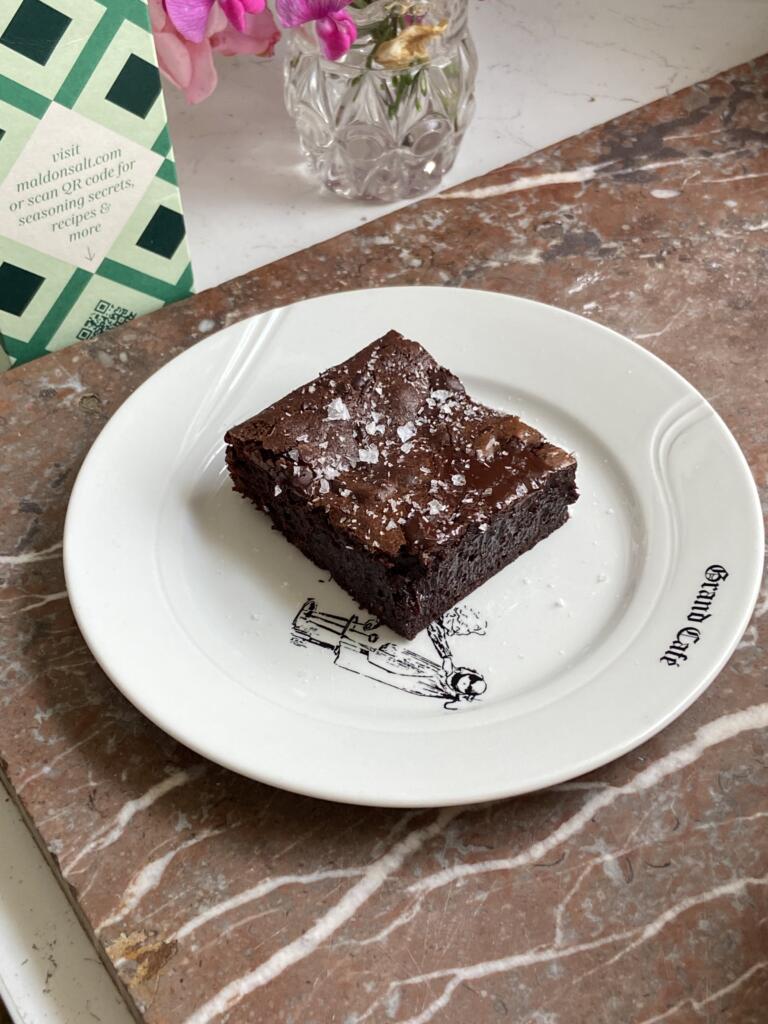
This isn’t just a brownie. It’s a love letter to chocolate.
There are brownies – and then there are Caitlin Carrick-Varty brownies…Known to her loyal followers as @cake.onmyface, Caitlin doesn’t just bake; she creates flavour sensations. Her Chocolate Brownies with Maldon Sea Salt are a masterclass in contrasts: they look like the picture of classic fudgy indulgence, they smell like pure cocoa bliss, yet the moment they touch your tongue, they melt in your mouth – like a decadent chocolate mousse.
Making them is as delicious as eating them: silky pools of melted chocolate folding into sugar, eggs and butter in slow, glossy swirls; batter pouring into the tin; a final, confident sprinkling of Maldon Sea Salt flakes over the top. The sea salt flakes strikes first – bright and sharp against the rich bitterness – before melting into a sweetness that lingers. Caitlin likes hers dark, leaning into that bittersweet edge, but if your heart beats for milder chocolate, you can swap 80g of the dark chocolate for milk. Whatever you do, don’t skip the Maldon Sea Salt flakes. It’s the soul of this brownie.
How to make Chocolate Brownies with Maldon Sea Salt
- Grease and line a 19cm / 7.5-inch square tin. Preheat the oven to 180/160 fan.
- Roughly chop the extra 20g dark chocolate, if you are using, then set aside.
- Chop the (180g) chocolate and butter roughly into chunks, then place in a large glass or metal bowl. Fill a small saucepan with a little water. Set the bowl of chocolate over the saucepan, making sure the bottom of the bowl does not come into direct contact with the water when it rests over the pan. Heat the pan on low/medium, stirring the chocolate mixture occasionally, to help it melt.
- Meanwhile, whisk the sugar, eggs, Maldon Sea Salt flakes, and vanilla in a large bowl. When the egg mixture is a bit frothy and lighter in colour, pour in the melted chocolate and butter – whisk just until you feel the glossy mixture become thicker.
- Now sift the flour and cocoa powder into the eggs and chocolate. Whisk until you feel the batter become thicker again, then immediately pour the batter into the prepared tin. Top with the reserved chopped chocolate and a generous pinch of Maldon Sea Salt flakes. Bake for 20 minutes, or until the top of the brownies are set but there is a wobble underneath.
- Allow to cool in the fridge before slicing. If you can wait, these brownies do well left in the fridge covered tightly with clingfilm overnight.
Recipe by Lacey Ostermann
A Bold, Citrusy Twist!
Lacey Ostermann brings the heat and zest to the breadboard with her unique Spicy Margarita Focaccia – a playful, flavour-packed recipe inspired by the classic cocktail. Infused with lime zest, a hint of orange and finished with Maldon Chilli Sea Salt flakes, this focaccia balances brightness with a gentle, smoky kick. It’s the kind of unexpected twist that turns a humble bake into a bold centrepiece, perfect for summer gathering, tapas spreads, or anyone craving a little spice with their slice!
Here Is How to Make Spicy Margarita Focaccia
Mix:
- Whisk together warm water, olive oil, honey (or sugar) and yeast. Every bread flour absorbs a different amount of water, so start with 390ml water and reserve the rest for later. Stir in bread flour and salt until well combined.
- Add in remaining water gradually to achieve a dough consistency similar to that shown in the video.
- Cover and rest at room temperature for 15minutes While the dough is resting, place the sugar and lime zest into a small bowl and rub them together using your fingers until well combined. Dice two jalapeños or chillies very finely.
Stretch & Fold and First Proof:
- Scatter half of the lime sugar and half of the diced jalapeños over the dough and then stretch & fold to incorporate them. First, wet your hand (so the dough doesn’t stick) and then grab the dough at the 12 o’clock position in the bowl.
- Pull the dough upwards and then fold it down to the 6 o’clock position. Repeat this motion about 8-10 times around the bowl. The dough should tighten up a bit after performing the stretch & folds.
- Cover and rest at room temp for 15minutes.Scatter the second half of the lime sugar and diced jalapeños over the dough and repeat the series of stretch & folds once more.
- Cover and proof at room temperature for 1-1.5 hours or until the dough has nearly doubled in size.
Transfer to Tray and Second Proof:
- Prepare a metal baking tray (see dimensions above in equipment list) with non-stick parchment paper and 2 tablespoons of melted coconut oil or another neutral oil of your choosing. I put a tiny bit of oil underneath the paper so it stays in place on the tray.
- Tip the dough into the prepared tray. Rub a little oil from the tray onto your hands and fold one side of the dough towards the middle. Repeat with the other side, folding it over the top as if you are folding a piece of paper into thirds (it will look like a large burrito).
- Rotate the dough so its long side aligns with the long side of the tray, then flip it over so the seams from the folding are at the bottom and the top is smooth
- Cover the dough with a piece of oiled parchment paper and leave it to proof at room temperature for 1-1.5 hours.
Dimple & Bake:
- Preheat the oven to 215C or 420F and move the baking rack to the lowest position.
- Drizzle 1 tablespoon coconut oil over the top of the focaccia dough and then dimple it into the dough.
- Bake the focaccia for 18-22 minutes or until the bread is golden brown.
Prepare the Margarita Syrup:
- While the focaccia is baking, make the margarita syrup by combining the sugar, tequila and lime juice in a small saucepan.
- Simmer over a medium heat and stir until all the sugar granules have dissolved. Remove from the heat and set aside.
- When the focaccia is out of the oven, transfer it to a wire cooling rack and place the rack on top of a larger tray to catch any syrup and glaze drizzles that may drip down.
- Poke the focaccia all over with a chopstick or skewer and then brush the margarita syrup over the bread using a pastry brush, allowing it to fully soak into the dimples and holes before adding more.
Prepare the Lime Glaze:

- Allow the focaccia to cool for about 15 minutes. While it’s cooling, mix together the powdered sugar, lime zest and lime juice for the glaze. Add in the lime juice gradually until the glaze is drizzling consistency (you can add more lime juice if needed).
- Drizzle the glaze over the top of the focaccia and then use a pastry brush to brush it evenly over the top and sides of the bread.
- Garnish the focaccia as you would a spicy margarita…with fresh Jalapeño rings and a good sprinkle of Maldon Chilli Sea Salt. Be sure to add these on before the glaze hardens so they will stick in place!
- Place the focaccia on a cooling rack for about 20 minutes or until the glaze has hardened up and then cut in and enjoy!
A Summer Staple!

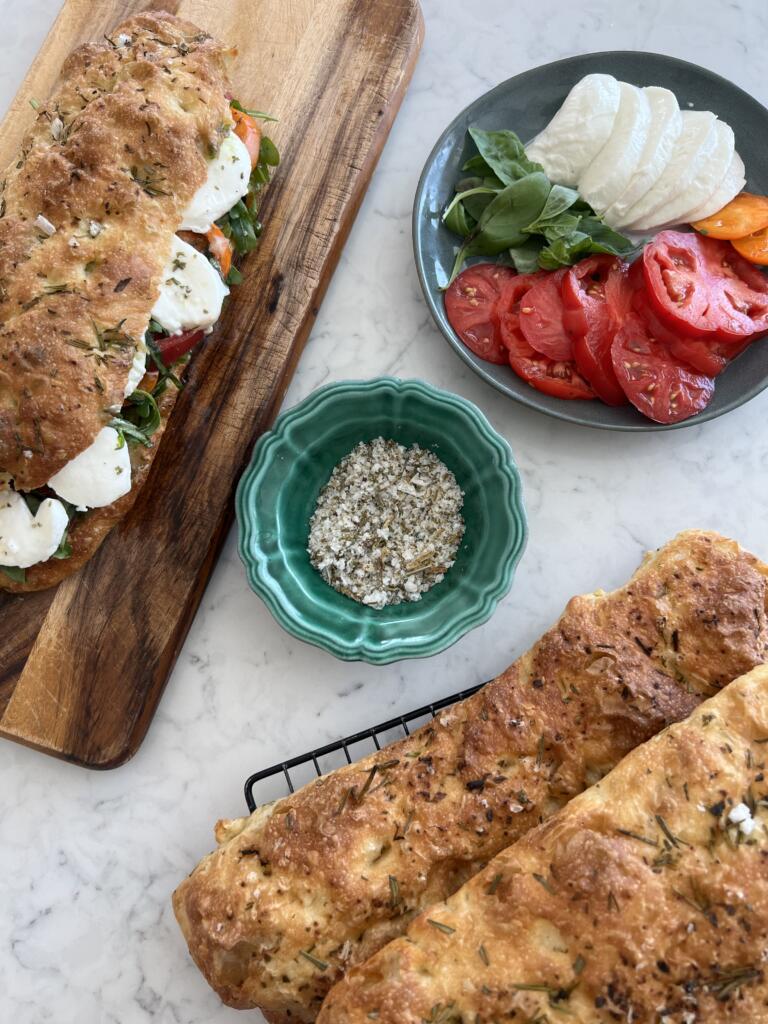
Lacey Ostermann has a way of turning simple ingredients into unforgettable experiences – and her Garlic Sea Salt and Rosemary Focaccia Sandwich Rolls are no exception. Infused with the deep, aromatic flavour of Maldon Garlic Sea Salt and fresh rosemary, these golden rolls are baked to perfection: crisp on the outside, pillowy within. Ideal for summer, they’re the perfect vessel for seasonal favourites like a caprese sandwich layered with pesto, peppery rocket, and juicy tomato slices. Whether for a picnic, lunch al fresco, or casual entertaining, these rolls are the ultimate upgrade to your summer sandwich game.
Mix
- Whisk together warm water, olive oil, honey (or sugar) and yeast. Every bread flour absorbs a different amount of water, so start with 390ml water and reserve the rest for later.
- Stir in bread flour and salt until well combined. Add in remaining water gradually to achieve a dough consistency similar to that shown in the video.
- Cover and rest at room temperature for 15 minutes.
Stretch & Fold and First Proof
- Stretch & fold the dough. First, wet your hand (so the dough doesn’t stick) and then grab the dough at the 12 o’clock position in the bowl.
- Pull the dough upwards and then fold it down to the 6 o’clock position. Repeat this motion about 8-10 times around the bowl.
- The dough should tighten up a bit after performing the stretch & folds.
- Cover and rest at room temp for 15 minutes.
- Repeat the series of stretch & folds once more, cover and proof at room temperature for 1-1.5 hours or until the dough has nearly doubled in size.
Transfer to Tray and Second Proof:
- Prepare a large baking tray (see dimensions above in equipment list) with non-stick parchment paper and 3 tablespoons of extra virgin olive oil. I put a tiny bit of oil underneath the paper so it stays in place on the tray.
- Tip the dough into the prepared tray. Rub a little oil from the tray onto your hands and fold one side of the dough towards the middle. Repeat with the other side, folding it over the top as if you are folding a piece of paper into thirds (it will look like a large burrito). Rotate the dough so its long side aligns with the long side of the tray, then flip it over so the seams from the folding are at the bottom and the top is smooth.
- Cover the dough with a piece of oiled parchment paper and leave it to proof at room
temperature for 1-1.5 hours.
Shape & Bake
- Preheat the oven to 220C or 430F and move the baking rack to the lowest position.
- Sprinkle the rosemary over the top of the dough and drizzle over about a tablespoon of extra virgin olive oil. Dimple the rosemary into the dough, taking care not spread the dough all the way to the edges of the tray – there should be some empty tray bordering the dough (use the video tutorial for visual guidance). Use your hands gently guide the edges of the dough into a rectangular shape to it’s easy to cut the dough into evenly sized rolls.
- Use an oiled dough scraper or sharp knife to cut the rectangle in half. Cut each of those halves in half so you have four long roll shaped pieces of dough. Gently stretch the dough to the length of the tray (about 12-13 inches) and space them out evenly across the tray (see video).
Sprinkle each roll generously with Maldon Garlic Sea Salt and bake on the lowest rack of the oven for 18-22 minutes or until the rolls are a deep golden brown. Baking on the bottom rack should help to crisp up the bottom of the bread. - Once baked, remove from tray and transfer to a cooling rack. They’re best enjoyed fresh but can be stored in large freezer bags for up to 3 days at room temperature or frozen for up to 2 months. To bring back to life, wrap in foil at bake at 200C/400F for 10-15 minutes. Peel back the foil for the last few minutes so they can crisp back up.
- Fill the rolls with your favourite summer sandwich fillings. My go-to is a caprese sandwich with pesto, rocket, aged balsamic vinegar, basil, mozzarella and juicy heirloom tomato slices…seasoned with more Maldon Garlic Sea Salt, of course!
Make weekend brunch special with brioche French toast piled high with lemony ricotta and juicy berries. Thick slices are briefly dried, soaked in a vanilla custard and pan‑fried in butter for golden edges and a fluffy centre. A final pinch of Maldon Original Sea Salt lifts the sweetness, while maple syrup brings everything together. This easy French toast recipe is quick to master and perfect for sharing.
How to Make French Toast with Ricotta and Berries
Step 1 – Dry the Bread
- Lightly toast slices for 1–2 minutes, or bake briefly in a low oven to dry. Day-old / stale brioche or challah works best.
- Aim to dehydrate so the bread absorbs custard; avoid taking on colour.
Step 2 – Make the Custard & Soak
- In a shallow dish, whisk eggs, milk, vanilla and a pinch of Maldon Original Sea Salt.
- Dip two slices at a time, turning to coat. Soak 20–30 seconds per side until evenly saturated but not collapsing.
Step 3 – Cook the French Toast
- Heat a large non‑stick frying pan over medium heat. Add half the butter.
- When foaming, add soaked slices. Cook ~3 minutes per side until golden with lightly crisp edges.
- Add more butter as needed and repeat with remaining slices.
- Texture cue: outside golden and lightly crisp; centre custardy and set.
Step 4 – Assemble & Serve
- Plate the French toast. Top each with a spoonful of ricotta.
- Grate lemon zest over ricotta and sprinkle a tiny pinch of Maldon Original Sea Salt.
- Add fresh berries and finish with maple syrup. Best served warm.
Tips & FAQs
Tips
- Use thick‑cut brioche/challah (2–3cm) for the best custardy interior.
- Drying the bread prevents sogginess and allows maximum custard absorption.
- Keep heat at medium; too hot scorches the exterior before the centre sets.
- Wipe the pan between batches if butter begins to brown.
- A small pinch of Maldon Original Sea Salt in the custard and on top heightens sweetness and flavour contrast.
FAQs:
- What’s the best bread for French toast?
- Rich, sturdy loaves like brioche or challah hold their shape and soak evenly.
- How do I stop French toast from going soggy?
- Dry the bread first, don’t oversoak, and cook over medium heat until the centre is set.
- Can I make French toast ahead of time?
- Cook slices, cool on a rack, then reheat in a 180°C (350°F) oven for 6–8 minutes. Assemble with ricotta and berries just before serving.
- Can I bake French toast for a crowd?
- Yes. Arrange soaked slices on a buttered tray and bake at 190°C (375°F) for 12–15 minutes, flipping once.
- Can I use frozen berries?
- Yes. Thaw and drain well, or gently warm with a little lemon zest and maple syrup.
Serving Suggestions
- Add a quick berry compote (berries + lemon zest + a splash of maple) for extra sauciness.
- Swap ricotta for whipped mascarpone or Greek yogurt.
- Finish with toasted almonds or pistachios for crunch.
- Pair with crispy bacon or sausages for a sweet‑salty brunch plate.
- For a citrus twist, add orange zest to the custard.
Storage & Reheating
- Store cooked slices (undressed) in an airtight container in the fridge up to 3 days.
- Reheat on a wire rack over a tray at 180°C (350°F) for 6–8 minutes, or in a toaster until warm and crisp.
- Freeze cooked slices between sheets of parchment for up to 2 months; reheat from frozen at 190°C (375°F) for 10–12 minutes.
- Store ricotta and berries separately; assemble to serve.
Recipe by Lacey Ostermann
A Sweet-Savoury Twist!

When it comes to reimagining classics, Lacey is the master of this. Her Peach Crumble Focaccia is a perfect example – where the rustic soul of Italian bread meets the delicate sweetness of summer peaches, all brought into a bold balance with a finishing touch of Maldon Sea Salt flakes. This isn’t just a dessert or bread – it’s a conversation starter, a seasonal centrepiece, and a love letter to texture and contrast.
Mix:
- Whisk together warm water, olive oil, honey (or sugar) and yeast. Every bread flour absorbs a different amount of water, so start with 390ml water and reserve the rest for later.
- Stir in bread flour and salt until well combined. Add in remaining water gradually to achieve a dough consistency similar to that shown in the video. Cover and rest at room temperature for 15 minutes.
Stretch & Fold and First Proof:
- Stretch & fold the dough. First, wet your hand (so the dough doesn’t stick) and then grab the dough at the 12 o’clock position in the bowl. Pull the dough upwards and then fold it down to the 6 o’clock position. Repeat this motion about 8-10 times around the bowl. The dough should tighten up a bit after performing the stretch & folds. Cover and rest at room temp for 15 minutes.
- Repeat the series of stretch & folds once more, cover and proof at room temperature for 1-1.5 hours or until the dough has nearly doubled in size.
Prepare the Cinnamon Filling / Topping:
- First, brown the butter. Melt the butter in a medium frying pan over a medium high heat and then turn it to a simmer, stirring every 30 seconds or so to ensure the butter isn’t burning on the base of the pan. You’ll hear the bubbles from the butter sizzle as the water evaporates off of it but the sizzling will stop as the butter starts to foam up. Once this happens, look at the colour of the foam…you’ll start to notice lightly browned specks in the butter. Give the butter another good stir and remove from the heat. The butter should be a lovely golden brown (not dark brown – be careful as it can burn quickly!).
- Once the butter is browned, stir in the brown sugar, cinnamon, a pinch of Maldon Sea Salt and vanilla until well combined.
Transfer to Tray and Second Proof:
- Prepare a metal baking tray (see dimensions above in equipment list) with non stick parchment paper and 2 tablespoons of melted butter. I put a tiny bit of oil underneath the paper so it stays in place on the tray.
- Tip the dough into the prepared tray and gently stretch the dough into an even layer so it reaches the edges of the tray. Spread half of the cinnamon filling all over the dough in an even layer and then fold one side of the dough towards the middle. Repeat with the other side, folding it over the top as if you are folding a piece of paper into thirds (it will look like a large burrito).Rotate the dough so its long side aligns with the long side of the tray, then flip it over so the seams from the folding are at the bottom and the top is smooth.
- Cover the dough with a piece of oiled parchment paper and leave it to proof at room temperature for 1-1.5 hours.
Prepare the Peaches and Crumble

- Cube 2/3 of the peaches and cut the remaining peach into attractive slices. Set aside.
- Mix together the flour and both types of sugar and slowly drizzle in the melted butter. Stir with a spoon until all of the flour/sugar has absorbed the butter. It will be a crumbly consistency. Store in the fridge until ready to use.
Dimple and Bake

- Preheat oven to 220C/430F and move the baking rack to the lowest position.
- Just before dimpling the dough, coat the chopped peaches with the remaining cinnamon filling in the frying pan. If the butter has solidified, you may need to reheat it briefly to make coating the peaches easier. Spread the cinnamon coated peaches evenly over the dough and dimple them in. Sprinkle the crumble topping evenly over the dough. Coat the peach slices in any
extra cinnamon filling that remains in the pan and then push them into the dough. Finish with a sprinkle of Maldon Sea Salt Flakes – the perfect delicate hit of salt to balance all the sweet! - Bake on the lowest rack of the oven for 22-26 minutes or until the crumble is golden brown and the peaches are starting to caramelise. Remove from baking tray and transfer to a cooling rack.
- Best enjoyed the day of baking but can be stored in a large plastic freezer bag or in an airtight container for up to two days. To bring back to life, wrap a portion in foil and bake at 220C/400Ffor 15 minutes or until heated through. Peel back the foil on top for the last few minutes to crisp up the crumble topping. Enjoy!
These griddled sweet potatoes deliver the best of both worlds: deep char from a hot cast‑iron griddle and a tender‑centre finish in the oven. Tossed with olive oil and seasoned with Maldon Original Sea Salt, the wedges pair perfectly with a zesty coriander‑mint mayo brightened with lime and a touch of chilli. An easy grilled sweet potato side for BBQs, weeknights and sharing platters.
How to Make Griddled Sweet Potatoes with Herby Mayo
Step 1 – Preheat & Prep
- Preheat oven to 180°C fan (200°C conventional / 400°F).
- Set a cast‑iron griddle pan over high heat (or preheat BBQ griddle).
- Toss sweet potato wedges with enough olive oil to coat and a generous pinch of Maldon Original Sea Salt. Tap the wedges dry before oiling for a better char result!
Step 2 – Griddle the Wedges
- Working in batches, place wedges cut‑side down on the hot griddle without overcrowding.
- Cook 5 minutes per side until well‑marked and lightly charred.
- Texture cue: pronounced grill lines; surface lightly crisping.
Step 3 – Finish in the Oven
- Transfer charred wedges to a baking tray.
- Bake 10–15 minutes until tender when pierced.
Step 4 – Make the Herby Mayo
- Mix mayonnaise, coriander, mint, chilli, lime zest and juice.
- Season to taste with Maldon Original Sea Salt.
Step 5 – Serve
- Pile wedges onto a platter, add lime wedges and a pinch more Maldon Original Sea Salt.
- Serve with herby mayo for dipping.
- Serving temperature: hot or warm.
Tips & FAQs
Tips
- Heat matters: preheat the griddle until smoking‑hot for defined char without sticking.
- Don’t overcrowd: cook in a single layer; steam prevents browning.
- Even wedges: aim for 2–3cm thick for consistent cooking.
- Short on time? Microwave wedges 3–4 minutes to jump‑start tenderness, then griddle briefly and finish in oven.
FAQs
- How long to grill sweet potato wedges?
- About 5 minutes per side on a very hot griddle, then 10–15 minutes in the oven until tender.
- Do I need to parboil sweet potatoes before grilling?
- No. High‑heat griddling plus oven‑finishing cooks them through. Par‑microwaving is a quick alternative.
- How do I stop sweet potatoes sticking to the griddle?
- Preheat thoroughly, oil the wedges (not the pan), and don’t move them for the first few minutes so a crust forms.
- Can I cook these on a BBQ?
- Yes. Grill over direct heat for colour, then move to indirect heat or a preheated tray with the lid down to finish.
- Can I make the herby mayo ahead?
- Yes, up to 2 days in the fridge. Stir and adjust lime/salt before serving.
Serving Suggestions:
- Add crumbled feta or toasted pumpkin seeds for extra contrast.
- Pair with grilled chicken, halloumi skewers, chimichurri steak or salmon.
- Make a platter with rocket, pickled red onions and extra lime.
- Turn into tacos: wedges + herby mayo + slaw + a sprinkle of Maldon.
Storage & Reheating
- tore wedges and mayo separately in airtight containers. Wedges: fridge up to 3 days; mayo: up to 2 days.
- Reheat wedges on a hot tray at 200°C (390–400°F) for 8–10 minutes or in an air fryer at 190°C (375°F) for 4–6 minutes, in a single layer.
- Refresh with a pinch of Maldon Original Sea Salt and a squeeze of lime.
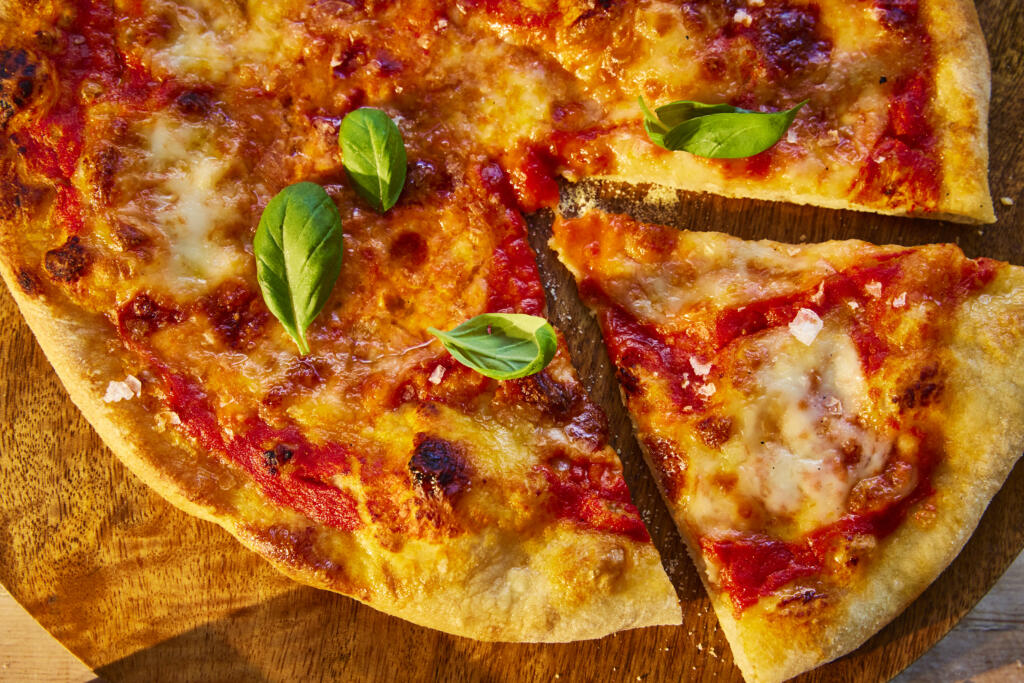
Make pizzeria‑style pizza at home with this easy dough and San Marzano sauce, baked on a Le Creuset BBQ pizza pan for a crisp base and chewy, blistered crust. The dough mixes in minutes, proves until airy, then stretches easily for topping with mozzarella, basil and your favourites. A pinch of Maldon Original Sea Salt in the dough and sauce brings clean, bright flavour — perfect for pizza night or summer BBQs.
How to Cook Pizza on a Le Creuset BBQ Pizza Pan (Quick Steps)
- Preheat pan 30 minutes at 250–260°C (480–500°F).
- Stretch dough to 30cm; add light toppings.
- Launch onto hot pan; bake 8–10 minutes until base is crisp and rim blistered.
- Finish with basil and Maldon Original Sea Salt.
How to Make Pizza on a Le Creuset BBQ Pizza Pan (Detailed Version)
Step 1 – Mix and Prove the Dough
- In a large bowl, mix flour, Maldon Original Sea Salt and yeast.
- Add water; stir until a sticky dough forms. Drizzle a little olive oil over the top and spread to coat.
- Cover with a damp tea towel and prove in a warm place 60–90 minutes until doubled.
- Optional: ‘stretch & fold’ after 30 minutes (8-10 folds, rotating the bowl) to strengthen a high-hydration dough.
Step 2 – Divide the Ball
- Flour the work surface. Tip out dough and divide into 4 equal pieces.
- Gather edges to the centre, flip seam‑side down and shape into taut balls.
- Rest on a floured tray, covered, for 30 minutes — or refrigerate overnight in a lidded, floured container.
- If chilled, remove from the fridge 1 hour before baking.
Step 3 – Make the Sauce
- Warm olive oil in a saucepan over low heat.
- Add blitzed tomatoes and a generous pinch of Maldon Original Sea Salt.
- Simmer uncovered ~30 minutes until thickened. For ultra‑smooth, blitz again.
Step 4 – Preheat the Pan
- Set oven to its hottest (250–260°C / 480–500°F) or preheat BBQ to high with lid down.
- Place the Le Creuset BBQ pizza pan inside and heat at least 30 minutes. Make sure to follow Le Creuset guidance for maximum temperatures and handling.
Step 5 – Shape, Top and Bake
- Dust work surface with semolina. Flatten one dough ball with fingertips, then lift and stretch over knuckles to ~30cm, keeping a thicker rim.
- Place on a pizza paddle or flat, parchment‑lined tray.
- Spread a thin layer of sauce (don’t overload). Add mozzarella and light toppings. Drizzle crust with olive oil.
- Launch onto the preheated pan. Bake/BBQ 8–10 minutes until the base is crisp and the rim blistered. The texture should be crisp underside, airy cornichon, cheese melted with light browning.
- Finish with basil and a pinch of Maldon Original Sea Salt. Repeat with remaining dough.
Tips & FAQs
Tips
- High heat is everything: preheat the pan for at least 30 minutes.
- Keep toppings light and well‑drained (pat mozzarella dry) to avoid soggy centres.
- Semolina acts like tiny ball bearings for easy launching; use a thin, even layer.
- If dough resists stretching, rest it 5–10 minutes to relax gluten.
- For extra flavour, cold‑ferment dough balls 12–24 hours.
FAQs:
- What temperature should I set for pizza on a BBQ pizza pan?
- Aim for the hottest your oven/BBQ safely reaches (typically 250–300°C / 480–570°F). Keep the lid down on a BBQ to hold heat.
- Can I use 00 flour instead of strong white bread flour?
- Yes. 00 flour gives a tender chew; strong bread flour adds structure. A 50:50 blend works well.
- How do I stop pizza sticking to the pan?
- Preheat the pan thoroughly and launch from a paddle/tray dusted with semolina. Avoid wet, heavy toppings.
- Can I make the dough ahead?
- Yes. Ball and chill up to 24 hours (or freeze balls up to 3 months). Thaw overnight in the fridge, then bring to room temperature for 1 hour before baking.
- Stone vs pizza pan — which is better?
- Both can deliver a crisp base. A preheated cast‑iron/steel pan often reheats faster between pies and holds heat well on BBQs.
Serving Suggestions
- Classic Margherita (mozzarella + basil), Diavola (salami + chilli), or Veggie (courgette ribbons + olives + capers).
- Finish hot pizzas with olive oil, Maldon Original Sea Salt, chilli flakes or a swirl of pesto.
- Side ideas: tomato and basil salad, rocket with lemon, marinated olives.
- Drinks: crisp lager, Italian red, or a Frozen Mango Margarita.
Storage & Reheating
- Leftover slices: refrigerate up to 3 days. Reheat on the pizza pan at 220°C (425°F) for 5–7 minutes or in an air fryer at 190°C (375°F) for 3–4 minutes.
- Dough: refrigerate balled dough up to 24 hours; freeze up to 3 months (lightly oiled bags).
- Sauce: refrigerate up to 5 days or freeze 2 months.
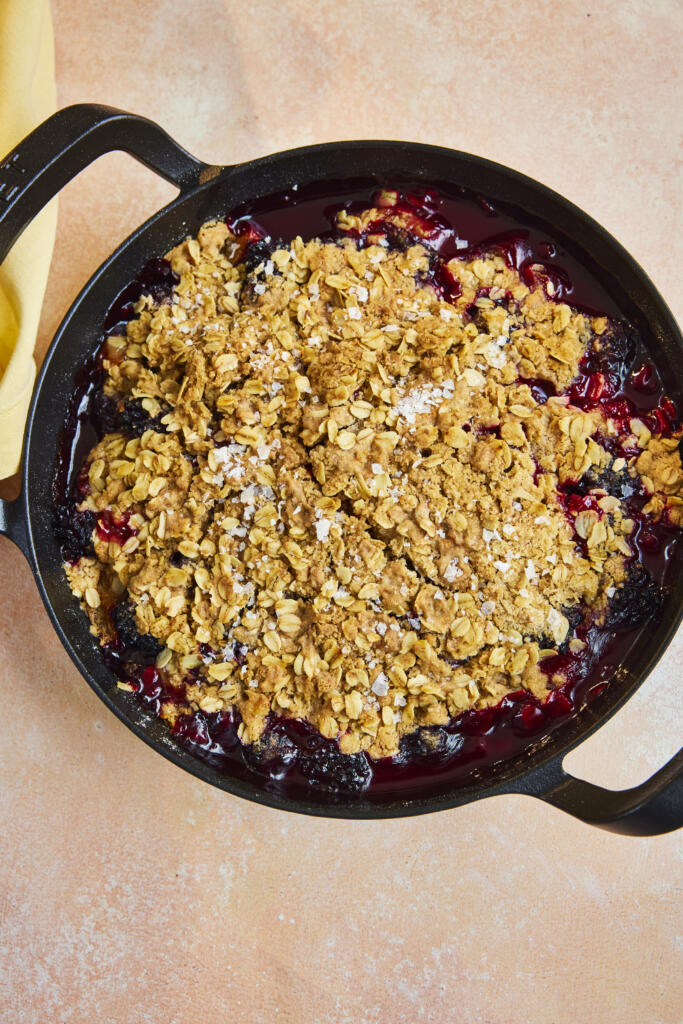
Celebrate late‑season fruit with this plum and blackberry crumble: juicy, tangy fruit baked beneath a buttery oat topping scented with cinnamon and a pinch of Maldon Original Sea Salt. The salt sharpens the fruit and adds balance to the sweet, crunchy crumbs. This easy fruit crumble comes together in minutes and bakes to a golden, bubbling finish — serve warm with ice cream, whipped cream or thick yogurt.
How To Make Blackberry and Plum Crumble (Quick Steps)
- Toss plums and blackberries with lemon and sugar to taste.
- Rub butter into flour, cinnamon and Maldon Sea Salt; add oats and Demerara.
- Scatter over fruit and bake at 180°C fan for 30 minutes until golden and bubbling.
- Rest briefly, then serve warm with ice cream or yogurt.
How To Make Blackberry & Plum Crumble (Detailed Version)
Step 1 – Heat the Oven & Prep Fruit
- Preheat oven to 180°C fan (200°C conventional / 400°F).
- Add plums and blackberries to a skillet or ovenproof dish.
- Taste the fruit; add a pinch of sugar only if needed. Squeeze over lemon juice and toss.
Step 2 – Make the Oat Crumble
- In a large bowl, mix flour, cinnamon and Maldon Original Sea Salt.
- Add butter cubes; toss to coat. Rub in with fingertips to fine breadcrumbs.
- Stir in oats and Demerara sugar. The texture should resemble a mix of fin crumbs and small clumps for crunch.
Step 3 – Assemble & Bake
- Scatter the crumble evenly over the fruit — don’t press down.
- Bake 30 minutes until the top is crisp and golden and the fruit is bubbling at the edges.
Step 4 – Serve
- Rest 5–10 minutes to let juices thicken slightly.
- Spoon into bowls and serve with ice cream, whipped cream or yogurt.
- Optional: finish with a tiny pinch of Maldon Sea Salt flakes for sweet‑salty contrast.
- Best served warm.
Tips & FAQs:
Tips
- Sweetness control: taste fruit first; late‑summer plums can be very sweet, so add sugar only as needed.
- Extra crunch: chill the crumble 10 minutes before baking to keep butter cold and crumbs craggy.
- Even browning: bake on the middle rack; rotate the dish after 20 minutes if browning unevenly.
- Juicy but set: letting the crumble stand for 10 minutes post‑bake helps juices thicken.
FAQs
- What’s the best fruit mix for a crumble?
- Tart blackberries balance sweet plums. You can swap in apples, pears or nectarines; aim for a tart‑sweet balance.
- Can I use frozen fruit?
- Yes. Bake from frozen but toss fruit with 1–2 tsp flour or cornflour to absorb extra juices and add 5–10 minutes to the bake.
- Can I make crumble ahead?
- Assemble fruit and topping separately up to 24 hours in the fridge. Top and bake just before serving. The raw crumble topping also freezes well.
- How do I keep the topping crunchy?
- Keep butter cold, don’t over‑mix, and avoid pressing the topping down. If needed, finish with 2–3 minutes under a hot grill/broiler.
- Can I make it dairy‑free or vegan?
- Use a plant‑based butter with similar fat content. Check that your sugar suits your dietary needs.
Serving Suggestions
- Classic: serve warm with a scoop of homemade ice cream..
- Lighter: thick Greek yogurt with a drizzle of honey.
- Extra texture: scatter toasted chopped pistachios or almonds before serving.
- Flavour twist: add orange zest to the fruit or swap cinnamon for mixed spice as we move into autumn.
Storage & Reheating
- Store leftovers covered in the fridge for up to 3 days.
- Reheat in a 170°C (340°F) oven for 12–15 minutes until hot and topping re‑crisped; or air fry at 170°C for 6–8 minutes.
- Freeze: cool completely, wrap tightly and freeze up to 2 months. Reheat from frozen at 170°C until piping hot (cover with foil if over‑browning).