Create a show-stopping classic beef Wellington with this simplified, step-by-step recipe, which serves up to 8 people. This easy beef Wellington features a beautifully seared beef fillet, which is brushed with Dijon mustard. wrapped in a rich mushroom duxelles made from chestnut mushrooms, layered with Parma ham (or prosciutto), then enclosed in all-butter pastry for a golden, flaky pastry finish. Careful chilling and resting of the beef Wellington ensures a medium-rare, perfectly pink centre on the beef.
Seasoned with Maldon Original Sea Salt and cracked black pepper, the beef Wellington with puff pastry pairs beautifully with creamy mashed potatoes, seasonal vegetable likes roasted carrots, and a rich red wine jus. This dish is ideal for any special occasion centrepiece; as a Easter alternative to lamb to a table show-stopper at Christmas time.
How to Make a Beef Wellington
Crafting a show-stopping beef Wellington by searing a tender beef fillet, wrapping it in mushroom duxelles and Parma ham, and baking it in golden, flaky puff pastry until perfectly pink at the centre.
Step 1 – Bring the Beef to Room Temperature
Remove the beef fillet from the fridge 1 hour before cooking so that the meat reached room temperature. This helps the meat cook more evenly, ensuring you achieve that signature pink centre without overcooking the outer layers.
Step 2 – Make the Mushroom Duxelles
Add unsalted butter and 1 tbsp olive oil to a large frying pan.
Soften the finely diced onion gently until translucent, then add the crushed garlic.
Pulse the chestnut mushrooms in a food processor until finely chopped, then cook them with the onions/garlic until all the liquid has evaporated (approx. 15 minutes). It is important to reduce the moisture from the mushroom duxelles because excess water can cause the pastry of the beef Wellington to become soggy.
Stir through thyme leaves and chopped parsley in the last 5 minutes.
Season with Maldon Original Sea Salt flakes and cracked black pepper, then cool completely, chilling in the fridge to firm up.
Step 3 – Sear the Beef Fillet
Generously season the beef fillet all over with Maldon Original Sea Salt flakes and cracked black pepper.
Heat a large frying pan over medium-high to high heat until very hot, then add 1 tbsp olive oil.
Sear the beef on all sides until well caramelised – no longer than 2 minutes total so the centre stays very rare.
Remove from the pan and rest for 30 minutes to cool slightly.
Step 4 – Wrap the Beef in Parma Ham and Duxelles
Lay out overlapping layers of clingfilm on a clean surface.
Arrange the Parma ham slices in an even layer that will fully wrap the beef.
Spread the chilled mushroom duxelles evenly over the Parma ham.
Brush the rested beef with Dijon mustard, place it on one edge, then use the clingfilm to roll everything up tightly into a firm “sausage” shape.
Twist the ends to secure and chill in the fridge for at least 1 hour (or overnight).
Step 5 – Encase in Puff Patry
Unroll the puff pastry on its parchment paper.
Remove the clingfilm from the beef log and place it in the centre of the pastry.
Wrap the pastry around the beef, sealing the edges well and ensuring the seam is on the underside.
Use beaten egg to brush and seal the pastry.
If needed, trim and use extra pastry to patch any gaps and decorate (e.g. thin strips for a lattice).
Transfer to a baking tray lined with baking paper and chill for a further hour to firm up.
Step 6 – Bake the Beef Wellington
Preheat the oven to 200°C (fan if appropriate – specify if recipe assumes fan or conventional).
Brush the Wellington all over with beaten egg for a glossy finish.
Bake for around 35 minutes, or until the pastry is deep golden brown.
You can mention indicative doneness (e.g. for medium-rare fillet, the centre should still feel slightly springy; optional note on using a thermometer if desired).
Remove from the oven and rest for 20 minutes before slicing.
Step 7 – Finish and Serve
Just before serving, sprinkle the pastry with Maldon Sea Salt flakes and a few extra thyme leaves. Seasoning your Wellington with Maldon Sea Salt flakes enhances flavour and texture by delivering clean, bright saltiness that lifts the beef, duxelles, and pastry while adding a delicate, crunchy finish.
Slice into 1-inch pieces with a sharp knife.
To Serve
A beef Wellington is ideal for Christmas, New Year’s, or any special occasion because it feels truly celebratory. It’s luxurious yet comforting, feeds a crowd with ease, and can be prepped ahead of time, making it perfect for busy kitchens. It’s classic flavour pair effortlessly with seasonal sides likes roasted carrots and red wine jus, making it just as fitting as a show-stopping alternative to lamb on Easter.
Here are a few sides that you can pair your beef Wellington:
Bring the beef fillet to room temperature for even cooking and a perfectly pink centre.
Sear the beef until golden to lock in flavour and prevent excess moisture.
Cook the mushroom duxelles thoroughly to remove moisture and avoid soggy pastry.
Wrap tightly with Parma ham (or prosciutto) to create a moisture barrier for the beef and mushroom duxelles.
Chill the beef Wellington before baking to help and pastry hold it’s shape.
Use all-butter puff pastry for the best golden, flaky finish.
Season generously with Maldon Sea Salt and cracked black pepper for an elevated flavour.
Rest the beef Wellington before slicing to keep the layers intact.
Doneness, Make-Ahead & Reheating Notes
How do I know when the beef will be done in a beef Wellington
Medium-rare is the classic level of doneness for beef Wellington. After 35 minutes at 200°C and resting, the 1lg fillet should be cooked and have a warm, perfectly pink centre with a tender texture.
Can I prepare beef Wellington in advance?
Yes, you can absolutely prepare beef Wellington in advance. You can assemble the Wellington (beef, mushroom duxelles, Parma ham, pastry), then wrap tightly in clingfilm and chill for up to 25 hours before baking.
Chilling helps the pastry stay crisp and golden and improves overall shape.
Brush with egg wash just before baking for the best finish.
Can I reheat beef Wellington?
Yes, you can reheat beef Wellington. Leftover slices can be reheated gently in the oven at 160°C (320°F) for 12-15 minutes until warmed. Make sure you use a wire rack to keep the pastry crisp.
You can also reheat in an air fryer. Set the air fryer to 150°C (300°F) and heat to 10-12 minutes, flipping halfway through for even cooking.
Avoid reheating in the microwave – it will make the pastry soggy and tough.
Please note – the beef will now stay medium-rare after reheating; it will cook further, but the flavour will remain delicious.
There are few desserts as universally loved and visually impressive as a molten chocolate fondant. Slicing through the delicate, baked sponge exterior to reveal a rich, flowing river of warm chocolate is the ultimate dinner party party trick. While they have a reputation for being difficult to master, this dark chocolate fondant recipe is surprisingly simple, requiring just 15 minutes of prep time. To cut through the richness of the dark chocolate and elevate the dessert to restaurant quality, we fold a generous pinch of Maldon Original Sea Salt flakes directly into the batter and finish the plated pudding with a final salty sprinkle.
Why You’ll Love This Dark Chocolate Fondant
The Perfect Molten Centre: Our precise baking time and temperature ensure that the outside sets into a light sponge while the inside remains delightfully gooey and liquid.
Sweet & Salty Balance: Dark chocolate and sea salt are a match made in heaven. The clean, bright salinity of Maldon Salt perfectly counteracts the bitterness of the cocoa and enhances the deep chocolate flavor.
Quick & Impressive: Despite looking incredibly complex, this molten chocolate fondant recipe comes together in under 30 minutes from start to finish.
How to Make Molten Chocolate Fondants (Step-by-Step)
Step 1 – Preheat and prepare
Preheat your oven to 200°C and place an empty baking tray onto the middle shelf to heat up. Take 2 ramekins (or dariole moulds) and grease the insides thoroughly with butter. Add the cocoa powder to one mould and tap it around to completely coat the buttery sides. Tip the excess cocoa powder into the second mould and repeat the process. Tip out any final excess cocoa powder, then set the prepared moulds aside.
Step 2 – Melt the chocolate
Place the unsalted butter and broken dark chocolate pieces into a heatproof bowl. Set the bowl over a pan of gently simmering water (a bain-marie), ensuring the base of the bowl does not touch the water. Stir continuously until the butter and chocolate have melted together into a smooth, glossy liquid. Remove the bowl from the heat and set aside to cool slightly.
Step 3 – Whisk the eggs
In a separate large bowl, add the whole egg, the 2 egg yolks, the caster sugar, and a generous pinch of Maldon Original Sea Salt flakes. Whisk the mixture vigorously until it becomes pale, thick, and fluffy.
Step 4 – Fold the batter
Pour the cooled, melted chocolate mixture into the fluffy egg mixture. Sift in the plain flour, then use a spatula to carefully fold everything together until just combined, ensuring you don’t knock the air out of the eggs.
Step 5 – Bake the fondants
Pour the fondant dark chocolate batter evenly into the prepared moulds, making sure to leave a 2cm gap at the top so they have room to rise. Carefully place the moulds onto the preheated tray in the oven and bake for exactly 10 minutes, until the tops have formed a crust and the edges are set.
Step 6 – Invest and serve
Remove the fondants from the oven and allow them to rest in their moulds for 30 seconds. Place a small dessert plate upside down on top of a mould, quickly flip it over, and carefully pull the mould away to invert the fondant. Serve immediately with a dusting of extra cocoa powder, a final sprinkle of Maldon Original Sea Salt flakes, and a scoop of vanilla ice cream.
Tips for the Perfect Gooey Centre
Do Not Skip the Cocoa Dusting: Greasing your moulds with butter and dusting them with cocoa powder is the secret to ensuring your fondants easily slip out of their ramekins without tearing and spilling their liquid centers.
Watch the Clock: Timing is everything with a molten chocolate fondant. Ovens vary, but 10 minutes at 200°C is usually the sweet spot. If you leave them in too long, they will bake all the way through and become standard chocolate cakes.
Use Quality Chocolate: Because chocolate is the star of the show here, ensure you are using a high-quality dark chocolate (ideally 70% cocoa solids or higher) for the richest, most decadent flavour.
Frequently Asked Questions
Can I prepare chocolate fondants in advance?
Yes, this is a fantastic make-ahead dessert! You can prepare the batter, pour it into the greased and dusted moulds, and keep them in the fridge for up to 24 hours. When you are ready for dessert, simply bake them straight from the fridge (you may need to add 1-2 extra minutes to the baking time since the batter is chilled).
Why didn’t my fondant melt in the middle?
If your chocolate fondant is cooked solidly all the way through, it was left in the oven for too long. Fondants continue to cook slightly from residual heat once removed from the oven, so it’s vital to pull them out as soon as the outer edges look set but the very centre still has a slight jiggle to it.
Why add sea salt to a chocolate dessert?
Salt is a natural flavour enhancer. Adding a pinch of Maldon Original Sea Salt to a rich chocolate dessert like this does not make it taste “salty.” Instead, the salt counteracts the bitterness of the cocoa, balances out the sugar, and makes the dark chocolate taste even more intense and complex.
Cabbage has become one of the biggest trends in modern cooking – loved for it’s affordability, versatility, and incredible ability to transform under high heat. When roasted, Savoy cabbage turns golden at the edges, rich and buttery at the core, and the perfect canvas for bold flavours. It’s no surprise that cabbage steak recipes are trending across Instagram and TikTok as cooks rediscover this once-humble vegetable.
Why are cabbages becoming popular again in food?
Cabbage is experiencing a major comeback as one of the biggest food trends of 2026, and there are several reasons for it’s rise in popularity.
It’s highly budget-friendly – Food prices have pushed home cooks towards ingredients that are affordable, versatile, and yield a lot per purchase. Cabbage fits this perfectly, making it a hero for cost-conscious cooing.
It’s an incredibly versatile ingredient – Chefs and creators highlight that cabbage can be roasted, sautéed, braised, fermented, grilled or served raw, making it one of the most adaptable vegetables available.
Social media trends are boosting it’s appeal – Pinterest Predicts and TikTok have reported major strikes in searches for cabbage dishes – from cabbage dumplings to fermented cabbage. Home cooks are incredibly inspired by visually striking cabbage steaks and charred wedges.
It offers strong nutritional benefits – Cabbage is a nutrient-dense cruciferous vegetable rich in vitamin C, folate, and potassium. It also has anti-inflammatory and gut-supportive properties, making it a go-to ingredient for health-focused cooks.
‘Simple Ingredients Done Well’ trend = Food analysts say the cabbage trend reflects a cultural shift toward everyday ingredients that deliver comfort, flavour, and a sense of home.
How to Cook Cabbage Steaks?
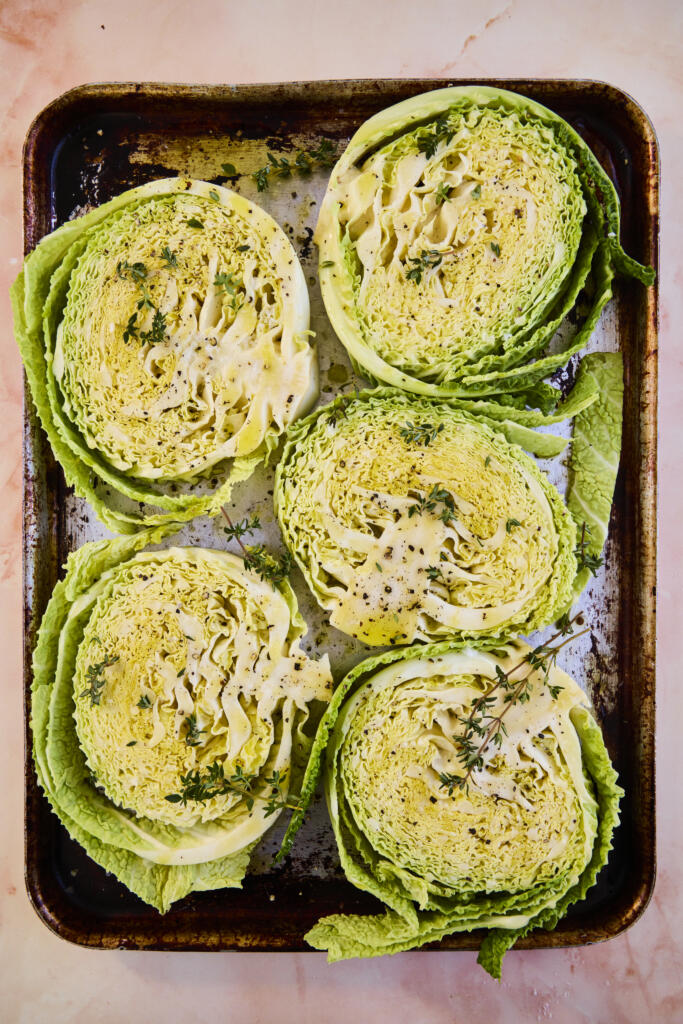
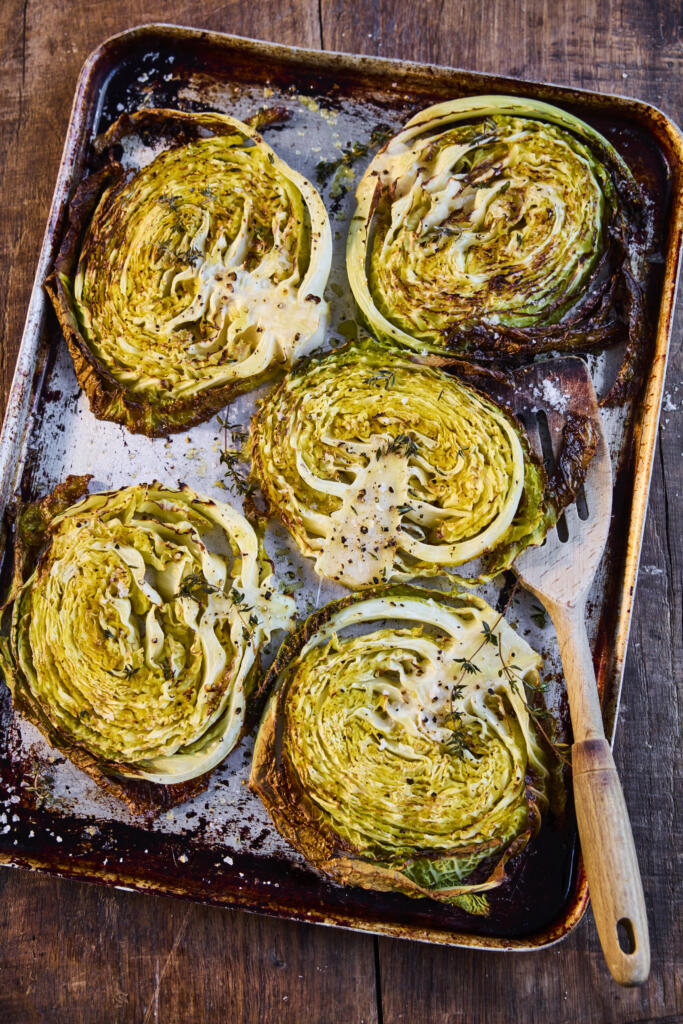
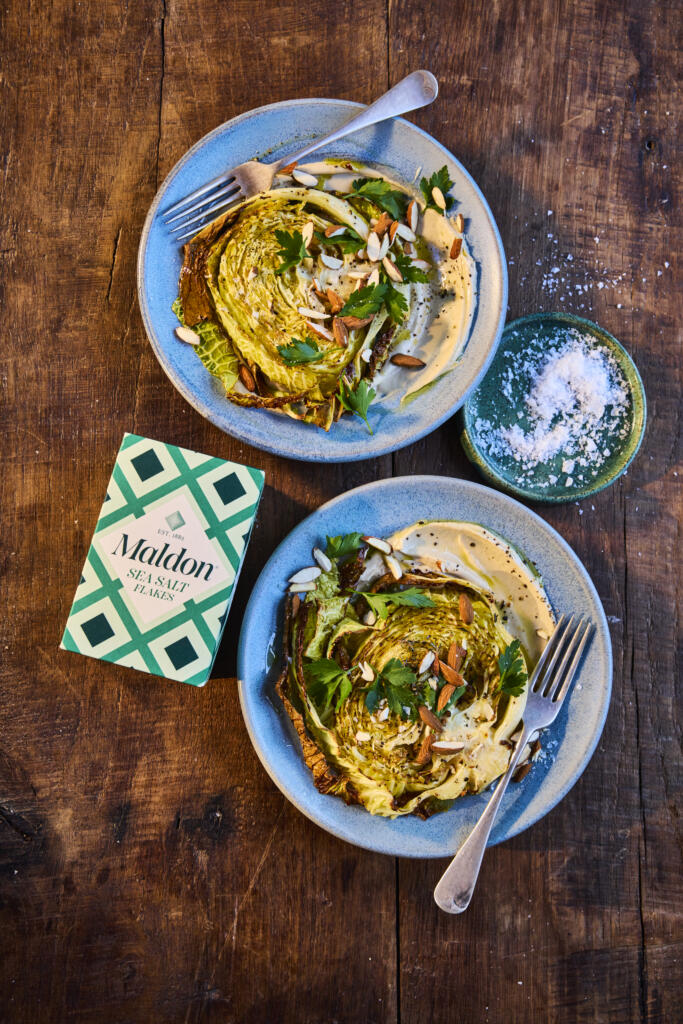
Raw Savoy cabbage steaks on a trayClose-up of the roasted edges + Maldon Sea Salt flakesFinal plated dish with tahini drizzle and toppings
This recipe brings together deeply caramelised roasted cabbage, a silky tahini sauce, and the clean, crisp finish of Maldon Original Sea Salt flakes. Topped with almonds and parsley, it’s a modern, plant-forward dish that punches fat above it’s simplicity.
Perfect as a side, centrepiece, or a hearty weeknight vegan dish – and ideal for sharing on Instagram thanks to those charred, crinkled Savoy leaves.
1. Prepare the cabbage steaks
Preheat the oven to 180c.
Take each savoy cabbage and slice into 1inch (roughly 2cm) ‘steaks’ to make 4 individual cabbage steaks. Discard the smaller pieces of cabbage from the ends – this can be used in another dish.
2. Roast until golden
Place the 4 cabbage steaks onto a baking tray and drizzle with the olive oil, some Maldon Original Sea Salt and cracked black pepper. Add some sprigs of thyme to the tray and then place into the preheated oven to roast for 25 minutes.
3. Make the tahini sauce
To make the tahini sauce, add the tahini to a mixing bowl along with the olive oil, lemon juice and Maldon Original Sea Salt flakes and pepper. It will be very thick so gradually add the water until it reaches a thick creamy consistency – you can add more water if you want it to be looser.
4. Plate and finish
To serve, place some of the creamy tahini sauce onto a place and then top with a roasted cabbage steak.
Garnish with some roasted chopped almonds and some parsley.
What to serve with cabbage steaks
A gain base: quinoa, bulgur, couscous, or wild race
Savoy cabbage works beautifully because it’s crinkled leaves roast into crisp, caramelised layers with soft centres. You can also use a classic green cabbage for a more neutral flavour. For a more vibrant, festive colour, you can use a red cabbage, but it may take slightly longer to cook and has a firmer texture.
Why are my cabbage steaks not crispy?
Make sure the steaks are well coated in oil and have space on the roasting tray – overcrowding causes steaming, not browning. More steam being produced means the cabbage is getting wet and will not get crispy.
Can I make cabbage steaks ahead of time?
You can part-roast cabbage steaks and finish just before serving. Add the tahini sauce and additional garnishes only at the end.
How do I store leftovers?
Store in an airtight container for up to 2 days. Reheat in the oven to restore crispness.
Can I make this recipe vegan and gluten-free?
This cabbage steaks recipe is naturally vegan and gluten-free – just make sure the topping (like nuts) are suitable for your guests.
How thick should I cut cabbage steaks?
We recommend cutting your cabbage steaks 2-3cm in thickness. This ensures a nice crispy edge and tender centres.
Make It, Taste It, Love It!
We’d love to see how you cabbage steaks turned out. Share your creation and tag us on Instagram at @maldonsalt so we can celebrate your seasoning mastery.
Originating from the French city of Lyon, this classic side dish transforms humble ingredients into a restaurant-quality centrepiece. Lyonnaise potatoes are the perfect marriage of textures and flavours: waxy potato slices pan-fried in butter and olive oil until golden and crisp, tossed together with deeply caramelised, sweet white onions. To elevate this traditional recipe, we finish the pan with a generous pinch of Maldon Garlic Sea Salt flakes, perfectly complementing the sweet onions and rich butter with a burst of savoury, roasted garlic flavour.
Why You’ll Love This Lyonnaise Potatoes Recipe
The Perfect Texture: Parboiling the potatoes first ensures they are beautifully tender on the inside, while frying them in batches guarantees a golden, crispy exterior.
Incredible Flavor: Slowly caramelising the onions in the leftover potato cooking oils creates a sweet, savory depth that coats every single bite.
Elevated Simplicity: It requires only a few basic pantry staples to create an impressive, classic French dish that pairs perfectly with almost any main course.
How to Make Lyonnaise Potatoes (Step-by-Step)
Step 1 – Parboil the potatoes
Start by slicing the waxy potatoes into 2cm thick slices, discarding the very small, uneven ends.
Place the slices into a pot of cold water and bring to the boil. Let the potatoes boil for just 2 minutes—you want them to start becoming tender but remain uncooked and firm in the middle. This crucial step ensures they won’t break down and turn to mash when sautéed later.
Step 2 – Dry and fry in batches
Drain the potatoes well and allow them to sit for a few minutes to ensure they are fully dry. In a large frying pan, add half of the butter and olive oil.
Once hot, begin frying the potato slices in batches to ensure they all get nice and golden crisp on each side.
Remove the slices from the pan as they finish cooking.
Step 3 – Caramelise the onions
Once all the potato slices are fried and set aside, add the remaining butter and olive oil to the pan.
Toss in the finely sliced white onions along with the Maldon Garlic Sea Salt flakes. Fry over medium heat for about 8 minutes until the onions are soft, golden, and beautifully caramelised.
Step 4 – Combine and serve
Finally, add the golden potatoes back to the pan with the onions to warm them through. Season with cracked black pepper.
Transfer the Lyonnaise potatoes to a serving dish and garnish with an extra sprinkle of Maldon Garlic Sea Salt flakes and the freshly chopped parsley.
Tips for the Perfect Potatoes a la Lyonnaise
Use Waxy Potatoes: It is vital to use waxy potatoes (like new potatoes, Charlotte, or Yukon Gold) rather than floury baking potatoes. Waxy potatoes hold their shape when boiled and fried; floury ones will disintegrate in the pan.
Dry Thoroughly: Moisture is the enemy of a crispy crust. After draining your parboiled potatoes, let them steam dry completely before they hit the hot fat.
Don’t Rush the Onions: The magic of a true recipe for potatoes Lyonnaise comes from the sweet, jammy onions. Take your time during the 8-minute frying stage to ensure they caramelise properly without burning.
This rich, buttery side dish is incredibly robust and pairs beautifully with classic, protein-heavy mains. It is the ultimate side dish for a perfectly seared steak, a roasted rack of lamb, or crispy-skinned roast chicken.
Frequently Asked Questions
What are Lyonnaise potatoes?
Lyonnaise potatoes (or pommes de terre à la lyonnaise) is a traditional French dish originating from the city of Lyon. It consists of sliced, pan-fried potatoes mixed with thinly sliced, butter-caramelised onions, typically finished with fresh parsley.
Do I have to peel the potatoes first?
This comes down to personal preference. Traditionally, the potatoes are peeled. However, if you are using thin-skinned new potatoes, you can absolutely leave the skins on for extra texture and rusticity.
Can I make Lyonnaise potatoes ahead of time?
While they are best served fresh and crispy straight from the frying pan, you can do the prep work ahead of time. You can parboil the potatoes and slice the onions hours in advance, leaving only the frying and caramelising for right before dinner.
Wild garlic season brings one of the most anticipated flavours of the year—vibrant, aromatic, and beautifully green. When blended into creamy, high-quality softened butter, it creates an irresistible condiment that elevates everything it touches. Learning how to make wild garlic butter is incredibly simple, taking only 5 minutes and a quick blitz in a food processor. To truly bring out the punchy, earthy flavours of the foraged leaves, we season this compound butter with our signature Maldon Garlic Sea Salt flakes, adding the perfect savoury crunch and an extra layer of roasted garlic depth.
Why You’ll Love This Wild Garlic Butter Recipe
Lightning Fast: With zero cooking required, this impressive, vibrant green butter comes together in just 5 minutes of prep time.
The Ultimate Flavour Enhancer: It is incredibly versatile. Melt it over a hot steak, stir it through freshly cooked pasta, or simply spread it thickly onto warm sourdough.
Preserve the Season: Wild garlic has a notoriously short season. Making a batch of this compound butter and rolling it into a log allows you to freeze it and enjoy the taste of spring all year round.
How to Make Wild Garlic Butter (Step-by-Step)
Step 1 – Blitz the garlic and salt
Start by placing the thoroughly washed and dried wild garlic leaves and the Maldon Garlic Sea Salt flakes into a food processor. Pulse the machine a few times to break up the wild garlic until it is very finely chopped.
Step 2 – Add the butter
Add the room-temperature, softened butter to the food processor. Pulse again until the finely chopped wild garlic is evenly dispersed throughout the butter, turning the entire mixture a stunning, vibrant green colour.
Step 3 – Shape the butter
Place a large, rectangular piece of baking parchment onto your kitchen surface. Spoon the bright green butter directly into the centre of the paper.
Step 4 – Roll and chill
Fold the parchment paper over the butter and roll it to shape the mixture into a neat, tight sausage shape. Twist the ends of the parchment paper tightly to seal it (like a Christmas cracker). You can either serve the butter immediately while soft, or place it into the fridge for 1 hour to firm up into a sliceable log.
Tips for the Perfect Compound Butter
Use Softened Butter: This is the most important step! If your butter is straight from the fridge and too cold, it will not blend smoothly with the wild garlic, leaving you with unpleasant, chunky lumps. Leave the butter out on the counter for a few hours before starting.
Dry the Leaves Thoroughly: If you have washed your foraged wild garlic, ensure every drop of water is dried off (using a salad spinner or kitchen towel) before adding it to the food processor. Excess water will cause the butter to split.
Don’t Over-Process: Pulse the butter just until it turns green and is combined. If you leave the food processor running on high for too long, the friction will melt the butter completely.
What to Serve with Wild Garlic Butter
The simplest and often best way to enjoy this is sliced thickly and smeared over a warm, crusty sourdough baguette. However, it also makes an incredible “melt” for hot food. Try placing a disc of chilled wild garlic butter on top of a resting steak, stirring a spoonful into a pan of sautéed mushrooms, or tossing it through freshly boiled new potatoes.
Frequently Asked Questions
How to make garlic butter wild wild garlic without a food processor?
If you don’t have a food processor, you can easily make butter by hand. Simply use a sharp knife to mince the wild garlic leaves as finely as humanly possible. Add the minced leaves and the Maldon Garlic Sea Salt to a mixing bowl with your softened butter and beat vigorously with a wooden spoon until fully incorporated.
Can you freeze wild garlic butter?
Yes, you can absolutely freeze wild garlic butter! Freezing is the best way to extend the short wild garlic season. Keep the butter wrapped tightly in its parchment paper sausage, place it in an airtight freezer bag, and freeze for up to 3 months. You can slice off individual discs straight from frozen whenever you need them.
Where can I find wild garlic?
Wild garlic typically grows in damp, ancient woodlands across the UK from late winter until the end of spring. If you aren’t keen on foraging, you can often find bunches of it at local farmers’ markets or premium greengrocers during the peak season (March to May).
When you need an elegant, restaurant-quality vegetable side dish but are short on time, this sauteed asparagus with mushrooms is the perfect solution. Earthy, wild mushrooms meet vibrant, tender-crisp asparagus in a hot pan, soaking up rich olive oil and aromatic crushed garlic. The entire dish comes together in under 15 minutes from prep to plate. The secret to elevating this simple pan-fry? A generous pinch of Maldon Smoked Sea Salt flakes tossed through right at the end to enhance the savoury, umami flavours of the mushrooms.
Why You’ll Love This Sautéed Asparagus Recipe
Lightning Fast: With just 5 minutes of prep and 10 minutes in the pan, this is the ultimate speedy side dish for busy weeknights or stress-free dinner parties.
Incredible Texture: Pan-frying the mushrooms on a high heat gives them a beautiful, golden-crisp edge, while the asparagus stays perfectly vibrant and tender-crisp.
Earthy & Smoky: Using a blend of wild mushrooms (like shiitake or chanterelle) paired with our signature smoked sea salt creates a deep, complex flavour profile that punches far above its simple ingredients.
How to Make Sauteed Asparagus with Mushrooms (Step-byStep)
Step 1 – Prepare the vegetables
Start by preparing your asparagus. Remove the tough, woody ends from the spears, then cut the remaining tender stems in half to create two shorter pieces per spear. Next, take your mixed mushrooms and brush them clean. Keep any smaller mushrooms whole, but cut larger varieties in half so everything cooks at the same rate.
Step 2 – Fry the mushrooms
Heat the olive oil in a large frying pan over a high heat. Add the prepared mushrooms and fry until they soften, release their moisture, and develop a nicely golden, crisp exterior.
Step 3 – Add the asparagus and garlic
Once the mushrooms are golden, toss the prepared asparagus pieces into the hot pan. Sauté the asparagus in the olive oil alongside the mushrooms for a couple of minutes until they turn bright green.
Step 4 – Finish and season
Add the crushed garlic cloves to the pan. Fry for another minute or so until the garlic becomes beautifully fragrant and the asparagus is perfectly tender. The whole cooking process should take 10 minutes or less. Remove the pan from the heat, season generously with Maldon Smoked Sea Salt flakes, and serve immediately.
Tips for the Perfect Pan-Fried Vegetables
Brush, Don’t Wash: Mushrooms are like sponges. If you rinse them under water, they will absorb it and steam in the pan rather than getting crispy. Always use a dry pastry brush or a damp piece of kitchen paper to gently brush away any dirt.
Keep the Heat High: To get that lovely golden-brown sear on the mushrooms without overcooking the asparagus, make sure your frying pan and olive oil are nice and hot before you start.
Add Garlic Last: Crushed garlic burns very quickly over high heat, turning bitter. By adding the garlic during the final minute of cooking, you infuse the dish with its fragrant flavour without risking a burnt taste.
What to Serve with Sautéed Asparagus
This garlicky, earthy side dish is incredibly versatile. It is a classic pairing for a pan-seared steak, a juicy roast chicken breast, or a thick-cut pork chop. For a vegetarian option, try serving these savoury vegetables stirred through a creamy Parmesan risotto or simply tossed with fresh pasta and an extra drizzle of good quality olive oil.
Frequently Asked Questions
Can I use butter instead of olive oil
Yes, you can absolutely use butter instead of olive oil! While our recipe calls for asparagus sautéed in olive oil for a lighter, Mediterranean finish, you can absolutely substitute it with butter. Butter will add a rich, nutty flavour that pairs beautifully with the mushrooms.
How do I know where to trim the asparagus
The easiest way to find where the tough, woody end stops and the tender stem begins is to take one spear of asparagus and gently bend it near the bottom. It will naturally snap at the exact point where it becomes tender. You can use that snapped piece as a length guide to slice the rest of your bunch with a knife.
Can I use standard button mushrooms?
You certainly can use button mushrooms instead of mixed mushrooms. However, we highly recommend using a “mixed wild” pack (containing varieties like shiitake, oyster, or chanterelle) if you can find them. They offer a much meatier texture and a deeper, more complex flavour than standard white button mushrooms.
If you have never tried cooking radishes before, you are in for a treat. While raw radishes are famous for their sharp, peppery bite, learning how to roast radishes completely transforms them. The oven mellows their heat, turning them incredibly sweet, tender, and juicy. Paired with earthy, vibrant baby rainbow carrots and a drizzle of honey, this dish is the ultimate celebration of seasonal root vegetables. We finish the whole tray with a generous pinch of Maldon Pepper Sea Salt flakes to perfectly balance the natural sweetness with a subtle, savoury, peppered flavour.
Why You’ll Love This Roasted Radishes and Rainbow Carrots Recipe
A Transformation of Flavor: Roasting radishes is a revelation, swapping their raw spice for a mellow, turnip-like sweetness that pairs flawlessly with caramelised carrots.
Visually Stunning: The mix of vibrant pinks, purples, oranges, and yellows makes this a beautiful side dish that will elevate any dinner table or Sunday roast.
Minimal Prep: With only 5 minutes of prep work required, you simply toss the vegetables on a tray and let the oven do the hard work.
How to Make Roasted Radishes and Rainbow Carrots (Step-by-Step)
Step 1 – Preheat the oven
Preheat your oven to 180°C.
Step 2 – Prepare the vegetables
Lightly scrub the rainbow carrots to remove any dirt and place them whole onto a large baking tray. Take your mixed radishes and keep the smaller ones whole, while halving any larger ones so everything cooks evenly. Add them to the tray.
Step 3 – Prepare the garlic
Cut the whole garlic bulb in half horizontally right through the middle, creating two cross-sections. Nestle both halves onto the baking tray among the vegetables.
Step 4 – Season and toss
Drizzle the carrots, radishes, and garlic generously with the olive oil. Season well with Maldon Pepper Sea Salt flakes and cracked black pepper. Give everything a light toss on the tray to ensure the vegetables are evenly coated, then place into the preheated oven.
Step 5 – Roast and garnish
Roast the vegetables for 35 minutes, or until they are fork-tender and beautifully caramelised around the edges. Remove from the oven, arrange on a serving platter, and finish with fresh thyme leaves and a sweet drizzle of honey.
Tips for the Perfect Roasted Root Vegetables
Don’t Overcrowd the Pan: Make sure your radishes and rainbow carrots have plenty of space on the baking tray. If they are piled on top of each other, they will steam instead of caramelising and getting those delicious, crispy edges.
Squeeze the Garlic: Once roasted, those halved garlic bulbs become incredibly sweet and spreadable. Squeeze the soft garlic cloves out of their papery skins directly over the vegetables before serving for an extra punch of flavor.
The Pepper Salt is Key: Because the carrots and radishes both become quite sweet in the oven—especially with the honey drizzle—the Maldon Pepper Sea Salt is vital. It cuts through the sweetness and adds a complex, savoury depth.
What to Serve with Roasted Radishes
This vibrant mix is incredibly versatile. It serves as a fantastic, colourful side dish for a classic Sunday roast chicken or beef. It also pairs beautifully with grilled fish, thick-cut pork chops, or as part of a larger vegetarian feast alongside grains like quinoa or farro.
Frequently Asked Questions
Can you roast radishes?
You can absolutely roast radishes! While often eaten raw in salads, roasting is arguably the best way to eat radishes. The heat breaks down their spicy compounds, turning them mild, juicy, and deliciously sweet.
Do I need to peel baby rainbow carrots?
No, there is no need to peel baby rainbow carrots! Their skins are very thin and hold a lot of nutrients. Simply give them a good scrub under cold water to remove any dirt before tossing them on your baking tray.
Can I use regular carrots or standard red radishes?
Yes. While the mixed colours of rainbow carrots and mixed radishes look stunning on a platter, the recipe works exactly the same with standard orange carrots and classic red globe radishes. Just ensure you cut any larger standard carrots into batons so they cook at the same rate as the radishes.
Bring bold, classic American flavours into your kitchen with our latest collaboration featuring recipe creator Chloe Hood.
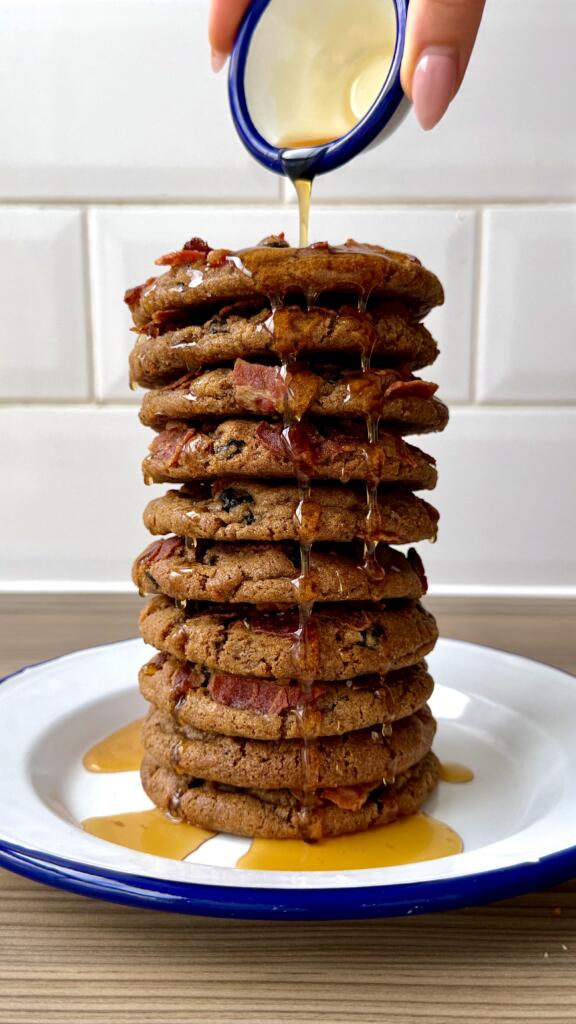
These Blueberry, Bacon & Maple Syrup Cookies are a deliciously unique twist on the sweet-and-salty (swalty) cookie trend, stacked high like an irresistible tower of pancakes and finished with a glossy drizzle of maple syrup.
Crafted with nutty brown butter, rich maple sweetness and chewy pops of dried blueberries, each cookie is studded with smoky, crispy bacon and elevated with the deep, rich flavour of Maldon Smoked Sea Salt flakes. The result is a cookie that’s decadent, surprising, and perfectly balanced – sweet, salty, smoky and buttery in every bite.
Perfect for adventurous bakers, weekend treats, or anyone craving a standout cookie recipe.
How to make Blueberry, Bacon and Maple Syrup Cookies
By Chloe Hood – A Stack of Blueberry, Bacon & Maple Syrup Cookies
Heat butter in a saucepan over a medium heat, stirring continuously, until deep brown and smelling nutty. Cool to room temperature.
Using an electric mixer, beat together browned butter, sugars and maple syrup.
Briefly mix in the egg and vanilla to combine.
In a separate bowl, combine flour, cinnamon, bicarb and Maldon Smoked Sea Salt.
Gradually, using a spatula, fold the dry mixture into the wet.
Before the dough is fully combined, fold in the dried blueberries.
Divide the dough into 10 equal balls (approximately 70g each).
Roll the top half of each dough ball in the bacon pieces.
Place on baking paper, cover and rest in the fridge overnight.
When ready to bake, preheat oven to 180°C (fan).
Space dough balls out on cold, baking paper-lined trays. Bake for 9 minutes.
Remove from the oven and bang the tray on the kitchen counter three times. Then, apply a circular motion around the cookies, using a cookie cutter.
Bake for 4 more minutes.
Repeat tray bangs and circular motion.
Whilst they’re still hot, sprinkle with Maldon Smoked Sea Salt.
Leave for 15 minutes before transferring to a wire rack to finish cooling.
Stacked them up and drizzle over maple syrup!
Made This Recipe? We Want to See!
If you recreated this recipe, don’t forget to tag @maldonsalt so we can admire your delicious stack of cookies. You can find out more details about Maldon Smoked Sea Salt flakes here.
Preheat the oven to 180c. Start by roasting the cauliflower and sweet potato. Place the cauliflower florets and the sweet potato cubes into a roasting tray and drizzle over the olive oil. Then add the turmeric, some Maldon Sea Salt and cracked black pepper. Toss this around in the tray so all the pieces are evenly coated.
Place into the preheated oven and roast for 30 – 40 minutes until soft, and lightly charred.
While the vegetables are roasting, get a small bowl and add the lime juice, rice vinegar and caster sugar. Mix until the sugar dissolves. Then add the finely sliced radishes to the bowl and toss. Set aside and allow this to pickle and turn a beautiful pink colour as you prepare the rest of the bowls.
To make the dressing, simply add all the ingredients to a bowl and whisk together. Set aside to use later.
Fry two Burford brown eggs until just set but not too crispy on the edges, adding a splash of water to the frying pan near the end of the cooking can help achieve this.
Prepare the packet rice according to the packet instructions. Then divide between the two bowls. Add some of the roasted cauliflower and sweet potato. Then top with some sliced avocado, a fried egg, some cucumber and carrot ribbons and the pickled radishes.
Drizzle over some of the ponzu dressing and then garnish with finely chopped chives and furikake.
Cut the squid into a mixture of rings or thick slices with the skin scored in a crisscross pattern. Keep the tentacles left whole or cut into two pieces. In a large bowl mix together the Shaoxing wine, soy sauce and grated ginger. Add the prepared squid to the bowl and toss it through the marinade so it is well coated. Cover the bowl in clingfilm and set aside in the fridge for 15 minutes.
In a second large bowl, mix the plain flour, cornflour and Maldon Pepper Sea Salt.
Place the vegetable oil in a deep saucepan, so it comes 3 inches up the sides. Place it on a medium heat and let the oil come up to 180c.
Take the squid out of the fridge and lift each piece out, shaking off any excess marinade and then transferring it into the flour bowl. Toss each piece well in the flour, again shaking off any excess, before dropping them into the hot oil. Do this in smaller batches so as not to overcrowd the pan.
Use a slotted spoon to lift the fried squid out of the oil when it is golden brown (after 2 – 3 minutes), and place onto a tray with some kitchen paper to absorb any excess oil.
In a small bowl mix together the mayonnaise, finely chopped coriander and dill, and lime juice.
Serve the fried squid immediately with the herbed mayonnaise and some extra Maldon Pepper Sea Salt.