






- Preheat the oven to 180c.
- Firstly, start with the Hasselback potatoes. The easiest way to make the cuts is to place a potato onto a chopping board and put a chopstick flat on either side. Then using a knife, carefully cut slices all the way along the potato – the chopsticks will ensure that you don’t cut fully through the potato. Repeat this with each potato.
- Place the leg of lamb onto a large roasting tray skin side up, and then nestle the prepared potatoes around it. Cut the shallots in half lengthways and add them to the tray. Cut the garlic bulbs in half, cutting through the cloves like a cross section. Add two of the halves to the tray. Use a sharp knife to insert some small cuts into the skin of the lamb, then press some of the other cut garlic cloves and small sprigs from the rosemary into the cuts. Slice the lemon in half and add this to the tray as well. Finally slot the bay leaves into some of the cuts of the potatoes.
- Drizzle the potatoes, shallots, garlic and lemons with 3 tbsp of the olive oil then drizzle the remaining two across the lamb. Season well with Maldon Sea Salt and cracked black pepper. Place into the preheated oven and roast for 1 hour 25 minutes.
- While the lamb and potatoes are cooking, make the salsa verde. Add the chopped shallot, anchovies, capers and herbs into a bowl. Add the red wine vinegar and give it a stir. Then slowly drizzle in the olive oil and give it a good mix. Season with Maldon Sea Salt and cracked black pepper to taste. Set aside.
- Once the lamb is cooked, remove it from the oven. The potatoes should be lovely and golden, and tender in the middle – but if they need a little longer, simply lift the lamb out onto a board to rest and return them to the oven for 10 minutes. Allow the lamb to rest before carving and serving with the potatoes, some greens and the salsa verde.
Category: Uncategorized
This quick and easy air fryer salmon recipe is the perfect way to enjoy a delicious and healthy meal without the hassle. In just a fraction of the time it takes to cook traditional salmon, the air fryer delivers perfectly crispy, golden-brown skin with tender, flaky fillets. Paired with colourful stem broccoli and seasoned with Maldon Sea Salt flakes, this salmon and veggies dish is both flavourful and nutritious. The best part? It’s all cooked in one air fryer basket, making clean-up a breeze and the cooking time quicker – ideal for busy weeknights or a light weekend dinner.
Air frying salmon and vegetables
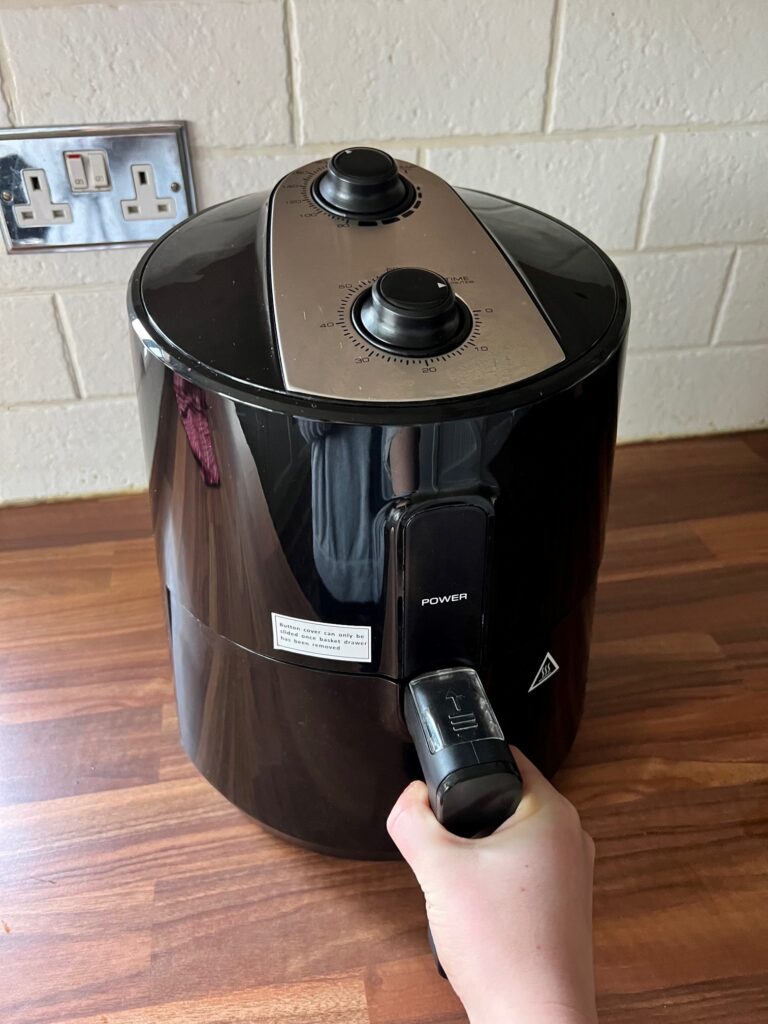
The beauty of this dish lies in it’s simplicity and speed. The air fryer ensures that the salmon achieve a perfectly flaky texture with a golden, crisp skin, while the vegetables retain their crunch and natural flavours. With minimal prep and clean up, this recipe is ideal for busy weeknights or when you want a wholesome meal without the hassle. Pair the salmon and veggies with a a packet of ready-cooked rice for a complete meal that’s both satisfying and healthy. Embrace the ease of air frying and make healthy eating in January a breeze.
How to cook salmon in an air fryer

To make this air fryer salmon and veggies, start by seasoning your salmon fillets with olive oil, Maldon Sea Salt and cracked black pepper. You can also add a pinch of garlic powder and a touch of brown sugar for subtle sweetness. Place the fillets skin-side down on a sheet of parchment paper in the air fryer basket. You can also arrange a few sliced bell peppers around the fish if you only have a one-basket air fryer. Air fry the salmon at the perfect temperature for a few minutes, ensuring the skin crisps up nicely while keeping the flesh moist and tender. After about 10-12 minutes, you can squeeze fresh lemon juice over the top, and serve your delicious fried salmon and roasted veggies right from the air fryer. With minimal prep and just a few simple ingredients, this air fryer recipe is a winning dinner choice that tastes like a gourmet meal.
Step 1
Place the salmon fillets skin-side down into the air fryer drawer.
Step 2
Brush the salmon skin with olive oil and sprinkle with a generous amount of Maldon Sea Salt flakes. Add a little black pepper and set to one side.
Step 3
In the second drawer, or alongside the salmon if you’re using a single-drawer air fryer, add the vegetables. Drizzle with olive oil, season generously with Maldon Garlic Sea Salt and a pinch of pepper, then give everything a good shake to ensure even coating. Place both drawers into the air fryer, ready to cook.
Step 4
Air fryer for 10 minutes at 200ºC, giving the vegetables a shake half way through cooking.
Step 5
Meanwhile, heat up your rice as per the packet instructions.
Step 6
Once everything is ready, share the rice between two plates, top each with a piece of perfectly cooked salmon and finish with the tasty vegetables. Make sure you eat the salmon skin, it’s the best bit!
What other vegetables can I serve with salmon?

There are many vegetables that go well with salmon such as tender asparagus spears, mild courgette slices, and sweet carrot batons, all of which are delicious when roasted or air-fried. Crisp green beans and sugar snap peas add a fresh, crunchy texture, while blistered cherry tomatoes provide juicy bursts of flavour. Hearty butternut squash cubes bring a slightly nutty depth, and a handful of spinach can be added at the end to wilt gently alongside the cooked salmon. These vibrant choices create a perfect balance of flavours, textures, and colours to complement your salmon dish.
Can you air fry frozen salmon?

Yes, you can cook frozen salmon in an air fryer. It’s a quick and convenient way to cook salmon without thawing it first. Simply preheat the air fryer to the desired temperature (around 199°C/390°F). Lightly coat the air fryer basket with oil or cooking spray to prevent sticking. Alternatively, you can use baking paper/parchment paper. Place the frozen salmon fillet in a single layer in the basket. You’re probably wondering how long does it take to air fry salmon? We recommend air frying the salmon for around 8-9 minutes, or until the salmon reaches an internal temperature of 145°F.
Is air frying salmon healthy?

Yes, air frying salmon can be a very healthy way to cook this nutrient-rich fish. The air fryer uses hot air circulation to cook food, which requires less oil than traditionally frying in a pan. This results in a lower-fat dish without sacrificing flavourful. Here are three benefits of air frying salmon, including how Maldon Sea Salt can enhance the dish.
- Lower Fat Content – Air frying reduces the amount of oil needed to cook salmon, compared to methods like deep frying or pan-frying. The hot air in the air fryer crisps up the salmon’s skin and helps lock in moisture without saturating the fish with excess fat. Since salmon already contained healthy fats (such as Omega-3 fatty acids, using minimal oil ensures that the dish stays light yet flavourful.
- Preserves Nutrients – Salmon is packed with essential nutrients, including Omega-3 fatty acids, protein, and vitamins D and B12. Air frying cooks the fish quickly and evenly, helping to retain these beneficial nutrients. The method also avoids overcooking the salmon, which can cause a loss of nutrients. The crispy skin create din the air fryer is an added bonus, as it adds a delicious texture without compromising the nutritional profile.
- Better Control Over Seasoning – When using Maldon Sea Salt in your air fryer salmon recipe, you get a better control over the seasoning. Maldon Salt is renowned for it’s delicate, flaky texture, which allows it to dissolve easily and evenly on the surface of the fish. It’s an excellent way to enhance the natural flavours of the salmon without overpowering the dish. Just a light pinch of Maldon Sea Salt after air frying gives the salmon a perfectly balances taste while also adding the mineral benefits of sea salt.

Who is MOB?
MOB, formerly known as Mob Kitchen, is a popular food platform that shares accessible and budget-friendly recipes. Their Instagram account, @mob, features a wide array of recipes, cooking tips and engaging food content.
Founded by Ben Lebus in 2016, MOB aims to inspire a love of cooking by providing simple, delicious and affordable recipes. Over the years, they have expanded their reach through cookbooks, a website, and a strong presence on social media platforms. Their content often included step-by-step recipe videos, behind-the-scenes glimpses and collaborations with carious chefs and food enthusiasts.
‘MOB One’ Cookbook

The ‘MOB One‘ cookbook is a vibrant culinary companion from MOB, the influential collective of chefs and creators who have captured the hearts (and taste buds) of over 2.7 million followers online.
Known for their accessible approach to cooking, MOB’s latest release is a game-changer, promising a world of delicious meals with minimal hassle. Staying true to their mission of inspiring everyone to love cooking, MOB One simplifies the process with recipes that rely on just one pot, pan or tray. The result? Dishes that are easy to prepare, affordable and undeniably delicious – perfect for home cooks of all skill levels.
MOB One thrives on the philosophy that great food doesn’t have to be complicated. The cookbook’s 100+ recipes are organised into intuitive categories like Easy Ones, Speedy Ones, Fancy Ones and Slow Ones, ensuring there’s something for everyone mood and occasion. From a creamy Vodka Orzotto to a hearty ‘Triple ‘Ch’ Traybake’ with chicken, chickpeas and chorizo, each recipe emphasises bold flavours without the fuss. There’s even a veggie spaghetti that somehow channels the taste of buffalo wings and show-stopping Coffee-Roasted Pork Belly for special occasions. With added QR bonus content covering essential cooking skills and online collections, MOB One goes beyond the page to truly transform your time in the kitchen.
In Conversation with MOB…
Hey MOB team! We’re HUGE fans of ‘MOB One’. Tell us, what inspired the concept for this cookbook?
We’re constantly looking at what issues our audience face when cooking, and I can’t tell you how often people talk about washing up! We wanted to create a cookbook that really spoke to that pain point and we knew that cooking everything in one pan was something that our audience would love.
The chapters—Easy Ones, Speedy Ones, Fancy Ones, and Slow Ones—are an excellent way to help readers find recipes to suit their needs. Can you share more about how you decided on these categories?
We wanted the dishes to suit a whole range of needs, from quick and easy midweek meals, to longer weekend slow cooks and dishes that whilst being cooked in one pan, would still be really impressive meals that people could serve up to their friends and family.
What was the process of selection and testing recipes for ‘MOB One’? Were there any surprising favourites or unexpected hits during the development?
We wanted a real range of recipes that hit within the recipe categories, we worked with some incredible recipe developers on the book that created all the stunning recipes in the book. It’s almost impossible for me to pick a favourite in there!
With over 100 new recipes to choose from…come on…you MUST have a favourite!
Well you always know a good recipe when it comes out of the test kitchen and it’s eaten by people in the office in a blink of an eye and I remember when the Nduja and pickled pepper pasta came out, it was gone almost instantly, and everyone was really raving about it. I’ve cooked it at home since then and it’s really incredible- I highly recommend if you’re looking for a new favourite midweek meal.
MOB has built an incredible community with over 2.7 million followers. How has the feedback from your audience influenced the recipes and format of ‘MOB One’ and your previous cookbooks?
Listening to feedback is always our first port of call when we’re working out what theme to run with next, it’s the same for anything we do here- we always want to create something that our audience are looking for, and then add our own twist to a theme. We’re constantly getting feedback from our audience on what they want to see next… we’ve actually already started on the next book and it’s something our audience have been asking for ALOT this year.
We’re curious, what does a normal day in the life look like for a MOB team member?
No day looks the same for a food team member here! We use audience feedback and data from what people are cooking on our site to dictate the kind of recipes we make as a team, it’s usually our healthy midweek meals that people love the most! Then the team devote their days to developing recipes, testing them and tweaking them to make sure they’re perfect and then shooting recipes for our feed.
Name three things in the kitchen you can’t live without!
- Spoonula – which is basically a half spatula and half spoon and it’s the best tool to use when cooking and then to get all the sauce out of a pan!
- A good knife, it doesn’t need to be expensive, it just needs to be sharp!
- A pan that you can cook on top of the stove and move into the oven- We’ve got a great round one and it’s so handy for one pan cooking!
‘Nduja and Pickled Pepper Pasta Recipe

A super-spicy one-pot pasta loaded with ’nduja, chorizo, cherry tomatoes and heaps of guindilla chillies – it’s tingly, it’s oozy and it’s oh-so-satisfying. A short, spirally pasta, such as radiatori or mafalda corta, works well for this.
Serves: 4 people
Prep time: 5 minutes
Cooking time: 20 minutes
Equipment: Use a large pan with a lid.
Ingredients:
- 150g chorizo
- 5 garlic cloves
- 300g cherry tomatoes
- 6 pickled guindilla chilli peppers
- A few sprigs of oregano
- 4 tbsp extra virgin olive oil
- 350g short pasta
- 700ml hot chicken stock
- 4 tbsp ’nduja paste
- 250g mascarpone
- 60g Parmesan
- Maldon Sea Salt flakes
- Black pepper
Method:
- Start with the prep. Chop the chorizo into 0.5cm rounds, then finely chop the garlic. Halve the cherry tomatoes and finely slice the chillies. Strip the leaves from the oregano sprigs.
- Heat the olive oil in the pan over a medium heat, add the garlic and chorizo and fry for 3–5 minutes until fragrant and the chorizo has released its red oil.
- Add the tomatoes and most of the chillies and oregano(reserving some of both for garnish), the pasta, stock and ’nduja paste to the pan. Season generously, cover with the lid and bubble away, stirring occasionally, for 10–12 minutes until
the pasta is al dente. - Remove the lid, add the mascarpone and toss vigorously to make sure most of the liquid is absorbed. Grate in most of the Parmesan and toss again until you have a nice glossy sauce.
- Sprinkle with the reserved chillies and oregano, then grate over the remaining Parmesan and to serve.
Where to Buy ‘MOB One’?

You can find where to purchase the NEW cookbook here and start being creative with food and flavours in the comfort of your kitchen.
Make sure you have your Maldon Salt ready for these recipes! If you are running out, please feel free to browse on our Where to Buy Page to find your nearest store in which stocks our beloved Maldon Salt.
Lastly, we LOVE seeing your creations – please tag us on Instagram using the #maldonsalt so we can share your own take on MOB’s recipes!

Nestled in the heart of Stockport, Little Scarfs is a one-of-a-kind fresh pasta and natural wine bar that doubles as a culinary studio. Founded by the talented duo Hannah and Elliot, the space is a haven for food lovers seeking innovative veg-focused cuisine and exceptional wines. Known for their handcrafted, seasonal pasta creations, Little Scarfs blends artistry with sustainability.
They run events and workshops, having fun with different designs and themes, and collaborating with other creatives. From smoky night pasta making classes, to serving up a warming tomato-based dish on the menu using braided pasta, there’s an occasion for everyone!

In December, Little Scarfs brought their culinary expertise to life in a sold-out pasta-making workshop, showcasing their commitment to high-quality ingredients and bold flavours.
Participants learned the craft of handmade, plant-based pasta, using premium elements like Maldon Smoked Sea Salt to elevate every bite. The workshop was a celebration of creativity and community, with attendees savouring the unique interplay of smoky, flaky salt and delicate, fresh pasta. Hannah and Elliot’s passion for teaching, combined with their attention to detail, left guests inspired and eager for the next event.
Getting to know Hannah and Elliot…

Hi Hannah & Elliot, tell us about Little Scarfs and how it came to be.
Hey! Absolutely! Only a year ago we were both working in different industries but wanting to be more creative and with a passion for cooking, we bought a pasta roller and made it almost every day for several weeks. We still crave it on a daily basis! As a couple, we love being creative together – from designing our logo, photographing moments, to creating new recipes.
Where do you seek your inspiration from?
We spent a few weeks travelling around European cities two summers ago and loved the food scene in Berlin in particular – how inspired the veggie brunches felt and discovering different studios combining art with cooking such as Herrlich and Schmaus.
There’s a funny story about your first paying visitor, tell us more.
Haha! Yes, so the lovely people at Rare Mags, the magazine shop around the corner, were hosting a talk and book signing and wanted to bring the author to Little Scarfs beforehand on our opening night. Minutes after opening, Tim Anderson (MasterChef winner and author of several amazing cookbooks) comes in. No pressure! He was absolutely lovely and all went well, but definitely a few deep breaths before cooking his pasta.
In the culinary world, is there anyone you look up to?
Elliot’s sister, Sophie Gordon, is a massive inspiration for us both. Not only because of her cooking and what she’s achieved with her supper clubs, retreats and cookbook but not being scared of creating her own path. Also, we know we can get honest advice from her!
Stockport appears to be a real creative hub, why do you think that is?
Hannah is from Stockport, so has loved seeing it grow into a cool, arty space for different shops selling vintage clothing, vinyls, natural wine and sourdough bakes. The council have been amazing at trying to only fill The Underbanks with independent shops, so it ends up with lots of shops that are really cared for.
What’s your favourite thing on the menu right now?
Our giant sun-dried tomato filled pappardelle is super tasty and really fun to make. It’s nice to have created something comforting, that feels indulgent but is full of good stuff, but that isn’t something you would typically make at home.
Why should people come to Little Scarfs this year?
We’ll be continuing to offer a small, considered menu of fresh pasta that we will always make from scratch. We are going to host more culinary events working with great brands and creatives, create more fun content, and collect more lovely plates and glasses. Even if you’re not in Manchester, follow the journey of our culinary studio! Thanks so much! Hannah and Elliot, Little Scarfs.
Visit to Little Scarfs today!
Check out their main website where all upcoming events/classes will be posted.
Walk-ins are available on Thursday, Friday and Saturday from 5-10pm. Kitchen closes at 8:30pm.
Little Scarfs are also excited to announce that they now take enquiries for private pasta making classes for 8-12 people, product launches, events and collaborations! For any enquiries, please email littlescarfs00@gmail.com .
Recipe created by Air Fryer Girl
Creamy, flavourful and effortlessly quick, these Creamy Garlic Butter Beans with Spinach are a game changer for busy weeknight or anyone looking for a quick and easy vegan dish! Elevated by the rich, aromatic Maldon Garlic Sea Salt, this recipe transforms humble ingredients into a dish bursting with savoury goodness. Whether you’re embracing Veganuary or simply seeking a nourishing, plant-based meal, this is the perfect go-to option. Plus, it’s air-fryer friendly, making clean-up a breeze!
Ready in just 25 minutes, this recipe requires minimal effort, yet delivers maximum flavour. The butter beans become velvety and indulgent, while fresh baby spinach wilts beautifully, creating a perfect balance of texture and taste. The air fryer works it’s magic, infusing the dish with the deep, garlicky notes of Maldon Garlic Sea Salt as you stir every five minutes for even cooking. Pure comfort in a bowl, made easy by your air fryer.
How to cook creamy garlic butter beans with spinach using an air fryer
- Start by removing the crisper tray from the air fryer drawer.
- Place the olive oil and rosemary into the drawer and air fry for 5 minutes at 200ºC.
- Once the 5 minutes is up, pour the butter beans (including the liquid) into the air fryer drawer, along with the red wine
vinegar, a generous pinch of Maldon Garlic Sea Salt and a little pepper. Mix everything together (at this point, if the rosemary leaves have come away from the stalk you can remove the stalks). - Air fry for 15 minutes at 200ºC, stirring every 5 minutes.
- Meanwhile, prepare your tomatoes and sourdough. I like to cook the tomatoes in the air fryer for 5-6 minutes on
190ºC, until soft and heated through and the sourdough takes around 4-5 minutes to turn into perfectly crisp toast. - Once the beans have finished cooking, stir in the spinach and pop back in the air fryer for a final 4 minutes at 190ºC.
- To plate up, place your sourdough on a plate, top with the butter beans mixture, followed by the tomatoes and tuck in!
- If you like to have a bit of meat with your meals – a bit of crunchy streaky bacon goes perfectly with this dish! (air fry the bacon for 8 minutes at 190ºC).
- Enjoy!
This aubergine traybake with tahini dressing is a Middle Eastern-inspired dish that combines bold flavours with vibrant textures in a single roasting tin. Perfect for busy weeknights or effortless entertaining, this recipe transforms tender roasted aubergine into a show-stopping centrepiece. The smoky heat of rose harissa pairs beautifully with creamy tahini dressing, while a sprinkle of Maldon Sea Salt flakes enhances every bite. Ready in just 45 minutes, this dish is finished with chopped parsley, but you can also use fresh mint leaves, toasted pine nuts and a touch of lemon juice for a extra burst of freshness.
Step 1
Preheat the oven to 180c.
Step 2
Prepare the aubergine but slicing them in half lengthways, keeping the stalk on, so you have 4 halves. Then score the flesh of each half with a sharp knife in a crisscross pattern – making sure to only cut the flesh and leave the skin intact.
Step 3
Then take a large baking tray and add the chickpeas, red onion wedges and red pepper chunks to the tray. In a small bowl, mix together the harissa and olive oil. Drizzle most of this in the tray and toss so all the ingredients are well coated.
Step 4
Next add the aubergine halves on top of the other veg in the tray so the cut side is facing up and then brush with the remaining harissa paste mix. Season well with Maldon Sea Salt flakes and cracked black pepper.
Step 5
Place the tray into the preheated oven for 25 minutes until everything is starting to look charred and softened. At this stage add the cherry tomatoes on the vine and nestle them in the tray around the aubergine, drizzling with a little extra oil. Then place the tray back in the oven for an additional 20 mins.
Step 6
While the veg is cooking, prepare the tahini dressing. Simply whisk together the tahini, lemon juice and olive oil. Then add as much water as needed until you reach a drizzle consistency – start with a tablespoon at a time. Season well with Maldon Sea Salt flakes and cracked black pepper.
Step 7
When the traybake is ready, remove from the oven and drizzle over the tahini dressing and the chopped parsley. Serve alongside some charred pitta bread, if you like.
Can you keep cooked aubergine in the fridge?
Yes, you can keep cooked aubergine in the fridge. Make sure to store it in an airtight contained for up to 3-5 days, however it’s best consumed within a few days for optimal freshness.
Can you keep cooked aubergine the freezer?
Yes, you can store cooked aubergine in the freezer for up three months in an airtight container. When you are defrosting your aubergine, thaw it in the fridge for 24 hours. Make sure to drain any excess water and pat dry to prevent it from becoming mushy!
Indulge in the perfect autumn dish with our air fryer pumpkin gnocchi, served with a rich, creamy sauce. Roasted pumpkin, caramelised onions, and soft gnocchi come together, topped with crispy sage, toasted walnuts, and a sprinkle of parmesan. This comforting homemade meal is easy to prepare and bursting with seasonal flavours, offering a flavour-packed experience. This air fryer pumpkin gnocchi recipe will transform pillowy gnocchi into a golden, slightly crisp delight, enhanced by a luscious pumpkin-infused sauce!
Whether you’re a fan of a classic potato gnocchi or a lover of seasonal pumpkin puree, this dish brings together the earthy richness and the aromatic crunch of fried sage, and the creamy decadence of parmesan cheese. Ready in no time, this dish is a celebration of simplicity and flavour, perfect for weeknights or impressing dinner guests.
Here’s how to make the pumpkin gnocchi and crispy sage recipe…

Step 1
Start by preparing the pumpkin by peeling and deseeding it, then cutting it into small 2cm pieces. Then preheat your air fryer to the desired setting – we did ours at 180c. Place the diced pumpkin into the basket along with the onion wedges and drizzle with olive oil then season with Maldon Garlic Sea Salt and cracked black pepper.
Step 2
Cut the garlic bulb into half so the cloves are exposed and then wrap each half in kitchen foil. Place these wrapped bulbs into the basket with the pumpkin and onions. Place the basket into the air fryer and roast for 15 – 20 minutes until the pumpkin is tender and the onions have softened and charred, remove from the basket and set aside. Once cool enough to handle, unwrap the foiled garlic bulbs and the garlic should be golden and soft inside – if they need a little simply wrap them again and place back in the air fryer for 5 minutes more.
Step 3
In a small frying pan add some oil and heat to a medium heat, then add the sage leaves and allow then to fry for a minute or so until crisp then remove and set aside. Place the walnuts into the air fryer and toast for 5 minutes. Then remove and roughly chop.
Step 4
Place a large pan of salted water on to boil and season well with Maldon Sea Salt. Then cook the gnocchi according to the packet instructions, then drain them but make sure to reserve a large mug of the cooking water. Place the drained gnocchi into a large frying pan.
Step 5
Put the roasted pumpkin and onion into a blender. Squeeze the garlic out of the paper skins and add to the blender too. Then add the grated parmesan, some Maldon Garlic Sea Salt and cracked black pepper to the blender along with 50ml of pasta water. Blend until smooth, adding a little more pasta water if required.
Step 6
Tip the smooth sauce into the pan with the cooked gnocchi and gently heat through, tossing well. Again, you can add a splash more of the pasta water here if it’s looking a little thick – you want a nice glossy sauce.
Step 7
Serve the gnocchi in bowls and then top with the toasted walnuts, crispy sage leaves and some extra grated parmesan.
Alternative sauces you can use for your gnocchi
Here are three delicious sauces to try instead of pumpkin for your gnocchi recipe:
Pesto Sauce

Brighten your gnocchi with a vibrant basil pesto. Blend fresh basil leaves, garlic, pine nuts, parmesan cheese, olive oil and a pinch of Maldon Sea Salt until you get a smooth sauce. Toss in your cooked gnocchi for a fresh, herbaceous twist. This sauce is perfect for those looking for a light yet flavourful option!
Creamy Parmesan Alfredo Sauce

For a rich and indulgent option, whisk together cream, butter, and freshly grated parmesan cheese over medium heat until smooth and velvety. The creamy Alfredo sauce coats the gnocchi beautifully, creating a luxurious dish for a cosy dinner. Add a touch of nutmeg for extra depth.
Tomato Butter Sauce

A simple yet irresistible choice, this sauce combined the tanginess of tomatoes with the richness of butter. Simmer crushed tomatoes with a generous amount of butter, garlic and a pinch of Maldon Sea Salt until thickened. Toss the gnocchi in the sauce and finish with fresh basil and parmesan for a comforting, hearty meal.
Each of these sauces offers a unique flavour profile, ensuring there’s something for evert palate. However, one of our favourites is a classic brown butter sauce. This is made by cooking unsalted butter in a pan until the milk solids turn slightly brown, giving a nutty, toasty flavour. The French name for brown butter is ‘beurre noisette’ which translates to ‘hazelnut butter’.
How to make brown butter sauce

If you’re looking to elevate your classic potato gnocchi recipe, brown butter sauce is a game-changer. Brown butter’s nutty caramelised richness perfectly compliments the light, pillowy texture of potato gnocchi, creating a luxurious yet simple dish. To make this alternative sauce, melt 150g unsalted butter in a pan over medium heart, stirring until it turns golden brown and develops a warm, toasty aroma. Add crispy sage leaves for an earthy kick and a pinch of Maldon Sea Salt and cracked black pepper to elevate the flavours. The brown butter sauce clings to each gnocchi, creating a dish that’s indulgent, aromatic, and incredibly satisfying. Top with freshly grated parmesan for a final touch of decadence.
How to make gnocchi without using potatoes
Here are three creative ways to make gnocchi without using potatoes:
Pumpkin or Sweet Potato Gnocchi

Replace traditional potatoes with pumpkin puree or mashed sweet potato for a flavourful twist. These ingredients add a hint of natural sweetness and vibrant colour to the gnocchi. Mix the puree with flour, egg, Maldon Sea Salt and a pinch of nutmeg or cinnamon for an autumn-inspired version that pairs beautifully with brown butter or cream sauces.
Cauliflower Gnocchi

For a low-carb and gluten-free option, use cauliflower! Steam or boil cauliflower florets until tender, then blend them into a smooth puree. Combine the puree with almond flour, an egg and Maldon Sea Salt to form a dough. This version is healthy and still satisfying, with a slightly nutty taste.
Ricotta Gnocchi

Craving indulgence? Swap the potatoes for creamy ricotta cheese to create light and tender gnocchi bites. Ricotta gnocchi, also known as ‘gnocchi di ricotta’ originates from Italy, and is similar to ‘Gnudi’ which is gnocchi-like dumplings filled with ricotta cheese and semolina.
Simply mix ricotta with flour, parmesan cheese and a pinch of Maldon Sea Salt. The dough comes together quickly and requires less kneading, resulting in soft, melt-in-your-mouth gnocchi with a subtle cheesy flavour.
Looking for a hearty and satisfying meal to warm up those cold evenings? This comforting chorizo and butter bean stew is the perfect solution, brimming with bold flavours and velvety texture. Whether you’re embracing Veganuary or simply craving a wholesome plant-based dish, this easy butterbean stew recipe is sure to become a family favourite. Infused with the smoky warmth of smoked paprika, tender butter beans and a hint of Maldon Sea Salt flakes, this stew pairs beautifully with a slice of crusty bread for the ultimate cosy dinning experience.
Here’s how to make a chorizo and butterbean stew

This butter bean stew is a delicious and hearty dish that’s perfect for any time of year. Packed with vibrant flavours from rosemary, garlic, and chorizo, it’s both comforting and nourishing.
Step 1:
Start by taking a large shallow pan and placing on a medium heat.
Step 2:
Melt the olive oil before adding the sliced onions and a pinch of Maldon Sea Salt flakes. Cook these gently for 2-3 minutes until softened.
Step 3:
Add the sliced garlic, rosemary, smoked paprika and chorizo and fry for another 5 minutes until the garlic smells fragrant and the chorizo begins to crisp.
Step 4:
Add the tinned tomatoes, followed by the butterbeans. (We used Bold Beans butter beans, but you can use lima beans or white beans if preferred). Stir well and allow the mix to bubble and thicken for 5 minutes. You should have a rich tomato base to create the perfect balance of flavours.
Step 5:
Stir the spinach and allow it to wilt into the sauce. Zest the lemon into the pan and season with more Maldon Sea Salt flakes and cracked black pepper.
Step 6:
Serve the stew sprinkled with parsley, crumbled feta (or vegan alternative ), and some toasted sourdough for dunking and soaking up the last of the juices!
How long can you keep the chorizo and butter bean stew in the fridge?
Once your stew is cooked, you can store it in the fridge for up to three to four days. You need to make sure that the stew is packed in a secure, airtight container before refrigerating it within two hours of cooking.
Please note that stews made with fish or shellfish should only be refrigerated for no more than a day.
Can you freeze cooked chorizo and butter bean stew?
You can freeze the chorizo and butter bean stew for up to three months once cooked. We recommend not eating it after three months because although it would still be safe to eat, it might not taste as good!
Make sure to store the stew in a secure, airtight container. When you are ready to eat the stew, place the frozen stew in the refrigerator to thaw slightly for at least 24 hours but no more than 2 days before reheating. You can reheat the stew by placing it in a saucepan on the stovetop over low heat, stirring occasionally until heated through.
Alternatively, you can reheat it in the oven at a low temperature, ensuring you stir periodically to prevent burning and ensure even heating throughout.
If you want to reheat the stew in a microwave, you need to make sure that the stew is covered with a microwave-safe lid or plastic wrap. This will trap steam and keep the stew nice and moist. Microwave on high for 1-2 minutes, or until the stew is warmed through.
Easy, butter bean recipes
If you’re looking for more easy butter bean recipes to make during the week, why not try a few of our favourites from our friends at Maldon Salt.
Spiced Roasted Carrots and Hazelnuts with Silky Butter Bean Mash

This is Rukimini Iyer’s butterbean recipe from ‘The Green Cookbook’. She roasts carrots with coriander seeds under foil, while the rich, silky butter bean mash takes just 10 minutes to put together. This recipe is a substantial, flavour-packed dish which is incidentally vegan!
Grilled Mackerel, Oregano and Lemon Pesto with Green-Style Butter Beans
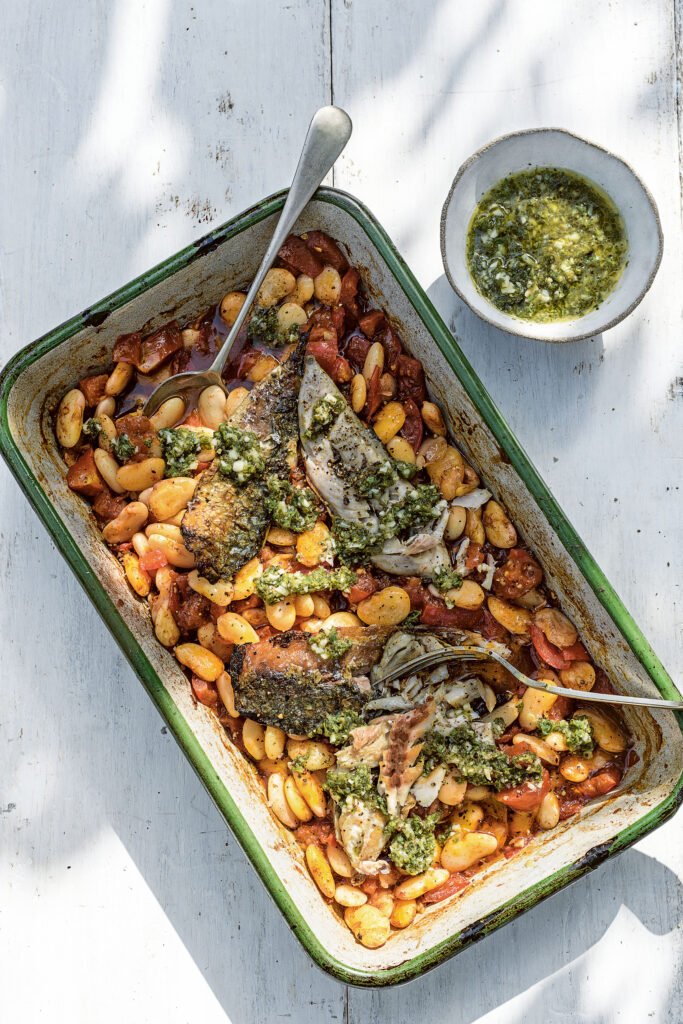
Genevieve Taylor loves fish and meat proteins, but she also adores pulses and tries to eat them several times a week! Cheap and cheerful, a bowlful of beans is an excellent way of making your mackerel go a little further. Fresh oregano is one of Gen’s favourite herbs, giving a slightly floral note to the pesto-style dressing.
Spiced White Beans with Roasted Carrots and Crispy Kale

Although white beans are not the same as butter beans, they are both types of white beans. White beans have a creamy, mild taste and can often be used interchangeably in recipes. This recipe, we used Bold Bean & Co’s Organic White Beans (haricot beans), which are perfect to use for this dish as their bean’s are slow-cooked which allows them to hold their shape when simmering in a stew, creating the perfect, buttery and smooth flavour.
When the cold winter months roll in, a hearty yet refreshing dish like a winter chickpea salad is just what you need. This versatile chickpea salad recipe is perfect as a main dish, a side, or even for meal prep. Combining the creaminess of the chickpeas with the vibrant pomegranate seeds, butternut squash, and crunchy baby carrots, this dish is a flavour-packed powerhouse! A generous pinch of Maldon Garlic Sea Salt flakes elevates the flavours, making it the perfect addition to your Veganuary menu or a comforting plant-based option for any day of the week.
Finish the recipe with a simple tahini dressing to make the salad burst with flavour, or instead use vegan mayonnaise to drizzle on top. You can also try crumbling a few pieces of plant-based cheeses to add depth and texture to the dish. We like using Violife Non-Diary Feta Style Cheese which is great when tossed in a crispy salad.
Here’s how to make the Winter Chickpea Salad

This vibrant and healthy salad is packed with roasted butternut squash, baby carrots, crispy chickpeas, and massaged kale, all drizzled with a creamy tahini dressing. Full of nourishing ingredients, it combines sweet, savoury and earthy flavours, complimented by the crunch of pomegranate seeds and toasted mixed seeds. Easy to prepare and full of vitamins, fibre, and plant-based protein, this dish makes for a satisfying and wholesome meal. Perfect for anyone looking to enjoy a nutritious, flavour-packed meal.
Step 1:
Preheat the oven to 180°C.
Step 2:
Place the butternut squash and baby carrots onto a roasting tray. Drizzle with 1 tbsp olive oil, fennel seeds, Maldon Garlic Sea Salt, and black pepper. Roast in the preheated oven for 25 minutes until tender, golden, and slightly charred.
Step 3:
Drain the chickpeas and pat them dry with kitchen paper. We used Bold Bean Co Organic Chickpeas, but you can substitute with white beans, cannellini beans or butterbeans as they all have the same creamy texture and mild flavour. Spread them onto a second baking tray and drizzle with 1 tbsp olive oil, paprika, and ground cumin. Season well and roast in the oven for 15 minutes until crispy and golden.
Step 4:
While the vegetables and chickpeas are roasting, place the kale into a large mixing bowl. Add 1 tbsp olive oil and a big pinch of Maldon Sea Salt. Massage the kale with your hands to soften it, then set aside.
Step 5:
Prepare the tahini dressing by whisking together tahini, lemon juice, olive oil, water, and seasoning until smooth and creamy.
Step 6:
Once the vegetables and chickpeas are roasted, assemble the salad. Toss most of the tahini dressing through the kale and transfer it to a platter. Top with the roasted butternut squash, baby carrots, and crispy chickpeas.
Step 7:
Drizzle over the remaining tahini dressing and garnish with pomegranate seeds and toasted mixed seeds before serving.
What to serve with your chickpea salad?
A winter chickpea salad is versatile and pairs beautifully with a variety of dishes. Here are some great options to serve alongside it:
Warm Bread
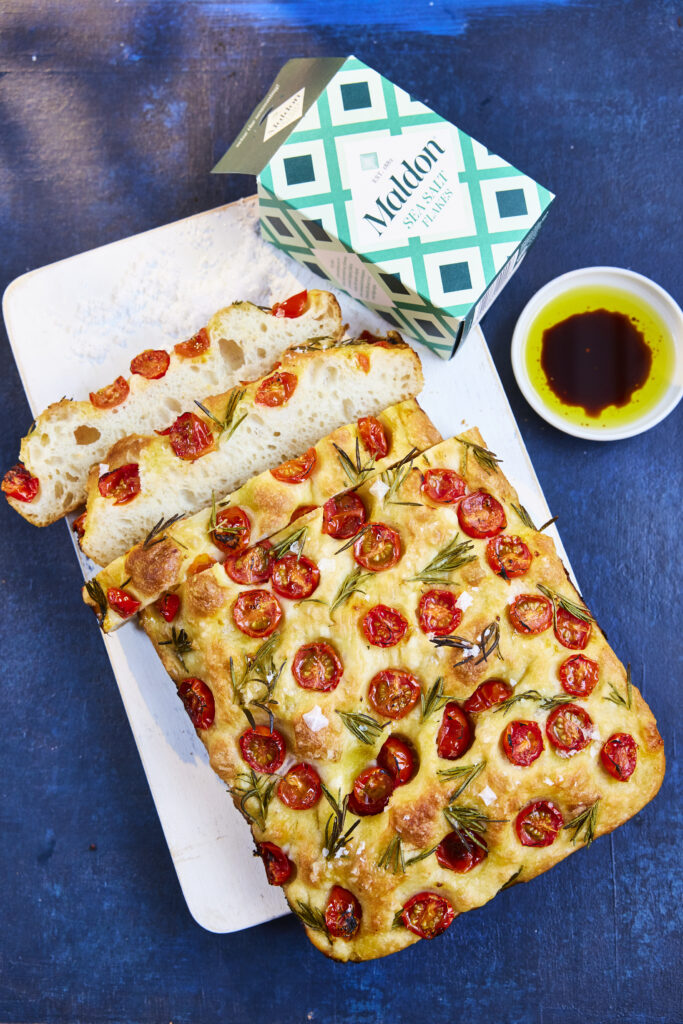
A delicious, crusty bread is perfect for scooping up the salad and soaking up it’s tangy dressing. Try making a cherry tomato and pesto focaccia which is easy to follow and packs a lot of flavour. Alternatively, pairing the salad with a warm, garlic bread add a wonderful savoury flavour to the dish, and adds a tasty crunch to your meal.
Soup
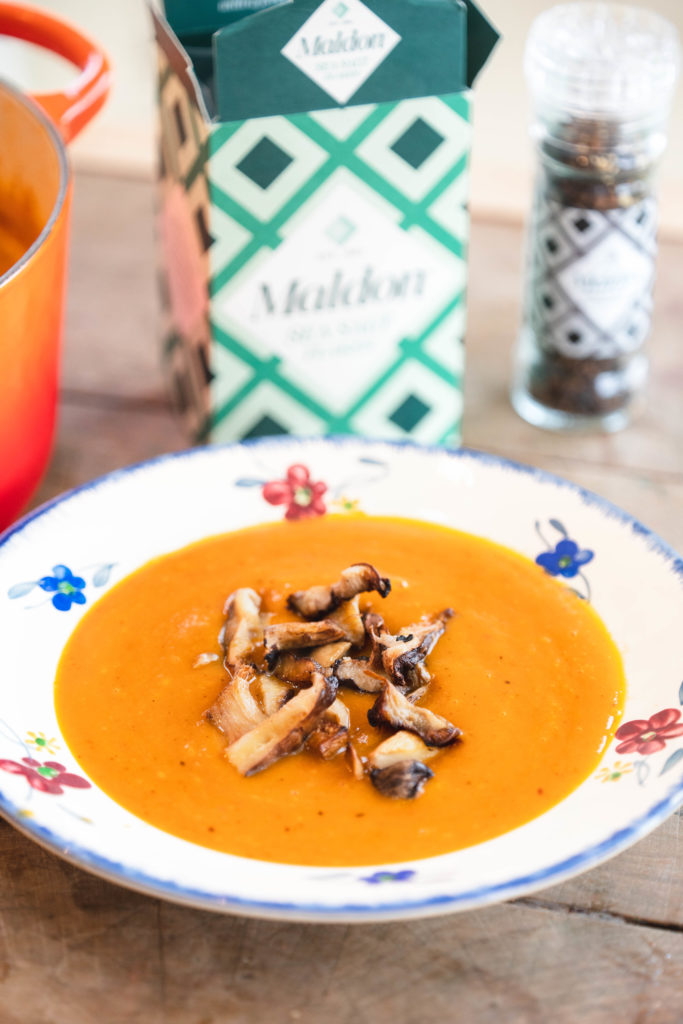
A classic butternut squash soup is hearty in flavour and compliments the fresh, tangy salad. It’s natural sweetness from the squash balances the savoury notes of the salad perfectly.
Protein
As a plant-based option, try adding a few falafel balls to make the dish more substantial and completely vegan.
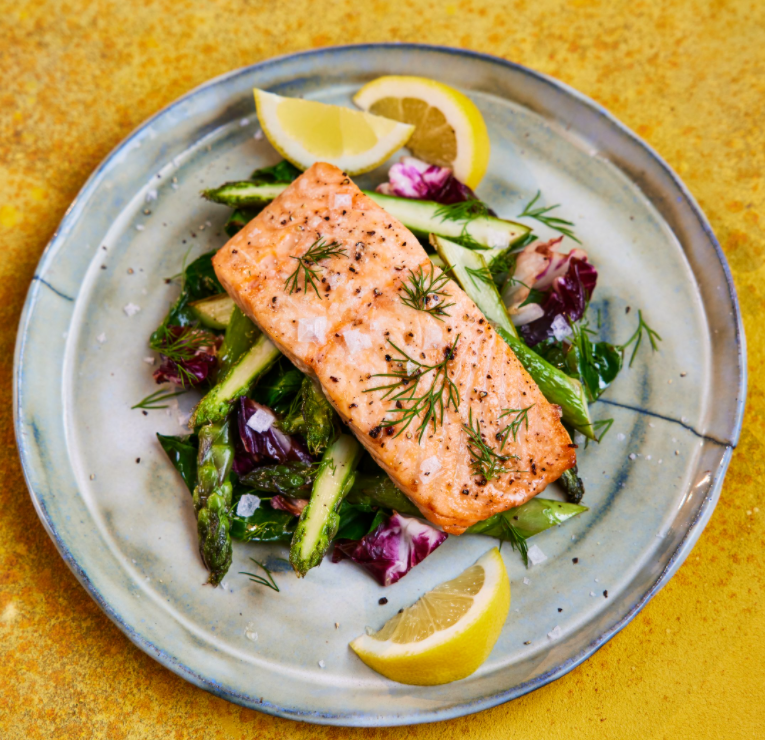
For non-vegans, grilled chicken makes a hearty, protein-rich pairing. You can also try pairing the salad with baked salmon. The delicate, butter fish is a great compliment to the crunchy chickpeas, roasted squash and baby carrots.
How long will the chickpea salad last in the fridge?
You can keep the chickpea salad in the fridge for up to four day in a secure, airtight container.
Any leftover tahini dressing can be stored a glass mason jar and refrigerate for up to 14 days, however it is best to consume within 5-7 days so that you can taste the tangy flavour. After refrigeration, the dressing can become much thicker and separate, so make sure to store before using again.
Can you freeze a chickpea salad?
You can freeze a chickpea salad for up to three months, but we don’t recommend this as the texture of the salad will change and loose it’s tasty crunchiness.
Any leftover tahini dressing can be stored in an airtight container for up to 8 weeks. Make sure to leave some headspace in the container as liquids expand when freezing. When you want to use the tahini, thaw it in the fridge overnight and give it a good stir before using as it can separate.
Salted caramel snickerdoodles take the classic, beloved cookie to a whole new level with the perfect blend of sweet and salty indulgence! These treats are a heavenly combination of chewy, cinnamon-sugar-coated snickerdoodles infused with Carnation Caramel and topped with a delicate pinch of Maldon Sea Salt flakes.
Creamy richness of Carnation condensed milk adds a luxurious texture, while the caramel provides a sweet depth that harmonises beautifully with the hint of sea salt. Whether you’re a seasoned baker or a kitchen novice, this recipe is an easy yet impressive way to elevate your cookie game.
How to make salted caramel snickerdoodles
If you love snickerdoodles for their soft, buttery texture and warm cinnamon flavour, you’ll adore this decadent twist! The Carnation Caramel swirls through the cookie dough, creating pockets of gooey sweetness, while the Maldon Salt adds just the right amount of crunch and balance to the sugary richness. The use of Carnation condensed milk ensures the dough is easy to work with and bakes into perfectly soft, chewy cookies every time. The perfect treat for a cosy night in, or a holiday spread, these salted caramel snickerdoodles are sure to become your go-to recipe for flawless sweet-and-salty indulgence.
- Preheat your oven to 180°C (160°C fan), Gas Mark 4.
- In a small bowl, combine the ingredients for the cinnamon sugar and set aside.
- In a large bowl, add the flour, corn starch, baking powder, bicarb, cream of tartar and Maldon Salt. Give everything a good mix to combine, then set aside.
- Add the butter and sugars to another large bowl and using an electric hand whisk, beat on high for 2-3 minutes until light and fluffy. Add the condensed milk, egg yolk and vanilla and whisk on low until combined. Whilst continuing to whisk on low, slowly add the dry ingredients until a dough has formed.
- Roll the dough into equal sized balls – they should be around 45g each. Roll each ball in the cinnamon sugar making sure to coat completely. Place the balls onto the baking tray and pop in the fridge for 20 minutes to chill before baking.
- When ready to bake, space the balls evenly across the baking trays and bake for 12-15 minutes until golden round the edges and the top is set. Remove from the oven and allow to cool completely on the tray.
- For the cream cheese frosting, add the room temperature cream cheese and butter to a large bowl and using an electric hand whisk, beat for 3 minutes until light and fluffy. Add the condensed milk, caramel, vanilla and Maldon Salt and beat again for another 4-5 minutes until the icing becomes smooth and creamy.
- To frost the cookies, place a ½ tablespoon of the icing into the middle of the cookie and then use the back of the spoon to push the icing out and create an even covering across the cookie. Repeat with all the cookies until they have all been iced.
- These are best eaten (and shared!) after baking but will keep in an airtight container in the fridge for up to three days.