- Preheat the oven to 160C fan. Grease the bundt tin generously with butter, ensuring you get into every corner of the tin. Dust the greased tin with flour, shaking to coat evenly, then tap off any excess.
- In a large bowl, mix the flour, ground almonds, ground pistachios, baking powder, cardamom and Maldon Sea Salt.
- Using the KitchenAid 4.3L Stand Mixer, cream the butter and sugar for 5 minutes, scraping down the sides with a spatula about halfway through, until very pale and fluffy. Add the eggs one by one, mixing well and scraping down the sides between each addition. Using a spatula, stir in the the lemon zest, lemon juice, and rosewater.
- Fold the dry ingredients into the wet ingredients then spoon the mixture into the prepared tin, distributing it evenly around the tin.
- Bake for 35-45 minutes until the cake is risen, golden, and a skewer inserted into the middle comes out clean. Leave to cool in the tin for a few minutes then invert onto a wire rack and leave to cool completely.
- Once the cake is completely cool, make the icing (if you try to ice the cake while still warm, it will melt and slip off). Sift the icing sugar into a bowl and whisk in the lemon juice and rosewater. Trickle in just enough cold water to bring the icing to a thick coating consistency. Spoon the icing over the cake, allowing it to run down the sides. Top with the chopped pistachios and rose petals.
Category: Uncategorized
Recipe created by Daniel Cooper
- Make the Caesar dressing by mixing the mayonnaise, Dijon mustard, lemon juice, Worcestershire sauce, mashed anchovies, grated garlic, and Parmesan in a bowl. Stir until smooth and season with Maldon Garlic Sea Salt and black pepper to taste. Set aside.
- Butterfly the chicken breasts and flatten to about 1cm thick.
- Coat each chicken breast by first dredging in Maldon Garlic Sea Salt, seasoned flour, then dipping in beaten egg, and finally pressing into the panko breadcrumbs until fully coated.
- Prepare the salad base by combining the heritage and bitter leaves in a large bowl. Add the chopped anchovies but leave undressed until ready to serve.
- Preheat your Weber Slate Griddle over medium direct heat.
- Add the olive oil and butter to the hot griddle. Once melted, add the halved garlic bulb and thyme sprigs. Let them infuse the oil for about 20 seconds.
- Place the breaded chicken onto the griddle and cook for 5–6 minutes on each side until golden, crisp, and cooked through.
- Remove the chicken and let it rest for 2 minutes. Meanwhile, toss the salad leaves and anchovies with the Caesar dressing. Taste and adjust seasoning with Maldon Garlic Sea Salt.
- To serve, lay each schnitzel on a plate, top with a mound of dressed salad, and finish with plenty of shaved Parmesan and a final pinch of Maldon Garlic Sea Salt.
Created by Shane M. McBagley
How to cook cod on the barbecue
- Preheat the grill to 200°C.
- Pat the cod dry with kitchen paper. Drizzle the skin side with oil and season generously with Maldon Smoked Sea Salt.
- Place the cod skin side down on the grill grates. Press gently with a fish slice to ensure contact.
- When the skin is crisp and lifts easily from the grill, transfer the cod flesh side down.
- Move to indirect heat and cook until the fish reaches an internal temperature of 62°C.
How to make the brown butter & lime Hollandaise
- In a saucepan over medium heat, brown the butter gently, stirring often to prevent burning.
- Grill the lime halves, cut side down, to intensify their flavour.
- In a bowl, whisk the egg yolks with the lime zest, juice, and a pinch of Maldon Sea Salt until light and frothy.
- Slowly drizzle in the browned butter, whisking constantly to form a silky emulsion.
- Season to taste and keep warm.
How to make Bombay potato cakes

- Slice the leeks in half lengthwise and grill cut side down until tender. Let cool slightly.
- Lightly crush the par-boiled potatoes. Thinly slice the grilled leeks and mix with the potatoes.
- Add the garlic, nigella seeds, chilli Maldon salt, curry powder, and a drizzle of oil.
- Form into thick patties and place on a cedar plank. Drizzle with oil and roast over indirect heat until golden and crisp.
How to make a tomato salad
- Combine chopped cherry tomatoes (cut in half), dill, nigella seeds, lemon zest and juice, cracked pepper, Maldon Sea Salt, and olive oil.
- Stir gently and let sit for 5–10 minutes before serving.
How to assemble

- Spoon a little hollandaise onto each plate.
- Place a Bombay potato cake in the centre.
- Top with the cedar plank cod.
- Spoon over the tomato salad.
- Finish with a final sprinkle of Maldon Smoked Sea Salt and a squeeze of fresh lime juice.
Discover a charred broccoli salad with caramelised edges, creamy feta and fresh mint, all tossed in a zesty lemon‑garlic dressing. Roasted at high heat for maximum flavour and tender‑crisp bite, this easy broccoli salad is a vibrant side for weeknights and a standout on festive tables. Finished with a pinch of Maldon Garlic Sea Salt for clean, bright seasoning.
How to char broccoli?
- Toss florets with oil and salt, spread on a hot tray in a single layer. Roast at 240°C fan for 15–20 minutes until edges are deeply browned and stems are tender‑crisp. Finish with Maldon Garlic Sea Salt flakes.
How to Make Charred Broccoli Salad with Feta, Almonds & Mint
Step 1 Roast the Broccoli
- Preheat oven to 240°C fan (465–480°F) or its highest setting. Preheat the tray for extra char on the broccoli; make sure to rotate the pan halway.
- Toss florets with 3 tbsp olive oil and a good pinch of Maldon Original Sea Salt.
- Spread in a single layer on your largest baking tray (use two if needed so broccoli browns, not steams).
- Roast 15–20 minutes until tender with deeply charred edges. Texture cue: tender‑crisp with caramelised tips.
Step 2 – Make the Lemon-Garlic Dressing
- Whisk lemon zest and juice, 5 tbsp olive oil, honey, grated garlic and chilli flakes.
- Season with a pinch of Maldon Garlic Sea Salt to taste.
Step 3 – Assemble and Serve
- Pile warm broccoli onto a large platter.
- Top with crumbled feta, toasted almonds and mint leaves.
- Drizzle over half the dressing; serve the rest alongside so guests can add more. You can serve at either warm or room remperature.
Tips & FAQs:
Tips:
- Dry broccoli well and cut similar‑sized florets for even charring.
- Don’t overcrowd the tray—space equals char.
- For extra smoky notes, finish under a hot grill/broiler for 1–2 minutes or on a BBQ.
- Finish with a final pinch of Maldon Original Sea Salt at the table for crunch and clean salinity.
FAQs:
- How do you char broccoli without burning it?
- Use very hot oven, large tray, and oil lightly. Roast until edges caramelise (15–20 mins), then check every 2 minutes.
- Can I make charred broccoli salad ahead?
- Roast broccoli and make dressing up to 2 days ahead. Dress just before serving; add mint and feta last for freshness.
- Can I use frozen broccoli?
- Yes. Roast from frozen on a preheated tray at high heat; expect a couple of extra minutes and slightly softer texture.
- How do I make it vegan or nut‑free?
- Swap feta for a vegan alternative (or omit), honey for maple syrup; replace almonds with toasted seeds (pumpkin/sunflower).
- Can I grill instead of roast?
- Toss florets with oil and salt, thread onto skewers or use a grill basket. High heat, 8–10 minutes, turning for even char.
Turn ripe plums into a stunning grilled fruit dessert in minutes. Hot griddle or BBQ heat caramelises the cut sides for deep, smoky‑sweet flavour, while a final sprinkle of Maldon Smoked Sea Salt adds crunchy contrast and subtle smoke. Serve these grilled plums warm with ice cream, yogurt or whipped cream and pistachios for texture — an easy BBQ dessert that feels restaurant‑worthy.
How to Grill Plums?
- Heat griddle/BBQ to medium‑high.
- Toss halved plums with oil and a pinch of Maldon Smoked Sea Salt.
- Grill cut‑side down 2–4 minutes until charred and juicy.
- Serve warm with ice cream and pistachios; finish with smoked salt.
How to Make Grilled Plums with Smoked Sea Salt (Detailed Version)

Step 1 – Preheat the Grill/Griddle
- Heat a griddle pan over high heat until smoking, or preheat BBQ to medium‑high direct heat (220–260°C / 425–500°F).
- Lightly oil the grates if using a BBQ.
Step 2 – Prep the Plums
- Toss plum halves with olive oil to coat lightly.
- Add a small pinch of Maldon Smoked Sea Salt to enhance sweetness. You should use rip but firm freestone plums so that the halves stay intact.
Step 3 – Grill to Caramelise
- Place plums cut‑side down in a single layer.
- Cook 2–4 minutes until deeply charred with clear grill marks and juices just begin to bubble. You should see caramelised edges, the texture should be tender but not collapsing.
- If desired, flip for 30–60 seconds to warm the skins.
Step 4 – Serve
- Plate warm plums. Add ice cream, yogurt or whipped cream.
- Sprinkle with pistachios and finish with a pinch more Maldon Smoked Sea Salt.
- Optional: drizzle with honey or maple syrup.
Tips & FAQs:
Tips
- Don’t overcrowd: space the halves so steam doesn’t soften them.
- Oil the fruit, not the pan, to reduce sticking and flare‑ups.
- Choose plums that give slightly when pressed; overly soft fruit collapses.
- Crosshatch: rotate 90° halfway through for restaurant‑style grill marks.
FAQs
- What plums are best for grilling?
- Freestone varieties (easier to de‑stone), ripe but firm. Black or red plums both work. This is because their firm flesh holds up well when heated.
- How long to grill plums?
- Typically 2–4 minutes cut‑side down on a very hot surface; flip briefly to warm through.
- Can I make grilled plums on a stovetop?
- Yes — use a preheated cast‑iron griddle pan over high heat.
- Can I use other stone fruit?
- Peaches, nectarines and apricots grill beautifully; timings are similar (smaller fruit needs less time).
- How do I prevent sticking?
- Preheat thoroughly, brush fruit with oil, and let the sear form before moving.
Serving Suggestions
- Classic: Ice cream, granola and a pinch of Maldon Smoked Sea Salt flakes.
- Lighter: Greek yogurt, honey and fresh thyme leaves.
- Indulgent: mascarpone, crushed amaretti and a balsamic reduction drizzle.
- Cheese board twist: serve warm plums with burrata or ricotta, olive oil and crusty bread.
Storage & Reheating
- Best enjoyed fresh.
- Leftovers: refrigerate up to 2 days in an airtight container.
- Reheat gently in a skillet over medium heat for 1–2 minutes or serve at room temperature.
- Freeze: not recommended (texture turns mushy).
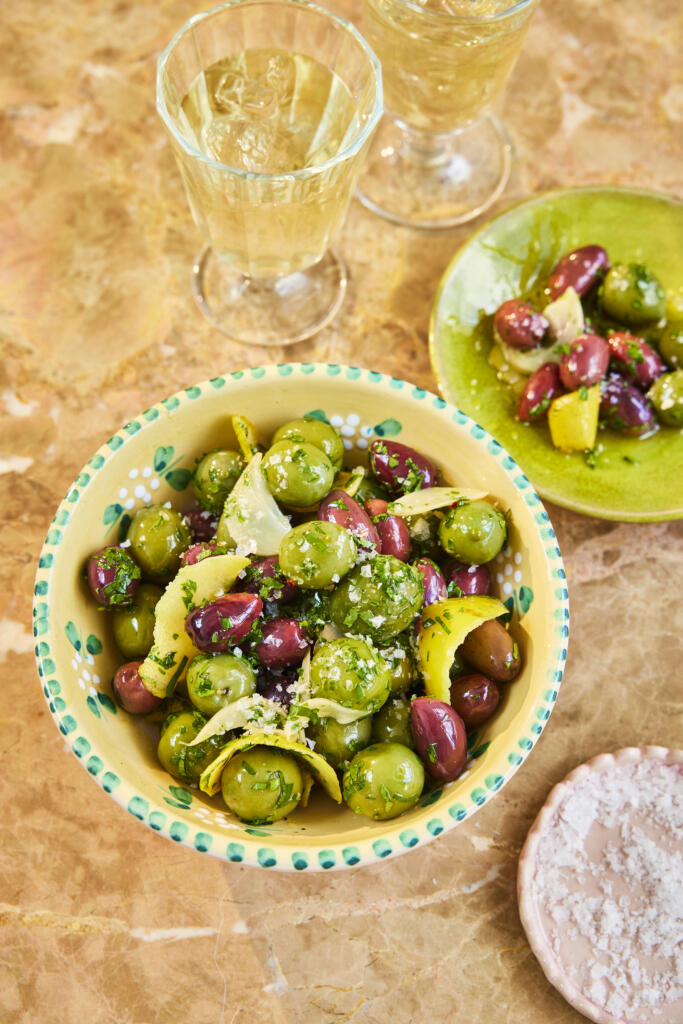
These easy marinated olives take minutes and taste like your favourite tapas bar. Lemon zest, soft garlic and a pinch of chilli infuse warm olive oil, then olives and fresh parsley soak up the flavours. Finished with a pinch of Maldon Original Sea Salt for clean, bright seasoning, this lemon‑garlic olives recipe is ideal for antipasti platters, last‑minute hosting or make‑ahead snacks.
How to Marinate Olives (Quick Steps)
- Gently warm olive oil with lemon zest and garlic; add chilli, then cool.
- Toss with olives, parsley and a pinch of Maldon Sea Salt.
- Marinate 30 minutes to overnight; serve at room temperature.
How to Make Marinated Olives (Detailed Version)
Step 1 – Infuse the Oil
- Add olive oil, lemon zest strips and sliced garlic to a small pan.
- Warm over medium‑low heat for 3–5 minutes until fragrant and the garlic softens; do not brown. You should see gentle bubbles around the garlic, with the colourisation being pale, not golden.
Step 2 – Add Heat & Cool
- Stir in a pinch of chilli flakes.
- Immediately remove from the heat and let the oil cool to room temperature.
Step 3 – Toss & Marinate
- In a bowl, combine olives, chopped parsley and a pinch of Maldon Original Sea Salt.
- Pour over the cooled oil and toss well to coat.
- Marinate at least 30 minutes; longer (up to overnight in the fridge) deepens flavour.
Step 4 – Serve
- Bring to room temperature. Taste and adjust salt or lemon zest.
- Spoon into a serving bowl with some infused oil.
- Serving suggestion: finish with a final pinch of Maldon flakes for crunchy contrast.
Tips & FAQs
Tips
- Use quality olives. Creamy Castelvetrano or meaty Kalamata work well; mix for colour and texture.
- Keep heat low. Browning garlic turns the oil bitter; you’re gently infusing.
- Cool the oil fully before adding parsley and olives to preserve freshness.
- For boards, marinate the day before; bring to room temp 20–30 minutes before serving so the oil isn’t congealed.
FAQs
- What olives are best for marinating?
- Mixed green and black, ideally firm and meaty. Pitted are convenient; whole hold shape better.
- Can I use dried herbs instead of fresh parsley?
- Yes—start with 1/2 tsp dried oregano or thyme. Add fresh parsley before serving for brightness if you like.
- How long should olives marinate?
- Minimum 30 minutes; 12–24 hours (refrigerated) gives deeper flavour. Always serve at room temperature.
- How long do marinated olives keep?
- Refrigerate in an airtight container and use within 3–4 days. Keep submerged in oil, and always return leftovers to the fridge. Do not store at room temperature when fresh garlic is used.
- Can I reuse the marinade oil?
- Use within 3–4 days in salad dressings or to drizzle over feta/roasted veg. Keep refrigerated; discard if in doubt.
Serving Suggestions
- Add to antipasti boards with cheeses, cured meats, nuts and crackers.
- Spoon over whipped feta or labneh with extra lemon zest and Maldon Sea Salt.
- Toss through warm roasted potatoes or salads as a quick dressing.
- Pair with chilled rosé, lager or a classic martini.
Storage & Make-Ahead
- Store refrigerated up to 3–4 days in a clean jar; ensure olives are mostly covered by oil.
- Bring to room temperature for 20–30 minutes before serving so the oil loosens.
- If the garlic browns during infusion, start again—browned garlic can taste bitter.
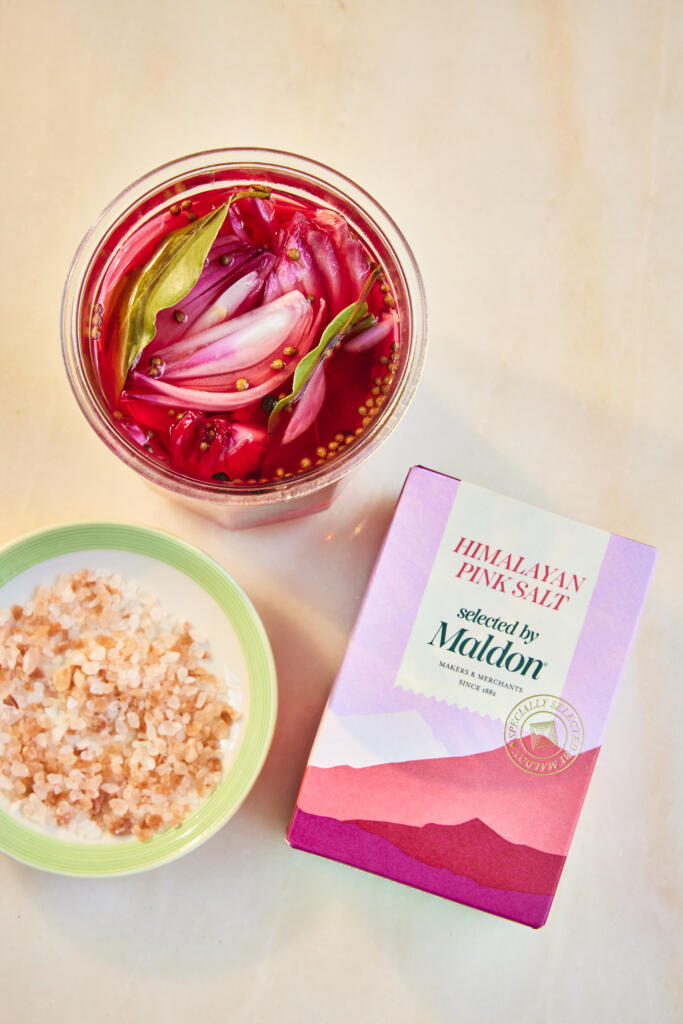
These quick pickled red onions are the easiest way to add tangy crunch and colour to everything from tacos to salads. A hot brine of apple cider vinegar, warm spices and honey is poured over thinly sliced onions, then finished with Himalayan Pink Salt, Selected by Maldon for clean, bright seasoning. They turn vivid pink in just a few hours and keep well in the fridge — an effortless, make‑ahead topping you’ll use all week.
How to Make Quick Pickled Red Onions?
- Pack sliced onions in a sterilised jar.
- Simmer vinegar, honey, spices and Himalayan Pink Salt, Selected by Maldon; pour over onions.
- Seal, cool and refrigerate until bright pink (2–12 hours).
- Keep refrigerated; use within 2 weeks.
How to Make Quick Pickled Red Onions (Detailed Version)
Step 1 – Prep the Jar & Onions
- Thinly slice red onions (a mandolin helps).
- Pack into a large, sterilised heatproof jar. To sterilise quickly, wash, then heat the jar in a 160°C (320°F) oven for 10 minutes; air-dry lids.
Step 2 – Make the Hot Brine
- Add vinegar, honey (or sugar), coriander seeds, peppercorns, bay leaves and Himalayan Pink Salt, Selected by Sea Salt to a small pan.
- Bring to a gentle simmer, stirring to dissolve, then remove from heat.
Step 3 – Pour & Seal
- Immediately pour hot brine over onions to fully submerge.
- Seal, cool to room temperature, then refrigerate.
Step 4 – Chill & Serve
- Leave to pickle a few hours until bright pink (flavour deepens overnight).
- Serve cold; keep onions submerged in brine.
Tips & FAQs
Tips
- Slice evenly (1–2 mm) for fast, even pickling.
- Pack tightly and submerge fully; top up with a splash more vinegar if needed.
- For softer bite, blanch slices in boiling water for 10 seconds; drain before jarring.
- Use caster sugar or maple syrup to make the recipe vegan.
FAQs:
- How long do pickled red onions last?
- Up to 2 weeks refrigerated in a clean, sealed jar. Always use clean utensils and keep onions submerged.
- Can I use different vinegar?
- Yes. White wine or red wine vinegar work; avoid malt vinegar for this style (overly strong).
- Do I need to sterilise the jar?
- Recommended for best quality. This is a refrigerator pickle (not canned); always store in the fridge.
- Can I reduce the sweetness?
- Yes. Adjust honey/sugar to taste; salt and acid provide the primary preservation.
- When are they ready to eat?
- After 1–2 hours for a quick pickle; best flavour and colour after 12–24 hours.
- Can I add other flavours?
- Try chilli flakes, fennel seeds, citrus peel, or garlic. Keep the basic acid‑salt ratio.
Serving Suggestions
- Tacos, burritos and quesadillas
- Burgers, hot dogs and pulled pork sandwiches
- Grain bowls, salads and slaws
- Avocado toast, fried eggs or shakshuka
- Cheese and charcuterie boards (drain lightly, sprinkle Maldon flakes)
Storage & Safety
- Refrigerate immediately after cooling; keep onions submerged.
- Use within 14 days. Discard if cloudy, fizzy, mouldy or off‑smelling.
- Always use clean utensils to avoid contamination.
- Do not shelf‑store; this is not a canned product.
Blend up a frozen mango margarita with bold mango sweetness, fresh lime and smooth tequila — finished with a punchy Maldon Chilli Sea Salt rim. This easy blender margarita pours ice‑cold with a perfectly slushy texture, balancing sweet, tart and gently spicy notes in every sip. Ideal for summer parties, BBQs or whenever you need a sunshine‑bright cocktail in minutes.
How to Make a Frozen Mango Margarita with Chilli Salt Rim
Step 1 – Blend the Margarita
- Add tequila, triple sec, lime zest and juice, frozen mango, agave (if using) and ice to a blender.
- Blend on high until smooth and slushy, 20–40 seconds.
- Taste; adjust sweetness or lime to preference.
- Texture cue: thick but pourable, like a soft‑serve slush.
Step 2 – Prepare the Chilli Salt Rim
- Run a lime wedge around the rim of a chilled margarita glass or coupe.
- Tip Maldon Chilli Sea Salt onto a small plate, then dip and roll the rim to coat evenly. Shake off any excess.
Step 3 – Pour & Garnish
- Pour the blended margarita into the rimmed glass.
- Garnish with a lime wedge or slice and serve immediately.
Tips & FAQs
Tips
- Use frozen mango for body and chill; if using fresh mango, add more ice and a few frozen mango cubes.
- A pinch of salt inside the blend can lift flavour, but the Maldon Chilli Sea Salt rim adds the perfect finishing contrast.
- For a thicker slush, add extra frozen mango or ice; for a looser pour, add a splash of cold water.
- Blanco tequila highlights bright fruit; reposado adds vanilla‑oak depth.
FAQs:
- Can I make a mango margarita without triple sec?
- Yes. Replace with 15–25ml agave syrup and a splash of water (or orange juice) to balance.
- What’s the best tequila for a frozen margarita?
- A good 100% agave blanco showcases mango and lime; reposado works if you prefer a rounder, mellow finish.
- How do I make it spicy?
- Keep the Maldon Chilli Sea Salt rim and optionally blend in 1–2 thin jalapeño slices or a pinch of chilli flakes.
- Can I batch this for a party?
- Multiply ingredients, blend in batches, and keep a jug in the freezer for 10–15 minutes to hold the slushy texture. Rim glasses to order.
- How do I fix a too‑sweet or too‑tart margarita?
- Add lime juice for sweetness balance, or a touch of agave for tartness. A small pinch of Maldon Sea Salt enhances balance.
Serving Suggestions
- Serve as a welcome drink with salty snacks (salted almonds, tortilla chips with pico de gallo).
- Add tropical twists: passion fruit pulp, pineapple or a dash of coconut water.
- Create a frozen mango‑chilli “float”: small scoop of mango sorbet on top, dust with Maldon Chilli Sea Salt.
Storage & Reheating
- Best enjoyed immediately.
- For make‑ahead, blend the base without ice and freeze in ice‑cube trays; blend cubes with fresh ice just before serving.
- If the drink separates, pulse the blender a few seconds to re‑slush.

This month, we’re diving into Flavour Heroes by Gurdeep Loyal – a vibrant, genre-blurring collection of recipes that proves pantry staples are anything but basic. With clever, global twists and bold, satisfying ideas on every page, this book is a true celebration of home cooking at it’s most creative (and craveable!) Whether you’re a seasoned chef or an enthusiastic beginner, Gurdeep’s flavour-forward approach to cooking is a delicious invitation to transform everyday meals with a dash of something special.
At the heart of Flavour Heroes are 15 global pantry essentials – from punchy harissa and rich pecorino Romano to fiery ‘nduja and umami-packed miso – used in inspired and unexpected ways. Gurdeep’s recipes show just how versatile and liberating these ingredients can be, inviting you to bend the rules and unlock new flavour profiles, from comfort classics to modern showstoppers. This is everyday cooking, supercharged – and we can’t wait to dig in!
Gurdeep Loyal is an award-winning food and travel writer and culinary trends expert with over 18 years of industry experience at gourmet institutions including Harrod’s Food Halls, Marks & Spencer Food and Innocent Drinks. Adding to his accolades, Gurdeep was the winner of the Jane Grigson Trust Award for his debut cookbook, Mother Tongue, which explores his culinary upbringing, combing ‘authentic’ home-cooked Punjabi food with ‘inauthentic’ curry-house Tika Masalas, the western foodie cannon, and a wanderlust for travel in pursuit of flavour. You can find Gurdeep as a regular guest on the Olive Podcast, as well as being a monthly columnist for the Olive Magazine.
In Conversation with Gurdeep Loyal
Gurdeep, we are loving Flavour Heroes! The book is all about turbocharging everyday meals with pantry staples. What inspired you to focus on these 15 particular ingredients – what makes them true ‘heroes’ in your eyes?
With Flavour Heroes I wanted to shine a light on 15 pantry powerhouses that can dial up your home cooking at the simple twist of a lid. For me a ‘Flavour Hero’ is an ingredient that delivers big flavour for little effort – and that also has the ability to be adapted and remixed into thousands of different delicious directions. The book I hope will empower and liberate home cooks to reach for these heroes when they cook as freely as a painter might reach for colours in a painters palette. I also wanted to celebrate some exciting newer ingredients that people might be less familiar with – like Yuzu Kosho (a Japanese citrus-chilli paste) and Calabrian Chilli Paste. These are all ingredients that transformative superpowers to amplify your cooking every day.
What’s an example of a flavour combo in the book that surprises people – but totally works!
One of my favourite ingredients in the world is Mango Chutney! Lots of people only use it to dollop along side a curry, or in a festive sandwich, but it’s such a brilliant ingredient to cook with. It’s tropical, vinegary, complexly fruit and often layered with ginger, garlic and spices. The ‘Halloumi, Mango Chutney, Courgette and Tarragon Pizzettes’ are a very ‘me’ flavour combination – that shouldn’t work but really does. The saltiness of the halloumi, and sweetness of the mango chutney are a wonderful contrast, and the tarragon echoes the flavour of nigella seeds which are often in mango chutney. Combined, it’s delicious to eat! The most unusual combination in the book is the ‘Kopi-Sambal Salmon with Pistachio Dukkah’ – that combines fiery Sambal Olek with Instant Espresso Coffee Powder. Sounds strange, but it has to be tried. It’s sublime!
For someone who’s just getting started on their flavour journey, which three ingredients from your hero list should they try first?
A good harissa is a fantastic chilli paste to have in your pantry. It has a rich, intense, complex flavour that can liven up anything – from a humble bag of carrots to a fancy lobster salad. Miso is a true panty powerhouse, with it’s salty, umami, savouriness that can add delicious depth to anything from Bolognese to chocolate fudge cake (which I have a recipe for in the book). And I love Dark Maple Syrup – it has a lovely rich, amber toffee flavour, that adds something totally unique, in both sweet and savoury dishes.
With 90 delicious recipes to choose from – come on, you MUST have a favourite that you like to make?
The ‘Fennel Sausage, Gochujang and Vodka Pasta ‘recipe is one that I make the most – it’s a perfect mid-week meal, but also great to wow a crowd. The flavours just have this magical alchemy together. The Peanut-Butter Pie with Cinnamon Cereal Crust is the most decadent recipe in the book – a slightly obscene deep filled dessert that’s worth every calorie!
What does a normal day in the life look like for you, Gurdeep?
A combination of lots of eating, lots of emailing, and lots of procrastinating! As a food and travel writer I’m very luck that every day is different. I’m an early riser, so I try to get in a workout early if I can. Then I spend time researching and writing up anything I’m working on – like my monthly columns in Olive Magazine and Scribehound, or it could be a book I’m working on or a travel piece for a magazine. As a food trends specialist, I then try to get out and about in search of one or two brand new things in food every day – maybe a new restaurant, or a cool new brand, or an independent maker, or a craft bakery. Throughout my morning travels I’ll pick up ingredients that I need for the afternoon when I do my recipe testing in my tiny East London kitchen. And if I have the energy, I’ll see friends in the evening – taking them each a doggy bag each from my days cooking!
Name three things in the kitchen you can’t live without.
A microplane! I use it for everything, from nutmeg and garlic, to lemon zest and chocolate. A good sturdy pestle and mortar for spices – nothing beats the smell of gently toasted spices ground by hand (cardamon and cumin in particular, especially ground together). And smoked salt. I use it so often – it brings a wonderful smoky depth to dishes that I love.
Do you have a current favourite cookbook that you’re enjoying? We’d love to know!
Ferment by Kenji Moromoto. He is so inventive with his recipes, and a genius with home fermenting. The book has brilliant recipes in it – particularly the Kimchi Bhajis.
Mango Chicken Schnitzel with Lime-Leaf Smashed Peas Recipe

Schnitzels and mushy peas both have a nostalgic seventies Fanny Cradock-meets-Wimpy-diner charm that Gurdeep is always drawn to – crying out for the addition of pineapple rings to garnish, piped green mashed potato and silver jugs of parsley sauce on the side. Gurdeep’s flavour elevated take on these culinary relics uses mango chutney to add tropical pizzaz to the chicken, and lime leaves to bring Southeast Asian fragrance to the smashed peas. Arguably so retro it’s back, although in Gurdeep’s opinion, these two culinary superheroes will never be out of vogue.
Serves: 2
Ingredients:
- 5 Tbsp mango chutney, plus extra to serve
- 3 fat garlic cloves
- 1 Tbsp Worcestershire sauce
- 2 Tbsp apple cider vinegar
- 500g (1lb 2oz) chicken breasts (2 large ones), boneless and skinless
- Cornflour (cornstarch), for dredging
- 1 large egg
- 60g (2¼oz) panko breadcrumbs
- 1 Tbsp nigella seeds
- 2 Tbsp sesame seeds
- Sunflower or vegetable oil, for frying
- Maldon Sea Salt
- Freshly ground black pepper
- Lemon wedges, to serve
For the lime-leaf smashed peas:
- 400g (14oz) frozen peas
- 12–14 fresh makrut lime leaves
- 30 fresh mint leaves
- Zest and juice of 1 small lemon
- 20g (¾oz) butter
- Splash of olive oil, for frying
- 2 whole spring onions (scallions), finely chopped
Method:
- Put the mango chutney, garlic cloves, Worcestershire sauce, vinegar, 1 teaspoon of Maldon Sea Salt and 1 teaspoon of black pepper in a small blender and whizz to a fine paste.
- Place one of the chicken breasts between two sheets of baking paper and use a rolling pin to gently flatten into a thin steak approximately3–4mm (1/8in) thick. Don’t bash hard or the meat will tear! Repeat with the other breast.
- Transfer them to a large bowl and smother both breasts all over with the mango marinade, then leave for at least 30 minutes. Prepare the smashed peas. Boil the peas in a pan of salted water for 3 minutes, then drain and set aside. Use a small blender to whizz together the lime leaves, mint, lemon juice and 1 teaspoon of zest to a very fine paste.
- Melt the butter in a pan with a splash of oil, then add the green paste, frying over a medium heat for 2 minutes. Next, add the spring onions, cook for another minute, then add the cooked peas, plus 1 teaspoon of salt. Cook for a final minute, then either smash chunkily with a potato masher, or use a hand blender to turn into a mushy pea purée. Keep warm.
- To coat the schnitzels, prepare three large bowls: one with cornflour, one with beaten egg, and one with a mix of breadcrumbs, nigella seeds and sesame seeds.
- Dredge one marinated chicken schnitzel in the cornflour, flipping it to coat all over. Leave for30 seconds, then dredge again so the surface is completely covered. Shake off the excess, then dip into the egg, and finally into the breadcrumbs,
coating liberally all over. Repeat with the second schnitzel. - Heat 2cm (¾in) of sunflower or vegetable oil in a deep frying pan to 165°C/329°F. Cook the schnitzels, one at a time, over a medium heat for 6–7 minutes – turning occasionally – until crunchy and golden brown on the outside and cooked through. Serve with the smashed peas, lemon wedge and extra mango chutney on the side.
Buy Flavour Heroes with Gurdeep Loyal

You can find where to purchase Gurdeep’s NEW cookbook here and start being creative with food and flavours in the comfort of your kitchen.
Make sure you have your Maldon Salt ready for these recipes! If you are running out, please feel free to browse on our Where to Buy Page to find your nearest store in which stocks our beloved Maldon Salt.
Lastly, we LOVE seeing your creations – please tag us on Instagram using the #maldonsalt so we can share your own take on Gurdeep’s recipes!
When the heat of summer sets in, nothing hits the spot quite like a chilled bowl of gazpacho. This classic Andalusian soup is a vibrant blend of ripe tomatoes, crisp cucumbers and punchy onions, all pureed to smooth perfect. Light, hydrating, and bursting with garden-fresh flavour. It’s the ultimate warm-weather dish.
What takes this gazpacho to the next level is a finishing touch of Maldon Chilli Sea Salt. It’s delicate flakes and gentle heat from the Aleppo pepper and bird’s eye chilli adds a kick to the natural sweetness of the tomatoes whilst adding a subtle heat that lingers just enough to keep each spoonful exciting. Serve it topped with diced cucumber, juicy tomato halves, a drizzle of extra virgin olive oil, and fresh basil leaves.
How to Make Gazpacho
Step 1 – Tame the Onion
- Boil a full kettle. Put the chopped onion in a sieve over the sink.
- Pour the boiling water over to soften bite and mellow raw flavour. Drain well and cool.
Step 2 – Blend the Soup
- Add onion, tomatoes, peeled cucumber, red pepper, garlic, sherry vinegar and olive oil to a blender.
- Season with a big pinch of Maldon Chilli Sea Salt.
- Blend until smooth (or leave slightly chunky). Taste and adjust salt and vinegar to balance. The texture should be silky and pourable but not watery.
Step 3 – Chill
- Transfer to a jug or container, cover and chill at least 2 hours (longer improves flavour).
- Stir before serving as natural separation can occur.
Step 4 – Make the Topping & Serve
- Toss diced cucumber, cherry tomatoes, basil and a pinch of Maldon Chilli Sea Salt with a drizzle of olive oil.
- Pour soup into bowls or small glasses, add 1–2 ice cubes per serving, spoon over the topping and finish with a little olive oil. Serve the soup well-chilled.
Tips & FAQs:
Tips
- Use ripe, in‑season tomatoes for natural sweetness and colour.
- Don’t skip chilling — it rounds acidity and lets flavours meld.
- For extra body, blend longer to emulsify the olive oil thoroughly.
- Prefer a super‑smooth finish? Blend, then pass through a fine sieve.
- Adjust heat with Maldon Chilli Sea Salt at the table for clean, crunchy warmth.
FAQs:
- What’s the best vinegar for gazpacho?
- Sherry vinegar delivers classic depth and balance; red wine vinegar works in a pinch.
- Can I make gazpacho ahead?
- Yes. Make 1–2 days ahead; flavours improve. Stir and re‑season with salt/vinegar just before serving.
- Can you freeze gazpacho?
- You can freeze for up to 2 months. Thaw overnight in the fridge and re‑blend to restore texture.
- How do I thicken gazpacho without bread?
- Emulsify longer, or add extra tomato and a little more olive oil. If desired, blend in a small piece of peeled cucumber for body.
- How do I make it spicier?
- Add a small fresh chilli to the blend or increase the Maldon Chilli Sea Salt sprinkle when serving.
- Is this gazpacho vegan and gluten‑free?
- Yes — as written, it’s naturally vegan and gluten‑free.
Serving Suggestions
- Serve in small glasses as a canapé shot for summer parties or alongside a tapas spread.
- Pair with tortilla Española, grilled prawns, or crusty bread with olive oil.
- Garnish variations: diced roasted pepper, finely chopped red onion, or a swirl of basil oil.
- For a lighter lunch, add a side of leafy salad with lemon vinaigrette.
Storage & Make-Ahead
- Refrigerate in an airtight jug or container for 3–4 days.
- Keep toppings separate; add just before serving to maintain crunch.
- Not intended for reheating. If separation occurs, stir or briefly re‑blend.