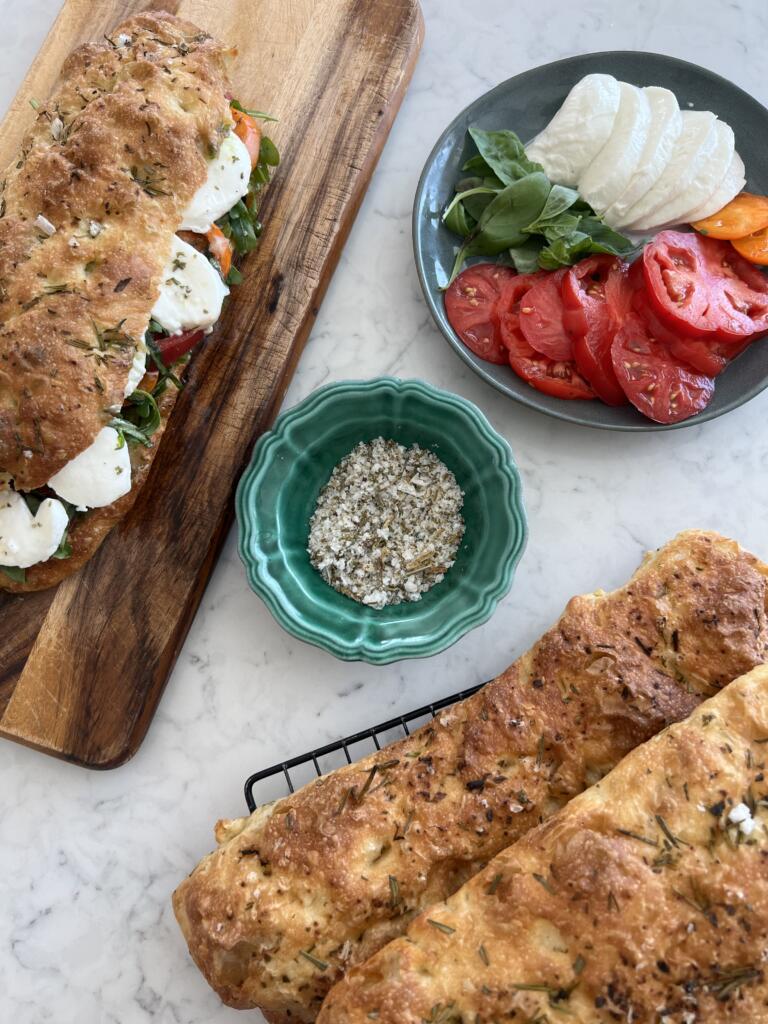
Lacey Ostermann has a way of turning simple ingredients into unforgettable experiences – and her Garlic Sea Salt and Rosemary Focaccia Sandwich Rolls are no exception. Infused with the deep, aromatic flavour of Maldon Garlic Sea Salt and fresh rosemary, these golden rolls are baked to perfection: crisp on the outside, pillowy within. Ideal for summer, they’re the perfect vessel for seasonal favourites like a caprese sandwich layered with pesto, peppery rocket, and juicy tomato slices. Whether for a picnic, lunch al fresco, or casual entertaining, these rolls are the ultimate upgrade to your summer sandwich game.
Mix
Whisk together warm water, olive oil, honey (or sugar) and yeast. Every bread flour absorbs a different amount of water, so start with 390ml water and reserve the rest for later.
Stir in bread flour and salt until well combined. Add in remaining water gradually to achieve a dough consistency similar to that shown in the video.
Cover and rest at room temperature for 15 minutes.
Stretch & Fold and First Proof
Stretch & fold the dough. First, wet your hand (so the dough doesn’t stick) and then grab the dough at the 12 o’clock position in the bowl.
Pull the dough upwards and then fold it down to the 6 o’clock position. Repeat this motion about 8-10 times around the bowl.
The dough should tighten up a bit after performing the stretch & folds.
Cover and rest at room temp for 15 minutes.
Repeat the series of stretch & folds once more, cover and proof at room temperature for 1-1.5 hours or until the dough has nearly doubled in size.
Transfer to Tray and Second Proof:
Prepare a large baking tray (see dimensions above in equipment list) with non-stick parchment paper and 3 tablespoons of extra virgin olive oil. I put a tiny bit of oil underneath the paper so it stays in place on the tray.
Tip the dough into the prepared tray. Rub a little oil from the tray onto your hands and fold one side of the dough towards the middle. Repeat with the other side, folding it over the top as if you are folding a piece of paper into thirds (it will look like a large burrito). Rotate the dough so its long side aligns with the long side of the tray, then flip it over so the seams from the folding are at the bottom and the top is smooth.
Cover the dough with a piece of oiled parchment paper and leave it to proof at room temperature for 1-1.5 hours.
Shape & Bake
Preheat the oven to 220C or 430F and move the baking rack to the lowest position.
Sprinkle the rosemary over the top of the dough and drizzle over about a tablespoon of extra virgin olive oil. Dimple the rosemary into the dough, taking care not spread the dough all the way to the edges of the tray – there should be some empty tray bordering the dough (use the video tutorial for visual guidance). Use your hands gently guide the edges of the dough into a rectangular shape to it’s easy to cut the dough into evenly sized rolls.
Use an oiled dough scraper or sharp knife to cut the rectangle in half. Cut each of those halves in half so you have four long roll shaped pieces of dough. Gently stretch the dough to the length of the tray (about 12-13 inches) and space them out evenly across the tray (see video). Sprinkle each roll generously with Maldon Garlic Sea Salt and bake on the lowest rack of the oven for 18-22 minutes or until the rolls are a deep golden brown. Baking on the bottom rack should help to crisp up the bottom of the bread.
Once baked, remove from tray and transfer to a cooling rack. They’re best enjoyed fresh but can be stored in large freezer bags for up to 3 days at room temperature or frozen for up to 2 months. To bring back to life, wrap in foil at bake at 200C/400F for 10-15 minutes. Peel back the foil for the last few minutes so they can crisp back up.
Fill the rolls with your favourite summer sandwich fillings. My go-to is a caprese sandwich with pesto, rocket, aged balsamic vinegar, basil, mozzarella and juicy heirloom tomato slices…seasoned with more Maldon Garlic Sea Salt, of course!
Make weekend brunch special with brioche French toast piled high with lemony ricotta and juicy berries. Thick slices are briefly dried, soaked in a vanilla custard and pan‑fried in butter for golden edges and a fluffy centre. A final pinch of Maldon Original Sea Salt lifts the sweetness, while maple syrup brings everything together. This easy French toast recipe is quick to master and perfect for sharing.
How to Make French Toast with Ricotta and Berries
Step 1 – Dry the Bread
Lightly toast slices for 1–2 minutes, or bake briefly in a low oven to dry. Day-old / stale brioche or challah works best.
Aim to dehydrate so the bread absorbs custard; avoid taking on colour.
Step 2 – Make the Custard & Soak
In a shallow dish, whisk eggs, milk, vanilla and a pinch of Maldon Original Sea Salt.
Dip two slices at a time, turning to coat. Soak 20–30 seconds per side until evenly saturated but not collapsing.
Step 3 – Cook the French Toast
Heat a large non‑stick frying pan over medium heat. Add half the butter.
When foaming, add soaked slices. Cook ~3 minutes per side until golden with lightly crisp edges.
Add more butter as needed and repeat with remaining slices.
Texture cue: outside golden and lightly crisp; centre custardy and set.
Step 4 – Assemble & Serve
Plate the French toast. Top each with a spoonful of ricotta.
Grate lemon zest over ricotta and sprinkle a tiny pinch of Maldon Original Sea Salt.
Add fresh berries and finish with maple syrup. Best served warm.
Tips & FAQs
Tips
Use thick‑cut brioche/challah (2–3cm) for the best custardy interior.
Drying the bread prevents sogginess and allows maximum custard absorption.
Keep heat at medium; too hot scorches the exterior before the centre sets.
Wipe the pan between batches if butter begins to brown.
A small pinch of Maldon Original Sea Salt in the custard and on top heightens sweetness and flavour contrast.
FAQs:
What’s the best bread for French toast?
Rich, sturdy loaves like brioche or challah hold their shape and soak evenly.
How do I stop French toast from going soggy?
Dry the bread first, don’t oversoak, and cook over medium heat until the centre is set.
Can I make French toast ahead of time?
Cook slices, cool on a rack, then reheat in a 180°C (350°F) oven for 6–8 minutes. Assemble with ricotta and berries just before serving.
Can I bake French toast for a crowd?
Yes. Arrange soaked slices on a buttered tray and bake at 190°C (375°F) for 12–15 minutes, flipping once.
Can I use frozen berries?
Yes. Thaw and drain well, or gently warm with a little lemon zest and maple syrup.
Serving Suggestions
Add a quick berry compote (berries + lemon zest + a splash of maple) for extra sauciness.
Swap ricotta for whipped mascarpone or Greek yogurt.
When it comes to reimagining classics, Lacey is the master of this. Her Peach Crumble Focaccia is a perfect example – where the rustic soul of Italian bread meets the delicate sweetness of summer peaches, all brought into a bold balance with a finishing touch of Maldon Sea Salt flakes. This isn’t just a dessert or bread – it’s a conversation starter, a seasonal centrepiece, and a love letter to texture and contrast.
Mix:
Whisk together warm water, olive oil, honey (or sugar) and yeast. Every bread flour absorbs a different amount of water, so start with 390ml water and reserve the rest for later.
Stir in bread flour and salt until well combined. Add in remaining water gradually to achieve a dough consistency similar to that shown in the video. Cover and rest at room temperature for 15 minutes.
Stretch & Fold and First Proof:
Stretch & fold the dough. First, wet your hand (so the dough doesn’t stick) and then grab the dough at the 12 o’clock position in the bowl. Pull the dough upwards and then fold it down to the 6 o’clock position. Repeat this motion about 8-10 times around the bowl. The dough should tighten up a bit after performing the stretch & folds. Cover and rest at room temp for 15 minutes.
Repeat the series of stretch & folds once more, cover and proof at room temperature for 1-1.5 hours or until the dough has nearly doubled in size.
Prepare the Cinnamon Filling / Topping:
First, brown the butter. Melt the butter in a medium frying pan over a medium high heat and then turn it to a simmer, stirring every 30 seconds or so to ensure the butter isn’t burning on the base of the pan. You’ll hear the bubbles from the butter sizzle as the water evaporates off of it but the sizzling will stop as the butter starts to foam up. Once this happens, look at the colour of the foam…you’ll start to notice lightly browned specks in the butter. Give the butter another good stir and remove from the heat. The butter should be a lovely golden brown (not dark brown – be careful as it can burn quickly!).
Once the butter is browned, stir in the brown sugar, cinnamon, a pinch of Maldon Sea Salt and vanilla until well combined.
Transfer to Tray and Second Proof:
Prepare a metal baking tray (see dimensions above in equipment list) with non stick parchment paper and 2 tablespoons of melted butter. I put a tiny bit of oil underneath the paper so it stays in place on the tray.
Tip the dough into the prepared tray and gently stretch the dough into an even layer so it reaches the edges of the tray. Spread half of the cinnamon filling all over the dough in an even layer and then fold one side of the dough towards the middle. Repeat with the other side, folding it over the top as if you are folding a piece of paper into thirds (it will look like a large burrito).Rotate the dough so its long side aligns with the long side of the tray, then flip it over so the seams from the folding are at the bottom and the top is smooth.
Cover the dough with a piece of oiled parchment paper and leave it to proof at room temperature for 1-1.5 hours.
Prepare the Peaches and Crumble
Cube 2/3 of the peaches and cut the remaining peach into attractive slices. Set aside.
Mix together the flour and both types of sugar and slowly drizzle in the melted butter. Stir with a spoon until all of the flour/sugar has absorbed the butter. It will be a crumbly consistency. Store in the fridge until ready to use.
Dimple and Bake
Preheat oven to 220C/430F and move the baking rack to the lowest position.
Just before dimpling the dough, coat the chopped peaches with the remaining cinnamon filling in the frying pan. If the butter has solidified, you may need to reheat it briefly to make coating the peaches easier. Spread the cinnamon coated peaches evenly over the dough and dimple them in. Sprinkle the crumble topping evenly over the dough. Coat the peach slices in any extra cinnamon filling that remains in the pan and then push them into the dough. Finish with a sprinkle of Maldon Sea Salt Flakes – the perfect delicate hit of salt to balance all the sweet!
Bake on the lowest rack of the oven for 22-26 minutes or until the crumble is golden brown and the peaches are starting to caramelise. Remove from baking tray and transfer to a cooling rack.
Best enjoyed the day of baking but can be stored in a large plastic freezer bag or in an airtight container for up to two days. To bring back to life, wrap a portion in foil and bake at 220C/400Ffor 15 minutes or until heated through. Peel back the foil on top for the last few minutes to crisp up the crumble topping. Enjoy!
These griddled sweet potatoes deliver the best of both worlds: deep char from a hot cast‑iron griddle and a tender‑centre finish in the oven. Tossed with olive oil and seasoned with Maldon Original Sea Salt, the wedges pair perfectly with a zesty coriander‑mint mayo brightened with lime and a touch of chilli. An easy grilled sweet potato side for BBQs, weeknights and sharing platters.
How to Make Griddled Sweet Potatoes with Herby Mayo
Step 1 – Preheat & Prep
Preheat oven to 180°C fan (200°C conventional / 400°F).
Set a cast‑iron griddle pan over high heat (or preheat BBQ griddle).
Toss sweet potato wedges with enough olive oil to coat and a generous pinch of Maldon Original Sea Salt. Tap the wedges dry before oiling for a better char result!
Step 2 – Griddle the Wedges
Working in batches, place wedges cut‑side down on the hot griddle without overcrowding.
Cook 5 minutes per side until well‑marked and lightly charred.
Mix mayonnaise, coriander, mint, chilli, lime zest and juice.
Season to taste with Maldon Original Sea Salt.
Step 5 – Serve
Pile wedges onto a platter, add lime wedges and a pinch more Maldon Original Sea Salt.
Serve with herby mayo for dipping.
Serving temperature: hot or warm.
Tips & FAQs
Tips
Heat matters: preheat the griddle until smoking‑hot for defined char without sticking.
Don’t overcrowd: cook in a single layer; steam prevents browning.
Even wedges: aim for 2–3cm thick for consistent cooking.
Short on time? Microwave wedges 3–4 minutes to jump‑start tenderness, then griddle briefly and finish in oven.
FAQs
How long to grill sweet potato wedges?
About 5 minutes per side on a very hot griddle, then 10–15 minutes in the oven until tender.
Do I need to parboil sweet potatoes before grilling?
No. High‑heat griddling plus oven‑finishing cooks them through. Par‑microwaving is a quick alternative.
How do I stop sweet potatoes sticking to the griddle?
Preheat thoroughly, oil the wedges (not the pan), and don’t move them for the first few minutes so a crust forms.
Can I cook these on a BBQ?
Yes. Grill over direct heat for colour, then move to indirect heat or a preheated tray with the lid down to finish.
Can I make the herby mayo ahead?
Yes, up to 2 days in the fridge. Stir and adjust lime/salt before serving.
Serving Suggestions:
Add crumbled feta or toasted pumpkin seeds for extra contrast.
Pair with grilled chicken, halloumi skewers, chimichurri steak or salmon.
Make a platter with rocket, pickled red onions and extra lime.
Turn into tacos: wedges + herby mayo + slaw + a sprinkle of Maldon.
Storage & Reheating
tore wedges and mayo separately in airtight containers. Wedges: fridge up to 3 days; mayo: up to 2 days.
Reheat wedges on a hot tray at 200°C (390–400°F) for 8–10 minutes or in an air fryer at 190°C (375°F) for 4–6 minutes, in a single layer.
Refresh with a pinch of Maldon Original Sea Salt and a squeeze of lime.
Make pizzeria‑style pizza at home with this easy dough and San Marzano sauce, baked on a Le Creuset BBQ pizza pan for a crisp base and chewy, blistered crust. The dough mixes in minutes, proves until airy, then stretches easily for topping with mozzarella, basil and your favourites. A pinch of Maldon Original Sea Salt in the dough and sauce brings clean, bright flavour — perfect for pizza night or summer BBQs.
How to Cook Pizza on a Le Creuset BBQ Pizza Pan (Quick Steps)
Preheat pan 30 minutes at 250–260°C (480–500°F).
Stretch dough to 30cm; add light toppings.
Launch onto hot pan; bake 8–10 minutes until base is crisp and rim blistered.
Finish with basil and Maldon Original Sea Salt.
How to Make Pizza on a Le Creuset BBQ Pizza Pan (Detailed Version)
Step 1 – Mix and Prove the Dough
In a large bowl, mix flour, Maldon Original Sea Salt and yeast.
Add water; stir until a sticky dough forms. Drizzle a little olive oil over the top and spread to coat.
Cover with a damp tea towel and prove in a warm place 60–90 minutes until doubled.
Optional: ‘stretch & fold’ after 30 minutes (8-10 folds, rotating the bowl) to strengthen a high-hydration dough.
Step 2 – Divide the Ball
Flour the work surface. Tip out dough and divide into 4 equal pieces.
Gather edges to the centre, flip seam‑side down and shape into taut balls.
Rest on a floured tray, covered, for 30 minutes — or refrigerate overnight in a lidded, floured container.
If chilled, remove from the fridge 1 hour before baking.
Step 3 – Make the Sauce
Warm olive oil in a saucepan over low heat.
Add blitzed tomatoes and a generous pinch of Maldon Original Sea Salt.
Simmer uncovered ~30 minutes until thickened. For ultra‑smooth, blitz again.
Step 4 – Preheat the Pan
Set oven to its hottest (250–260°C / 480–500°F) or preheat BBQ to high with lid down.
Place the Le Creuset BBQ pizza pan inside and heat at least 30 minutes. Make sure to follow Le Creuset guidance for maximum temperatures and handling.
Step 5 – Shape, Top and Bake
Dust work surface with semolina. Flatten one dough ball with fingertips, then lift and stretch over knuckles to ~30cm, keeping a thicker rim.
Place on a pizza paddle or flat, parchment‑lined tray.
Spread a thin layer of sauce (don’t overload). Add mozzarella and light toppings. Drizzle crust with olive oil.
Launch onto the preheated pan. Bake/BBQ 8–10 minutes until the base is crisp and the rim blistered. The texture should be crisp underside, airy cornichon, cheese melted with light browning.
Finish with basil and a pinch of Maldon Original Sea Salt. Repeat with remaining dough.
Tips & FAQs
Tips
High heat is everything: preheat the pan for at least 30 minutes.
Keep toppings light and well‑drained (pat mozzarella dry) to avoid soggy centres.
Semolina acts like tiny ball bearings for easy launching; use a thin, even layer.
If dough resists stretching, rest it 5–10 minutes to relax gluten.
For extra flavour, cold‑ferment dough balls 12–24 hours.
FAQs:
What temperature should I set for pizza on a BBQ pizza pan?
Aim for the hottest your oven/BBQ safely reaches (typically 250–300°C / 480–570°F). Keep the lid down on a BBQ to hold heat.
Can I use 00 flour instead of strong white bread flour?
Yes. 00 flour gives a tender chew; strong bread flour adds structure. A 50:50 blend works well.
How do I stop pizza sticking to the pan?
Preheat the pan thoroughly and launch from a paddle/tray dusted with semolina. Avoid wet, heavy toppings.
Can I make the dough ahead?
Yes. Ball and chill up to 24 hours (or freeze balls up to 3 months). Thaw overnight in the fridge, then bring to room temperature for 1 hour before baking.
Stone vs pizza pan — which is better?
Both can deliver a crisp base. A preheated cast‑iron/steel pan often reheats faster between pies and holds heat well on BBQs.
Leftover slices: refrigerate up to 3 days. Reheat on the pizza pan at 220°C (425°F) for 5–7 minutes or in an air fryer at 190°C (375°F) for 3–4 minutes.
Dough: refrigerate balled dough up to 24 hours; freeze up to 3 months (lightly oiled bags).
Sauce: refrigerate up to 5 days or freeze 2 months.
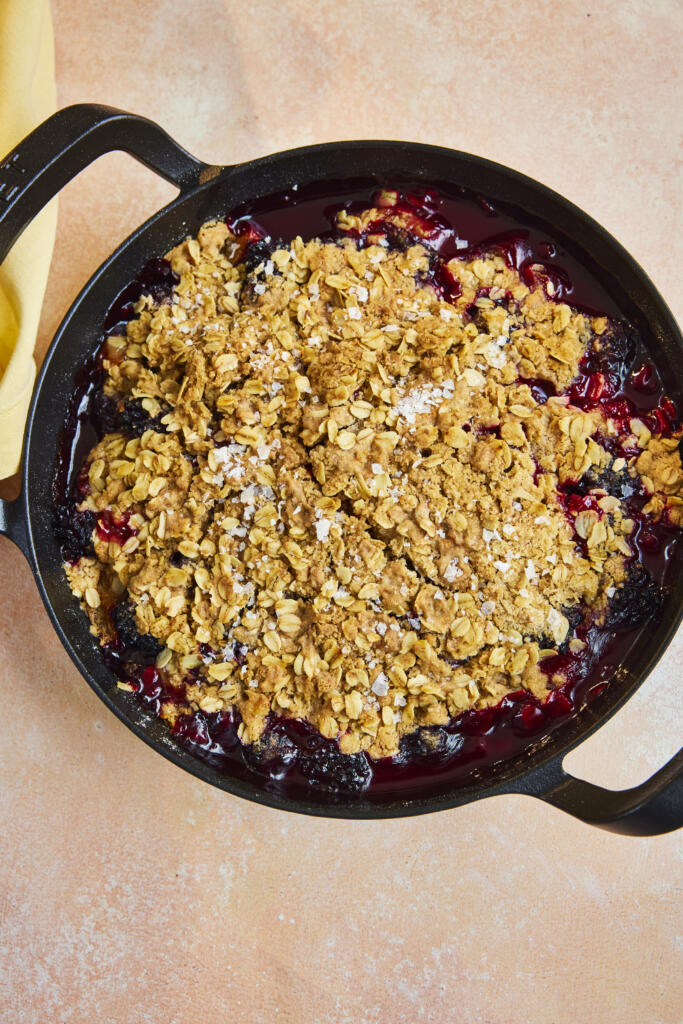
Celebrate late‑season fruit with this plum and blackberry crumble: juicy, tangy fruit baked beneath a buttery oat topping scented with cinnamon and a pinch of Maldon Original Sea Salt. The salt sharpens the fruit and adds balance to the sweet, crunchy crumbs. This easy fruit crumble comes together in minutes and bakes to a golden, bubbling finish — serve warm with ice cream, whipped cream or thick yogurt.
How To Make Blackberry and Plum Crumble (Quick Steps)
Toss plums and blackberries with lemon and sugar to taste.
Rub butter into flour, cinnamon and Maldon Sea Salt; add oats and Demerara.
Scatter over fruit and bake at 180°C fan for 30 minutes until golden and bubbling.
Rest briefly, then serve warm with ice cream or yogurt.
How To Make Blackberry & Plum Crumble (Detailed Version)
Step 1 – Heat the Oven & Prep Fruit
Preheat oven to 180°C fan (200°C conventional / 400°F).
Add plums and blackberries to a skillet or ovenproof dish.
Taste the fruit; add a pinch of sugar only if needed. Squeeze over lemon juice and toss.
Step 2 – Make the Oat Crumble
In a large bowl, mix flour, cinnamon and Maldon Original Sea Salt.
Add butter cubes; toss to coat. Rub in with fingertips to fine breadcrumbs.
Stir in oats and Demerara sugar. The texture should resemble a mix of fin crumbs and small clumps for crunch.
Step 3 – Assemble & Bake
Scatter the crumble evenly over the fruit — don’t press down.
Bake 30 minutes until the top is crisp and golden and the fruit is bubbling at the edges.
Step 4 – Serve
Rest 5–10 minutes to let juices thicken slightly.
Spoon into bowls and serve with ice cream, whipped cream or yogurt.
Optional: finish with a tiny pinch of Maldon Sea Salt flakes for sweet‑salty contrast.
Best served warm.
Tips & FAQs:
Tips
Sweetness control: taste fruit first; late‑summer plums can be very sweet, so add sugar only as needed.
Extra crunch: chill the crumble 10 minutes before baking to keep butter cold and crumbs craggy.
Even browning: bake on the middle rack; rotate the dish after 20 minutes if browning unevenly.
Juicy but set: letting the crumble stand for 10 minutes post‑bake helps juices thicken.
FAQs
What’s the best fruit mix for a crumble?
Tart blackberries balance sweet plums. You can swap in apples, pears or nectarines; aim for a tart‑sweet balance.
Can I use frozen fruit?
Yes. Bake from frozen but toss fruit with 1–2 tsp flour or cornflour to absorb extra juices and add 5–10 minutes to the bake.
Can I make crumble ahead?
Assemble fruit and topping separately up to 24 hours in the fridge. Top and bake just before serving. The raw crumble topping also freezes well.
How do I keep the topping crunchy?
Keep butter cold, don’t over‑mix, and avoid pressing the topping down. If needed, finish with 2–3 minutes under a hot grill/broiler.
Can I make it dairy‑free or vegan?
Use a plant‑based butter with similar fat content. Check that your sugar suits your dietary needs.
Flavour twist: add orange zest to the fruit or swap cinnamon for mixed spice as we move into autumn.
Storage & Reheating
Store leftovers covered in the fridge for up to 3 days.
Reheat in a 170°C (340°F) oven for 12–15 minutes until hot and topping re‑crisped; or air fry at 170°C for 6–8 minutes.
Freeze: cool completely, wrap tightly and freeze up to 2 months. Reheat from frozen at 170°C until piping hot (cover with foil if over‑browning).
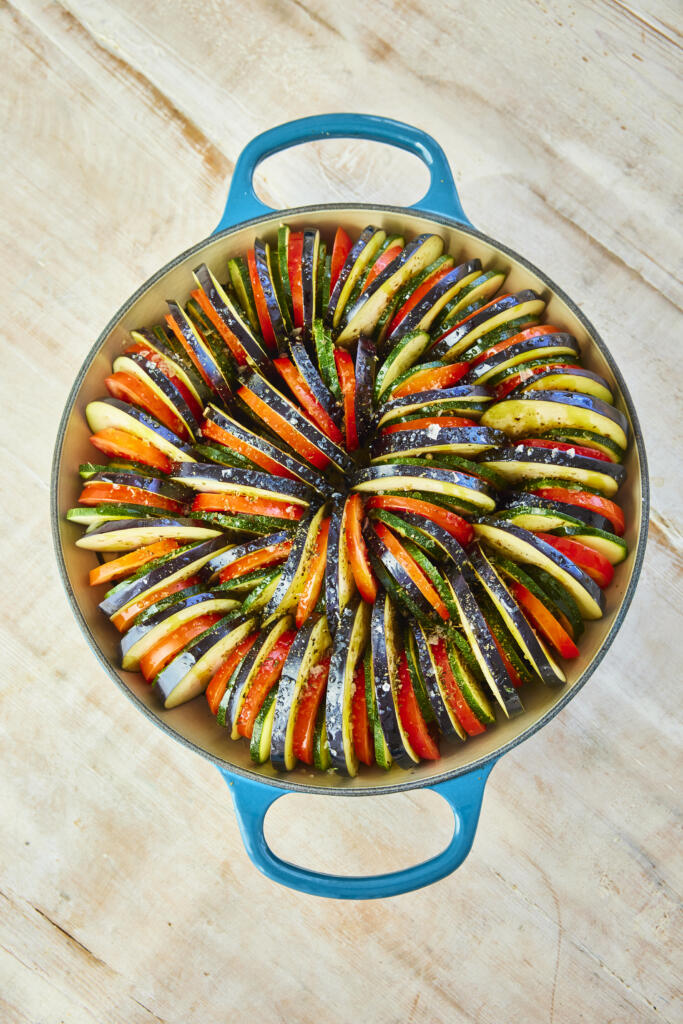
This oven‑baked ratatouille layers thin slices of aubergine, courgette and tomato in neat concentric circles for maximum flavour and a beautiful finish. Seasoned with Maldon Original Sea Salt, oregano and olive oil, the vegetables bake until tender with lightly caramelised edges. It’s an easy ratatouille recipe that celebrates peak‑summer produce, delicious warm or at room temperature and perfect as a vegetarian side or light main with crusty bread.
How to Make Oven-Baked Ratatouille?
Slice aubergine, courgette and tomato to 3 mm; season with Maldon Sea Salt.
Arrange in concentric circles; add oregano and olive oil.
Bake at 180°C fan for 30 minutes until tender and caramelised; finish with basil.
How to Make Oven-Baked Ratatouille (Detailed Version)
Step 1 – Heat the Oven & Slice Evenly
Preheat oven to 180°C fan (200°C conventional / 400°F).
Thinly slice aubergines, courgettes and tomatoes to pound‑coin thickness (~3 mm) using a mandolin or sharp knife for even cooking. Make sure you pat the wet tomatoes slices dry before arranging to avoid pooling which can cause the dish to become soggy!
Sprinkle the slices with Maldon Original Sea Salt to season and draw out a little moisture.
Step 2 – Arrange the Vegetables
In a round baking dish, lay slices in concentric circles, alternating aubergine, courgette and tomato.
Sprinkle over dried oregano and drizzle generously with olive oil.
Step 3 – Bake to Tender & Caramelise
Bake for about 30 minutes until the top is lightly caramelised and vegetables are tender when pierced. The edges of the dish should be lightly browned, centres soft but holding their shape.
Rest 5 minutes; scatter basil leaves and finish with a final pinch of Maldon.
Tips & FAQs
Tips
Even thickness is key: 3 mm slices cook at the same rate and layer neatly.
Season in layers: a light pre‑salt plus a finishing sprinkle of Maldon brightens flavours.
For extra colour, switch to grill/broiler for 1–2 minutes at the end.
If your dish is deep, cover loosely with foil for the first 15 minutes, then uncover to caramelise.
FAQs
What’s the difference between this and classic stewed ratatouille?
This is a sliced, baked version (often called confit byaldi style) with neat layers; classic ratatouille is a chopped, stovetop stew.
Can I add peppers or onions?
Yes—very thinly sliced red pepper or onion can be tucked between layers without changing timing much.
Do I need to salt and drain the aubergine?
Not essential with thin slices and modern aubergines; a light pre‑salt is sufficient.
How thick should I slice the vegetables?
About 3 mm (pound‑coin thickness). Thicker slices may need 5–10 extra minutes.
Can I make ratatouille ahead?
Bake, cool and refrigerate up to 2 days. Reheat covered at 170°C (340°F) for 12–15 minutes or enjoy at room temperature.
Serving Suggestions
Serve as a side with roast chicken, grilled fish, steak or lamb.
Make it a main: add torn mozzarella or crumbled goat’s cheese after baking; serve with crusty bread, couscous or soft polenta.
Finish with a drizzle of good olive oil, extra basil, or a splash of balsamic.
Storage & Reheating
Refrigerate leftovers in an airtight container for up to 3 days.
Reheat at 170°C (340°F) until hot (10–15 minutes) or enjoy room‑temperature.
Not ideal for freezing (tomatoes can become watery), but can be frozen for up to 1 month if needed; reheat from thawed and finish under the grill to re‑caramelise.
In a large bowl, mix all of the marinade ingredients. Add the chicken, onions and peppers to the bowl. Mix well to coat everything evenly in the marinade. Set aside to marinate for 20 minutes at room temperature, or up to 24 hours in the fridge.
Heat a griddle pan until very hot (either on the hob or on the BBQ) then add the marinated chicken and vegetables (if there is any marinade left in the bowl, drizzle this into the pan too). Depending on the size of the griddle pan, you may need to work in batches.
Cook for 5 minutes, turning a couple of times with tongs, until well charred and cooked through (cut into a piece of chicken to check for doneness).
Meanwhile, warm the tortillas, either over a flame or in a low oven wrapped in a tea towel. Serve the chicken with the tortillas, salsa, sour cream, avocados, avocado, coriander, and lime wedges. Add a few slices of Goat Rodeo Goods – Bad Boy Bread and Butter Cucumber Pickles to enhance the overall flavour experience by introducing a tangy, acidic element that complement the other ingredients. They also offer a crunchy texture that adds another dimension to the dish
Heat 3 tbsp olive oil in a large, heavy based pot. Once hot, add the minced beef and season with Maldon Original Sea Salt and pepper. Fry over a medium-high for about 10 minutes, breaking up the meat with your wooden spoon until well browned. You don’t want the pot to be too crowded otherwise the meat will steam rather than brown, so work in two batches if needed.
Scoop the meat out of the pot into a bowl and set aside. Add another 3 tbsp olive oil to the pot, along with the onions, peppers and garlic. Season with Maldon salt and pepper and cook gently over a medium low heat for about 15 minutes, stirring every so often, until soft.
Add the meat back into the pot, along with the tomatoes. Fill each tin halfway with water, swill it around to get every last bit of tomato, then add the liquid to the pot. Bring up to a simmer then leave to blip away for 45 minutes, stirring every so often to ensure it’s not sticking on the bottom of the pot, until thickened and reduced. Stir through the oregano and basil, then taste for seasoning.
Bring a large pot of salted water to the boil and cook the lasagne sheets in a few batches for just 2 minutes until no longer rigid but still very al dente, then transfer to an oiled baking tray. Drizzle the sheets with a little olive oil so they don’t stick to one another.
Preheat the oven to 180C fan.
To assemble the lasagne, spoon a couple of ladles of the meat sauce into a large, rectangular baking dish (about 30cm by 20cm). Cover with lasagne sheets then add a single layer of courgette slices. Season the courgettes with a small pinch of Maldon Original Sea Salt and pepper. Dot with roughly a third of the torn mozzarella, grate over roughly a third of the parmesan, and drizzle over roughly a third of the double cream. Repeat this layering process (meat sauce, lasagne sheets, courgette slices, seasoning, cheeses and cream) twice more. Drizzle the top with a little olive oil and cover the dish with foil. Put the dish on a baking tray (this will catch any spill over while baking).
Bake for 20 minutes then remove the foil and bake a further 20 minutes until golden and bubbling. Leave to stand for 20-30 minutes before serving (this allows the layers to settle and makes it easier to slice).
Extracted from The Spanish Pantry by José Pizarro (Quadrille, £28) Photography by Emma Lee
In The Spanish Pantry, award-winning chef and beloved ambassador of Spanish cuisine José Pizarro invited readers into the heart of his kitchen to explore the essential ingredients that define the rich culinary heritage of Spain.
More than just a cookbook, this is a love letter to 12 humble yet powerful staples, including tomatoes, peppers, almonds, chorizo and Manchego – that form the backbone of Spanish flavour. With over 100 vibrant, flavour-packed recipes, José shows how a thoughtfully stocked pantry can become the foundation for extraordinary meals.
Rooted in regional tradition but enriched with José creative flair, The Spanish Pantry takes readers on a journey across Spain – from sun-soaked coasts to rustic inland villages – celebrating the people, places, and ingredients that make the country’s food culture so distinct. Whether it’s a hearty Griddled Spring Onion Tortilla, beautiful Prawn Croquetas, summer-perfect Jamón and Watermelon Salad or sweet Orange-roasted Peaches with Honey and Lavender, each dish offers an authentic taste of Spain with José’s signature style – short on ingredients yet punchy on taste.
About José Pizarro
Pizarro is an award-winning chef and best-selling author, known to many as ‘The Godfather of Spanish Food‘ in the UK. Running three successful restaurants on London’s Bermondsey Street: José , Pizarro and Lolo, he also runs The Swan in Surrey, with two restaurants at The Royal Culinary of Arts and José by Pizarro at the Conrad Hilton in Abu Dhabi. Most recently, his is very proud to have his food on P&O Cruises, brining Spanish flavour to the sea. You’ll also see José regularly appearing on Channel 4 Sunday Brunch and James Martin’s Saturday Morning on ITV.
In Conversation with José Pizarro
José, we are loving The Spanish Pantry so much at Maldon – so many delicious recipes! The book celebrates 12 key ingredients. What was the most surprising or underrated ingredient in your list that you think home cooks should embrace more often?
Thank you so much! I would say chickpeas. They’re such a humble ingredient, but they’re incredibly versatile and full of flavour when treated well. From hearty stews to fresh salads, they really show how simple ingredients can become the backbone of truly satisfying dishes.
You describe this book as “tapestry of flavours, colours and textures”. Can you share how your travels across Spain shaped the final recipes and ingredient choices?
For me, Extremadura was a huge inspiration. It’s where I’m from, and it’s a region that really represents the soul of Spanish cooking, simple, honest food made with what the land gives you. From the incredible ibérico pork to the rich paprika from La Vera, Extremadura is at the heart of many of the recipes in this book. Travelling around Spain just deepened my appreciation for how every region has its own unique flavours and traditions, and I wanted that diversity to shine through.
From casual weeknight tortilla to a vibrant feast with friends, The Spanish Pantry has a wide range of recipes to choose from. Do you have a personal favourite dish from the book- Why?
Yes, one of my favourite is atún encebollado (tuna with onions) (however all of them mean something very special to me). It’s one of my mum’s recipes, so it’s very close to my heart. It reminds me of home, of family meals, and it’s the kind of dish that’s simple but full of love and flavour.
With your restaurants, cookbooks, and now your presence at sea with P&O cruises, you’re introducing Spanish cuisine to more people than ever! What do you hope readers can take away from this book beyond the recipes?
I really want people to cook from the book, to use it, to get it dirty in the kitchen, and not just let it sit beautifully on the shelf. I hope it inspires confidence to embrace Spanish cooking and create meals that bring people together. Beyond the recipes, I want readers to feel the culture and generosity that Spanish food represents.
What does a normal day in the life look like for you, José?
No day is ever the same! I always start the day by walking our dogs, Conchi & Pie. Then some mornings I’m in the markets choosing the best ingredients, other times I’m in the kitchens with my team, or travelling for events. But food is always at the centre of it all, and I always find time for a proper coffee to start the day!
Name three things in the kitchen you can’t live without!
Good olive oil, good salt and a mortar and pestle. There’s nothing like doing things by hand; it’s real craftsmanship and you can taste the difference. Salt is really underrated and it is always very important for me.
Do you have a current favourite cookbook that you’re reading? We’d love to know!
There are so many books I carry close to my heart however one of my all-time favourites is Claudia Roden’s The Food of Spain. She’s not only a dear friend but someone I deeply admire. The way she weaves history, culture, and recipes together is truly inspiring.
Crispy Fried Red Mullet with Chickpea and Red Onion Salad Recipe
Extracted from The Spanish Pantry by José Pizarro (Quadrille, £28) Photography by Emma Lee
Red mullet is one of the gems of the sea, one that José adores for it’s distinctive flavour, delicate texture and the charming ‘smile’ it seems to wear the fish market – always a sight that bring José joy! This highly prized fish, particularly revered in the Andalusian coastal town of Barbate, is known for it’s range of sizes and for the versatility it offers in cooking methods.
Best known for the way it’s sweet, nutty flavour – which some liken to a cross between crab and lobster – stands out whether its grilled or pan-fried, red mullet is a winner. This recipe celebrates this delightful fish by pairing it with a wonderful chickpea salad, complementing the natural flavours with the freshness of the lemon and aromatic fennel seeds. The contrast between the warm fish and the cool herbaceous salad created a food experience that is balanced and exciting.
2 × 400g (14oz) tins of chickpeas (garbanzos), drained and rinsed
1 red onion, finely chopped
juice of 1 lemon
3 tbsp extra virgin olive oil
large handful of flat-leaf parsley, leaves picked and chopped
Method:
Prepare the salad. Heat the oil, garlic and fennel seeds in a frying pan (skillet). Add the chickpeas and gently cook for 3–4 minutes, stirring, then tip into a large serving bowl and season well with Maldon Sea Salt and pepper.
Add the onion and lemon juice and set aside while you prepare the fish.
Mix the chickpea flour with the pimentón and plenty of Maldon Sea Salt and pepper. Dredge the red mullet fillets in the flour.
Heat the oil in a large frying pan (skillet) until it shimmers, then add the fillets and fry for 4–5 minutes until golden and crispy, turning once. Drain on paper towels.
Add the parsley to the salad and serve with the crispy red mullet fillets.
Where can you buy red mullets in the UK?
Whether you prefer a quick online order or enjoy chatting with your local fishmonger, you’ll find red mullet available to purchase across the UK. Online retailers which offer nationwide delivery include; The Fish Society, offering wild-caught red mullet fillets, butterflied or trimmed. Rick Stein Online Fishmongers delivers Cornish red mullet fillets across the UK and Trident Fish Sales stock both whole and filleted red mullets.
Tips for buying red mullet
Seasonality – Red mullet is typically plentiful in the UK from Spring to early Winter. Check stock freshness online.
Whole vs. Fillets – Many vendors offer both, whole fish is great for roasting, fillets are quick for pan-frying.
Delivery – Most offer next-day UK delivery (sometimes excluding remote regions like Scottish islands or Northern Ireland).
Local catch – Brixham and Cornish day boats are top sources – look for vendors sourcing from these areas.
Where to Buy The Spanish Pantry
Extracted from The Spanish Pantry by José Pizarro (Quadrille, £28) Photography by Emma Lee
You can find where to purchase José NEW cookbook here and start being creative with food and flavours in the comfort of your kitchen.
Make sure you have your Maldon Salt ready for these recipes! If you are running out, please feel free to browse on our Where to Buy Page to find your nearest store in which stocks our beloved Maldon Salt.
Lastly, we LOVE seeing your creations – please tag us on Instagram using the #maldonsalt so we can share your own take on José’s recipes!